
Assembly & Installation Instructions
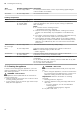
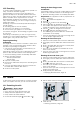
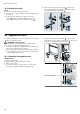
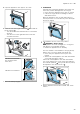
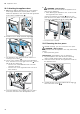
Table Of Contents
- Oven
- en
- Table of contents
- 1 Safety
- 2 Preventing material damage
- 3 Environmental protection and saving energy
- 4 Familiarising yourself with your appliance
- 5 Accessories
- 6 Before using for the first time
- 7 Basic operation
- 7.1 Switching on the appliance
- 7.2 Switching off the appliance
- 7.3 Residual heat indicator
- 7.4 Setting the type of heating and temperature
- 7.5 Changing the temperature
- 7.6 Changing the type of heating
- 7.7 Pausing operation
- 7.8 Cancelling operation
- 7.9 Viewing the current temperature
- 7.10 Displaying information
- 8 Steam
- 9 Time-setting options
- 10 Baking and roasting assistant
- 11 Steam programs
- 12 Childproof lock
- 13 Rapid heat-up
- 14 Sabbath mode
- 15 Basic settings
- 16 Home Connect
- 17 Cleaning and servicing
- 18 Cleaning functions
- 19 Rails
- 20 Appliance door
- 21 Troubleshooting
- 22 Disposal
- 23 Customer Service
- 24 Declaration of Conformity
- 25 How it works
- 25.1 General cooking tips
- 25.2 Baking tips
- 25.3 Roasting, braising and grilling tips
- 25.4 Cooking frozen products
- 25.5 Cooking ready meals
- 25.6 List of foods
- 25.7 Special cooking methods and other applications
- 25.8 Test dishes
- 26 Installation instructions
- 26.1 General installation instructions
- 26.2 Appliance dimensions
- 26.3 Installation below a worktop
- 26.4 Installation underneath a hob
- 26.5 Installation in a tall unit
- 26.6 Installing two appliances on top of each other
- 26.7 Corner installation
- 26.8 Electrical connection
- 26.9 Installing the appliance
- 26.10 Removing the appliance

Rails en
27
18.3 Descaling
To ensure that your appliance continues to operate cor-
rectly, it must be descaled regularly.
How frequently you need to run the descaling pro-
gramme will depend on the water hardness and how
many times you have used the steam function. The ap-
pliance indicates when only another five or fewer
steam-assisted operations are possible. If you do not
carry out the descaling, you can no longer set any op-
eration with steam.
Descaling comprises several steps and takes approx.
70–95minutes:
¡ Descaling (approx. 55–70minutes)
¡ First rinse cycle (approx. 9–12minutes)
¡ Second rinse cycle (approx. 9–12minutes)
For reasons of hygiene, the descaling programme must
be run in full.
If descaling is interrupted, you can no longer set any
operation. To ensure that the appliance is ready for op-
eration again, carry out two rinse cycles.
Preparing descaling
ATTENTION!
The length of time for which the descaler is left to work
is based on the recommended, liquid descaler. Other
descalers may damage the appliance.
▶ Only use the liquid descaler recommended by us
for the descaling programme.
If descaling solution comes into contact with the control
panel or other delicate surfaces, it will damage them.
▶ Remove descaling solution immediately with water.
1.
Mix the descaling solution:
‒ 200ml liquid descaler
‒ 400ml water
2.
Open the control panel.
3.
Remove the water tank and pour the descaling solu-
tion into it.
4.
Once the descaling solution has been poured into
the water tank, slide the tank back in.
5.
Close the control panel.
Setting the descaling process
ATTENTION!
If descaling solution comes into contact with the control
panel or other delicate surfaces, it will damage them.
▶ Remove descaling solution immediately with water.
Requirement:The appliance must be prepared for de-
scaling. →Page27
1.
Press to switch the appliance on.
2.
Press .
3.
Use the or button to set "Descaling" .
4.
Use the button to navigate to the next row.
a The duration will appear on the display. You cannot
change the duration of the descaling process.
5.
Use the button to navigate to the next row.
6.
Press to start the descaling process.
a The descaling process will start. The duration will
count down on the display.
a Once the descaling process has run through to the
end, an audible signal will sound.
Running the first rinse cycle
1.
Open the control panel and remove the water tank.
2.
Thoroughly rinse the water tank and fill it with fresh
water.
3.
Slide in the water tank and close the control panel.
4.
Press to start the rinse cycle.
a The rinse cycle will start. The duration will count
down on the display.
a Once the rinse cycle has run through to the end, an
audible signal will sound.
Running the second rinse cycle
1.
Open the control panel and remove the water tank.
2.
Thoroughly rinse the water tank and fill it with fresh
water.
3.
Slide in the water tank and close the control panel.
4.
Press to start the rinse cycle.
a The rinse cycle will start. The duration will count
down on the display.
a Once the rinse cycle has run through to the end, an
audible signal will sound.
5.
Empty and dry the water tank.
→"Emptying the water tank", Page15
19 Rails
To thoroughly clean the rails and the cooking compart-
ment, or to replace the rails, you can remove the rails.
19.1 Detaching the rails
WARNING‒Risk of burns!
The shelf supports get very hot
▶ Never touch the shelf supports when hot.
▶ Always allow the appliance to cool down.
▶ Keep children at a safe distance.
1.
Lift the rail forwards slightly and detach it .
2.
Pull the whole rail to the front and remove it.
3.
Clean the rail.
→"Cleaning products", Page23