
Assembly & Installation Instructions
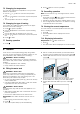

Table Of Contents
- Oven
- en
- Table of contents
- 1 Safety
- 2 Preventing material damage
- 3 Environmental protection and saving energy
- 4 Familiarising yourself with your appliance
- 5 Accessories
- 6 Before using for the first time
- 7 Basic operation
- 7.1 Switching on the appliance
- 7.2 Switching off the appliance
- 7.3 Residual heat indicator
- 7.4 Setting the type of heating and temperature
- 7.5 Changing the temperature
- 7.6 Changing the type of heating
- 7.7 Pausing operation
- 7.8 Cancelling operation
- 7.9 Viewing the current temperature
- 7.10 Displaying information
- 8 Steam
- 9 Time-setting options
- 10 Baking and roasting assistant
- 11 Steam programs
- 12 Childproof lock
- 13 Rapid heat-up
- 14 Sabbath mode
- 15 Basic settings
- 16 Home Connect
- 17 Cleaning and servicing
- 18 Cleaning functions
- 19 Rails
- 20 Appliance door
- 21 Troubleshooting
- 22 Disposal
- 23 Customer Service
- 24 Declaration of Conformity
- 25 How it works
- 25.1 General cooking tips
- 25.2 Baking tips
- 25.3 Roasting, braising and grilling tips
- 25.4 Cooking frozen products
- 25.5 Cooking ready meals
- 25.6 List of foods
- 25.7 Special cooking methods and other applications
- 25.8 Test dishes
- 26 Installation instructions
- 26.1 General installation instructions
- 26.2 Appliance dimensions
- 26.3 Installation below a worktop
- 26.4 Installation underneath a hob
- 26.5 Installation in a tall unit
- 26.6 Installing two appliances on top of each other
- 26.7 Corner installation
- 26.8 Electrical connection
- 26.9 Installing the appliance
- 26.10 Removing the appliance

en Steam
14
6.
Slide the full water tank back into the recess .
When doing so, make sure that the water tank clicks
into place in the retainers .
7.
Slowly slide the control panel downwards and then
push it away from you until it is closed completely.
8.2 Refilling the water tank
When "Fill water tank" appears on the display, you
must refill the water tank.
Notes
¡ Dough proving and Reheat functions: If you do not
refill the water tank, the appliance will stop. Refill the
water tank.
¡ Steam-assisted heating: If you do not refill the water
tank, the appliance will continue to heat but without
injecting steam into the cooking compartment.
1.
Open the control panel.
2.
Remove and refill the water tank.
3.
Insert the full water tank and close the control panel.
8.3 Steam heating functions
Your appliance has several steam heating functions:
¡ Dough proving
¡ Reheat
Dough proving
Yeast dough will prove considerably more quickly us-
ing the "Dough proving" heating function than at room
temperature, and it will not dry out.
Configuring the Dough proving heating function
Requirement:The cooking compartment must have
cooled down completely.
1.
Fill the water tank.
→"Filling the water tank", Page13
2.
Press to switch the appliance on.
3.
Use the or button to set "Dough proving" .
4.
Use the button to navigate to the next row.
5.
If necessary, use the button to set setting 2.
6.
Use the button to navigate to the next row.
7.
Use the or button to select the required proving
time.
8.
Press to start the dough proving process.
→"Pausing operation", Page13
→"Cancelling operation", Page13
a If the water tank runs dry during the dough proving
process, dough proving will be paused.
→"Refilling the water tank", Page14
a Once the duration has elapsed, an audible signal
will sound and the appliance will stop heating.
→"Switching off the appliance", Page12
9.
Press any button to end the audible signal.
10.
Empty the water tank and dry the cooking compart-
ment.
→"After every steam operation", Page15
Reheat
The "Reheat" function is used to warm up food that has
already been cooked, or bread and pastries from the
day before, without affecting its quality.
Configuring the Reheat heating function
1.
Fill the water tank.
→"Filling the water tank", Page13
2.
Press to switch the appliance on.
3.
Use the or button to set "Reheat" .
4.
Use the button to navigate to the next row.
5.
Use the or button to select the required temperat-
ure.
6.
Use the button to navigate to the next row.
7.
Use the or button to select the required reheating
time.
8.
Press to start the reheating process.
→"Pausing operation", Page13
→"Cancelling operation", Page13
a If the water tank runs dry during the reheating pro-
cess, reheating will be paused.
→"Refilling the water tank", Page14
a Once the duration has elapsed, an audible signal
will sound and the appliance will stop heating.
→"Switching off the appliance", Page12
9.
Press any button to end the audible signal.
10.
Empty the water tank and dry the cooking compart-
ment.
→"After every steam operation", Page15
8.4 Steam-assisted cooking
When you cook with steam assistance, the appliance
introduces steam into the cooking compartment at vari-
ous intervals. This gives your food a crispy crust and a
shiny surface. Meat stays juicy, tender and only under-
goes a minimum reduction in volume.
Heating functions compatible with steam
assistance
You can switch on steam assistance for the following
heating functions:
¡ "CircoTherm hot air"
¡ "Top/bottom heating"
¡ "Circo-roasting"
¡ "Bread-baking setting"
¡ "Keep warm"
Switching on steam assistance
1.
Fill the water tank.
→"Filling the water tank", Page13
2.
Press to switch the appliance on.
3.
Set a suitable heating function.
→"Heating functions compatible with steam assist-
ance", Page14
4.
Set the required temperature.
5.
Use the button to switch on steam assistance.
6.
Use the button to navigate to the row featuring
the steam intensity .
7.
Use the or button to select the required steam in-
tensity: