
Assembly & Installation Instructions
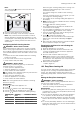
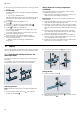
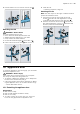
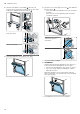
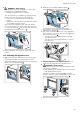
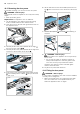
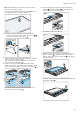
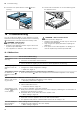
Table Of Contents
- Oven
- en
- Table of contents
- 1 Safety
- 2 Preventing material damage
- 3 Environmental protection and saving energy
- 4 Familiarising yourself with your appliance
- 5 Accessories
- 6 Before using for the first time
- 7 Basic operation
- 7.1 Switching on the appliance
- 7.2 Switching off the appliance
- 7.3 Residual heat indicator
- 7.4 Setting the type of heating and temperature
- 7.5 Changing the temperature
- 7.6 Changing the type of heating
- 7.7 Pausing operation
- 7.8 Cancelling operation
- 7.9 Viewing the current temperature
- 7.10 Displaying information
- 8 Time-setting options
- 9 Baking and roasting assistant
- 10 Childproof lock
- 11 Rapid heat-up
- 12 Sabbath mode
- 13 Basic settings
- 14 Home Connect
- 15 Cleaning and servicing
- 16 Cleaning functions
- 17 Rails
- 18 Appliance door
- 19 Troubleshooting
- 20 Disposal
- 21 Customer Service
- 22 Declaration of Conformity
- 23 How it works
- 24 Installation instructions
- 24.1 General installation instructions
- 24.2 Appliance dimensions
- 24.3 Installation below a worktop
- 24.4 Installation underneath a hob
- 24.5 Installation in a tall unit
- 24.6 Installing two appliances on top of each other
- 24.7 Corner installation
- 24.8 Electrical connection
- 24.9 Installing the appliance
- 24.10 Removing the appliance

Appliance door en
27
1.
Tip:When fitting the door panes, make sure that
they are in the original order.
Insert the intermediate pane so that the arrow on
the right-hand side is pointing upwards.
2.
Check the fit of the four spacers and two seals.
‒ Place the spacers on the centre of the lines .
‒ Secure the seals at the corners .
3.
Insert the intermediate pane with spacers and seals
in the direction of the arrow .
The arrow on the intermediate pane must line up
with the arrow on the frame .
4.
Insert the second intermediate pane without the
spacers and seals, and slide it in the direction of the
arrow until it is inserted in the sheet metal frame .
The arrow on the intermediate pane must line up
with the arrow on the frame .
5.
Push down lightly on the first intermediate pane
around , slide the retainer in at an angle and
push down until it clicks into place.
a The retainer has been inserted.
6.
Place the inner pane onto the appliance door so
that the number is legible at the bottom right. In-
sert the inner pane into the fixing rail at an angle
towards the back.
7.
Carefully lift the inner pane upwards at an angle and
attach the holder .