
Assembly & Installation Instructions
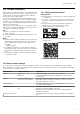

Table Of Contents
- Oven
- en
- Table of contents
- 1 Safety
- 2 Preventing material damage
- 3 Environmental protection and saving energy
- 4 Familiarising yourself with your appliance
- 5 Accessories
- 6 Before using for the first time
- 7 Basic operation
- 7.1 Switching on the appliance
- 7.2 Switching off the appliance
- 7.3 Residual heat indicator
- 7.4 Setting the type of heating and temperature
- 7.5 Changing the temperature
- 7.6 Changing the type of heating
- 7.7 Pausing operation
- 7.8 Cancelling operation
- 7.9 Viewing the current temperature
- 7.10 Displaying information
- 8 Time-setting options
- 9 Baking and roasting assistant
- 10 Childproof lock
- 11 Rapid heat-up
- 12 Sabbath mode
- 13 Basic settings
- 14 Home Connect
- 15 Cleaning and servicing
- 16 Cleaning functions
- 17 Rails
- 18 Appliance door
- 19 Troubleshooting
- 20 Disposal
- 21 Customer Service
- 22 Declaration of Conformity
- 23 How it works
- 24 Installation instructions
- 24.1 General installation instructions
- 24.2 Appliance dimensions
- 24.3 Installation below a worktop
- 24.4 Installation underneath a hob
- 24.5 Installation in a tall unit
- 24.6 Installing two appliances on top of each other
- 24.7 Corner installation
- 24.8 Electrical connection
- 24.9 Installing the appliance
- 24.10 Removing the appliance

HomeConnect en
17
14 HomeConnect
This appliance is network-capable. Connecting your ap-
pliance to a mobile device lets you control its functions
via the HomeConnect app, adjust its basic settings
and monitor its operating status.
The HomeConnect services are not available in every
country. The availability of the HomeConnect function
depends on the availability of HomeConnect services
in your country. You can find information about this at:
www.home-connect.com.
The HomeConnect app guides you through the entire
login process. Follow the instructions in the HomeCon-
nect app to configure the settings.
Tips
¡ Please consult the documents supplied by
HomeConnect.
¡ Please also follow the instructions in the HomeCon-
nect app.
Notes
¡ Please note the safety precautions in this instruction
manual and make sure that they are also observed
when operating the appliance via the HomeCon-
nect app.
→"Safety", Page2
¡ Operating the appliance on the appliance itself al-
ways takes priority. During this time it is not possible
to operate the appliance using the HomeConnect
app.
¡ In networked standby mode, the appliance requires
a maximum of2W.
14.1 Setting up HomeConnect
Requirements
¡ The appliance is connected to the power supply and
is switched on.
¡ You have a mobile device with a current version of
the iOS or Android operating system, e.g. a smart-
phone.
¡ The mobile device and the appliance are within
range of your home network's Wi-Fi signal.
1.
Download the HomeConnect app.
2.
Open the HomeConnect app and scan the follow-
ing QR code.
3.
Follow the instructions in the HomeConnect app.
14.2 HomeConnect Settings
You can adjust the settings and network settings for HomeConnect by going to your appliance's basic settings.
Which settings the display shows will depend on whether HomeConnect has been set up and whether the appliance
is connected to your home network.
Basic setting Possible settings Explanation
Wi-Fi Switch on
Switch off
If Wi-Fi is activated, you can use HomeConnect.
In networked standby mode, the appliance requires a max-
imum of 2W.
Network Connect to network
Disconnect from network
If you disconnect the appliance from the network, all network
information will be deleted. This setting is useful if you have
new login details for the router.
Connect to app - This setting initiates the connection between the HomeCon-
nectapp and the appliance.
Remote control On
Off
When this function is deactivated, all you can do is view the
appliance's operating status in the app.
When this function is activated, you can remotely start and
control the appliance.
Appliance information
- The display shows information about the network or the appli-
ance.