
Assembly & Installation Instructions
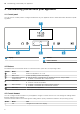
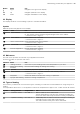
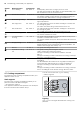
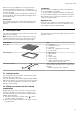
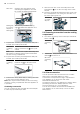
Table Of Contents
- Oven
- en
- Table of contents
- 1 Safety
- 2 Preventing material damage
- 3 Environmental protection and saving energy
- 4 Familiarising yourself with your appliance
- 5 Accessories
- 6 Before using for the first time
- 7 Basic operation
- 7.1 Switching on the appliance
- 7.2 Switching off the appliance
- 7.3 Residual heat indicator
- 7.4 Setting the type of heating and temperature
- 7.5 Changing the temperature
- 7.6 Changing the type of heating
- 7.7 Pausing operation
- 7.8 Cancelling operation
- 7.9 Viewing the current temperature
- 7.10 Displaying information
- 8 Time-setting options
- 9 Baking and roasting assistant
- 10 Childproof lock
- 11 Rapid heat-up
- 12 Sabbath mode
- 13 Basic settings
- 14 Home Connect
- 15 Cleaning and servicing
- 16 Cleaning functions
- 17 Rails
- 18 Appliance door
- 19 Troubleshooting
- 20 Disposal
- 21 Customer Service
- 22 Declaration of Conformity
- 23 How it works
- 24 Installation instructions
- 24.1 General installation instructions
- 24.2 Appliance dimensions
- 24.3 Installation below a worktop
- 24.4 Installation underneath a hob
- 24.5 Installation in a tall unit
- 24.6 Installing two appliances on top of each other
- 24.7 Corner installation
- 24.8 Electrical connection
- 24.9 Installing the appliance
- 24.10 Removing the appliance

en Accessories
10
Wire rack Insert the wire rack with the open
side facing the appliance door and
the curved lip facing downwards.
Baking tray
E.g. univer-
sal pan or
baking tray
Slide the tray in with the sloping
edge towards the appliance door.
3.
To place the accessory at shelf positions with pull-
out rails, pull out the pull-out rails.
Wire rack
or baking
tray
Position the accessory so that its
edge is behind the lug on the pull-
out rail.
Note:The pull-out rails lock in place when they are
fully pulled out. Gently push the pull-out rails back
into the cooking compartment.
4.
To place the accessory at shelf positions with pull-
out rails, pull out the pull-out rails.
Wire rack
or baking
tray
Position the accessory so that it is
below the lug on the pull-out rail.
5.
Push the accessory all the way in, making sure that
it does not touch the appliance door.
Note:Take any accessories that you will not be using
out of the cooking compartment while the appliance is
in operation.
Combining accessories
You can combine the wire rack with the universal pan
to catch any liquid that drips down.
1.
Place the wire rack on the universal pan so that
both spacers are on the rear edge of the univer-
sal pan.
2.
Insert the universal pan between the two guide rods
for a shelf position. In so doing, the wire rack is on
top of the upper guide rod.
Wire rack
on univer-
sal pan
5.3 Removing accessories from the cooking
compartment
1.
Pull out the accessory on the telescopic shelf as far
as the notch .
Wire rack
or baking
tray
2.
Hold the accessory on both sides in the area
marked and remove it.
Wire rack
or baking
tray
5.4 Other accessories
You can purchase other accessories from our after-
sales service, specialist retailers or online.
You will find a comprehensive range of products for
your appliance in our brochures and online:
www.neff-international.com
Accessories vary from one appliance to another. When
purchasing accessories, always quote the exact
product number (E no.) of your appliance.
You can find out which accessories are available for
your appliance in our online shop or from our after-
sales service.