
Installation Instruction
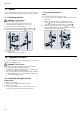

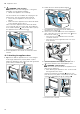
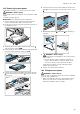
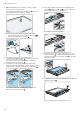


Table Of Contents
- Oven
- en
- Table of contents
- 1 Safety
- 2 Preventing material damage
- 3 Environmental protection and saving energy
- 4 Familiarising yourself with your appliance
- 5 Accessories
- 6 Before using for the first time
- 7 Basic operation
- 7.1 Switching on the appliance
- 7.2 Switching off the appliance
- 7.3 Residual heat indicator
- 7.4 Setting the type of heating and temperature
- 7.5 Changing the temperature
- 7.6 Changing the type of heating
- 7.7 Pausing operation
- 7.8 Cancelling operation
- 7.9 Viewing the current temperature
- 7.10 Displaying information
- 8 Time-setting options
- 9 Baking and roasting assistant
- 10 Childproof lock
- 11 Rapid heat-up
- 12 Sabbath mode
- 13 Basic settings
- 14 Home Connect
- 15 Cleaning and servicing
- 16 Cleaning functions
- 17 Rails
- 18 Appliance door
- 19 Troubleshooting
- 20 Disposal
- 21 Customer Service
- 22 Declaration of Conformity
- 23 How it works
- 24 Installation instructions
- 24.1 General installation instructions
- 24.2 Appliance dimensions
- 24.3 Installation below a worktop
- 24.4 Installation underneath a hob
- 24.5 Installation in a tall unit
- 24.6 Installing two appliances on top of each other
- 24.7 Corner installation
- 24.8 Electrical connection
- 24.9 Installing the appliance
- 24.10 Removing the appliance

Appliance door en
25
18.3 Removing the door panes
To facilitate cleaning, you can remove the door pane.
WARNING‒Risk of injury!
Components inside the appliance door may have sharp
edges.
▶ Wear protective gloves.
Requirement:The appliance door is detached.
1.
Lay the appliance door with the front side facing
down on a flat surface that is soft and clean.
2.
Undo and remove the left- and right-hand screws on
the appliance door.
3.
Carefully lift the inner pane upwards at an angle
and remove the holder .
4.
Carefully lift the inner pane upwards at an angle and
remove it in the direction of the arrow .
5.
Push down on the intermediate pane lightly around
, and carefully lift the retainer until you are able
to pull it out.
6.
Lift the first and second intermediate panes from be-
low and remove them in the direction of the arrow
.
7.
Remove the spacers and seals for cleaning, if
required.
8.
WARNING‒Risk of injury!
Scratched glass in the appliance door may develop
into a crack.
▶ Do not use any harsh or abrasive cleaners or
sharp metal scrapers to clean the glass on the
oven door, as they may scratch the surface.
Clean the door panes on both sides with glass
cleaner and a soft cloth.
9.
Dry the door panes and refit them.
18.4 Fitting the door panes
WARNING‒Risk of injury!
If a door pane or appliance door has not been installed
correctly, this is dangerous.
▶ Make sure that all of the door panes and the appli-
ance door have been correctly fitted before you
switch the appliance back on again.