Oven [en] User manual and installation instructions B57CS22.
en Safety Table of contents USER MANUAL 1 Safety .................................................................... 2 2 Preventing material damage ............................... 5 3 Environmental protection and saving energy ....................................................................... 5 4 Familiarising yourself with your appliance ........ 6 5 Accessories.......................................................... 9 6 Before using for the first time ...........................
Safety Opening the appliance door creates a draught. Greaseproof paper may come into contact with the heating element and catch fire. ▶ Never place greaseproof paper loosely over accessories when preheating the appliance and while cooking. ▶ Always cut greaseproof paper to size and use a plate or baking tin to hold it down. WARNING ‒ Risk of burns! The appliance and its parts that can be touched become hot during use. ▶ Caution should be exercised here in order to avoid touching heating elements.
en Safety WARNING ‒ Risk of suffocation! Children may put packaging material over their heads or wrap themselves up in it and suffocate. ▶ Keep packaging material away from children. ▶ Do not let children play with packaging material. Children may breathe in or swallow small parts, causing them to suffocate. ▶ Keep small parts away from children. ▶ Do not let children play with small parts. 1.5 Halogen bulb WARNING ‒ Risk of burns! The bulbs in the cooking compartment get very hot.
Preventing material damage en 2 Preventing material damage 2.1 General ▶ Take care not to trap anything in the appliance ATTENTION! Objects on the cooking compartment floor at over 50 °C will cause heat to build up. The baking and roasting times will no longer be correct and the enamel will be damaged. ▶ Do not place any accessories, greaseproof paper or foil of any kind on the cooking compartment floor. ▶ Only place cookware on the cooking compartment floor if a temperature above 50 °C has been set.
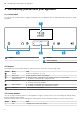
en Familiarising yourself with your appliance 4 Familiarising yourself with your appliance 4.1 Control panel You can use the control panel to configure all functions of your appliance and to obtain information about the operating status. 1 2 1 Display 3 2 2 3 Buttons Control element 4.2 Buttons The buttons are touch-sensitive areas. To select a function, press the corresponding button.
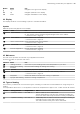
Familiarising yourself with your appliance Button Name Right Use Navigate to the right on the display Up Navigate upwards on the display Down Navigate downwards on the display en 4.4 Display The display shows the current settings, options or relevant information. Symbols Different symbols may appear on the display.
en Familiarising yourself with your appliance Symbol Heating function Circo-roasting Temperature 50 - 250 °C CircoTherm Intensive 50 - 275 °C Bread-baking setting 180 - 240 °C Grill, large area 50 - 290 °C Grill, small area 50 - 290 °C Bottom heating 50 - 250 °C Low Temperature Cooking 70 - 120 °C Dough proving 35 - 55 °C Defrost 30 - 60 °C Top/bottom heating eco 50 - 275 °C CircoTherm eco 40 - 200 °C Use Roast poultry, whole fish or larger pieces of meat.
Accessories When you open the appliance door, the light in the cooking compartment switches on. If the appliance door remains open for longer than 15 minutes, the light switches off again. For most operating modes, the lighting is switched on during operation. The lighting switches off again when the operation ends. Cooling fan The cooling fan switches on and off depending on the appliance's temperature. The hot air escapes above the door.
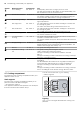
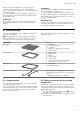
en Before using for the first time Wire rack Insert the wire rack with the open side facing the appliance door and the curved lip facing downwards. 1. Place the wire rack on the universal pan so that both spacers are on the rear edge of the universal pan. 2. Insert the universal pan between the two guide rods for a shelf position. In so doing, the wire rack is on top of the upper guide rod. Wire rack on universal pan Baking tray Slide the tray in with the sloping E.g.
Basic operation 3. Press to switch the appliance on. → "Switching on the appliance", Page 11 4. Set the required heating function and temperature for the heat-up process and press to start. → "Setting the type of heating and temperature", Page 11 Heating up Heating function Temperature Cooking time CircoTherm hot air Maximum 1 hour en 5. Keep the kitchen ventilated while the appliance is heating. 6. Press to switch off the appliance after 1 hour.
en Time-setting options ▶ Press . a The information will be displayed for a few seconds. 8 Time-setting options Your appliance has different time-setting options, with which you can control its operation. 8.1 Overview of the time-setting options When you are setting a time, the time values will increase by greater increments as you scroll through the higher values. The cooking time, for example, can be set in 1-minute increments up to 1 hour, and then in 5minute increments thereafter.
Baking and roasting assistant en 7. Press to confirm the delayed start. a The appliance will start at the appropriate time. a Once the cooking time has elapsed, an audible signal will sound. 8. Press any button to end the audible signal. 3. Use the or button to change the end time. a The setting will then be applied. Changing the Ready at time for delayed starts a The end time corresponds to the current time plus the set cooking time.
en Childproof lock 10 Childproof lock You can secure your appliance to prevent children from accidentally switching it on or changing the settings. 2. Press to switch the appliance on and then start it up. 10.1 Locks 10.4 Deactivating the automatic childproof lock Your appliance has two different locks: 1. Press and hold the Lock Automatic childproof lock One-time childproof lock Activate/deactivate Via the MyProfile menu Using the button 10.
Sabbath mode en 11.2 Activating the "Rapid heat-up" function 11.4 Activating the "PowerBoost" function 1. Set Top/bottom heating 1. Place the food on a single level in the cooking com- 2. 2. Set CircoTherm hot air a 3. a a 4. and a temperature of at least 100 °C. Press to start. The button will be lit. Use the button to activate the "Rapid heat-up" function. will appear on the display.
en Home Connect Basic setting Lighting Selection ¡ On during operation ¡ Off during operation Childproof lock ¡ Button lock only ¡ Door lock and button lock Automatic childproof ¡ Deactivated lock ¡ Activated Operation after ¡ Main menu switch-on ¡ Types of heating ¡ Baking and roasting assistant Night-time dimming ¡ Switched off ¡ On (display dimmed between 10 p.m. and 5.59 a.m.
Home Connect en 1. Download the Home Connect app. 2. Open the Home Connect app and scan the follow- ing QR code. 3. Follow the instructions in the Home Connect app. 14.2 Home Connect Settings You can adjust the settings and network settings for Home Connect by going to your appliance's basic settings. Which settings the display shows will depend on whether Home Connect has been set up and whether the appliance is connected to your home network.
en Cleaning and servicing Notes ¡ You can continue to use your appliance as normal while updates are downloading. Depending on your personal settings in the app, software updates can also be set to download automatically. ¡ We recommend that you install security updates as soon as possible. 14.
Cleaning and servicing en Appliance door Area Door panels Door cover Stainless steel interior door frame Door handle Door seal Suitable cleaning agents Information ¡ Hot soapy water Do not use a glass scraper or a stainless steel wool. Tip: Remove the door panels in order to clean them thoroughly. → "Appliance door", Page 22 ¡ Made of stainless Do not use glass cleaner or a glass scraper. steel: Do not use stainless steel care products.
en Cleaning functions 16 Cleaning functions You can use the cleaning functions to clean the appliance. Note: The vertical bar must be to the front of the accessory supports. 16.1 Self-cleaning function The "Self-cleaning" function cleans the cooking compartment virtually automatically. Use this cleaning function to clean the cooking compartment every 2 to 3 months. You can use the cleaning function more often, if required. The cleaning function requires approx. 2.5 - 4.7 kilowatt hours.
Cleaning functions Cleaning setting 1 2 3 a 6. a a a 7. 8. Cleaning level Low Medium High Duration in hours Approx. 1:15 Approx. 1:30 Approx. 2:00 Select a higher cleaning setting if the cooking compartment is particularly dirty or has not been cleaned for a while. You cannot change the duration of the cleaning function. Once the cleaning function is in progress, you cannot change the cleaning setting. The duration of the cleaning setting will appear on the display.
en Rails 17 Rails To thoroughly clean the rails and the cooking compartment, or to replace the rails, you can remove the rails. 17.1 Detaching the rails WARNING ‒ Risk of burns! The shelf supports get very hot ▶ Never touch the shelf supports when hot. ▶ Always allow the appliance to cool down. ▶ Keep children at a safe distance. 1. Lift the rail forwards slightly and detach it . 2. Pull the whole rail to the front and remove it. 3. Clean the rail.
Appliance door 2. Hold the screwdriver horizontally and use it to push the door lock (black component) on each side of the door upwards as far as it will go . en 4. Insert the coin in the gap in the lock and rotate as far as it will go . ‒ Turn the lock on the left-hand side in a clockwise direction. ‒ Turn the lock on the right-hand side in an anticlockwise direction. Door lock open Left-hand lock secured The arrows point to each other Door lock closed Left-hand lock released 3.
en Appliance door 6. WARNING ‒ Risk of injury! The appliance door has a weight of 7–10 kg and may fall if it is not handled carefully. ▶ Handle the appliance door carefully. The door handle is not suitable for carrying the appliance door. The door handle may break off. ▶ Never carry the appliance door by the door handle. ▶ Grab hold of the appliance door with both hands on the left and right to carry it.
Appliance door 18.3 Removing the door panes en 6. Lift the first and second intermediate panes from be- low . To facilitate cleaning, you can remove the door pane. and remove them in the direction of the arrow WARNING ‒ Risk of injury! Components inside the appliance door may have sharp edges. ▶ Wear protective gloves. Requirement: The appliance door is detached. 1. Lay the appliance door with the front side facing down on a flat surface that is soft and clean. 2.
en Appliance door 1. Tip: When fitting the door panes, make sure that they are in the original order. Insert the intermediate pane so that the the right-hand side is pointing upwards. 5. Push down lightly on the first intermediate pane around , slide the retainer in at an angle and push down until it clicks into place. arrow on a The retainer has been inserted. 2. Check the fit of the four spacers and two seals.
Troubleshooting 8. Insert the inner pane with the holder into the opening. en 9. Screw both screws back in on the left and right of the appliance door. 19 Troubleshooting You can rectify minor faults on your appliance yourself. Read the troubleshooting information before contacting after-sales service. This will avoid unnecessary costs. WARNING ‒ Risk of injury! Improper repairs are dangerous. ▶ Repairs to the appliance should only be carried out by trained specialist staff.
en Troubleshooting Fault Appliance door cannot be opened. HomeConnect is not working correctly. The interior lighting does not work. Maximum operating time reached. A message with "D" or "E" appears in the display, e.g. D0111 or E0111. The cooking result is not satisfactory. Cause and troubleshooting The cleaning function locks the appliance door; is lit on the display. ▶ Allow the appliance to cool down until goes out on the display.
Disposal 5. Depending on the appliance model, the glass cover may have a sealing ring. Put the sealing ring in position. en 6. Screw the glass cover on. 7. Take the tea towel out of the cooking compartment. 8. Connect the appliance to the power supply. 20 Disposal Find out here how to dispose of old appliances correctly. 20.1 Disposing of old appliance Valuable raw materials can be reused by recycling. 1. Unplug the appliance from the mains. 2. Cut through the power cord. 3.
en How it works BE FR MT SE 5 GHz WLAN (Wi-Fi): BG HR NL NO For indoor CZ IT AT CH use only. DK CY PL TR AL BA MD 5 GHz WLAN (Wi-Fi): For indoor use only. ME DE LI PT IS EE LV RO UK (NI) MK RS IE LT SI EL LU SK ES HU FI UK UA 23 How it works Here, you can find the ideal settings for various types of food as well as the best accessories and cookware. We have perfectly tailored these recommendations to your appliance. 23.
How it works ¡ Add up to ½ litre of water to the universal pan, depending on the size and type of food that you want to roast. You can make a sauce from the juices that are collected. This also means that less smoke is produced and the cooking compartment does not become as dirty. Roasting in cookware If you cover the cookware when you cook your food, this will keep the cooking compartment cleaner. General information about roasting in cookware ¡ Use heat-resistant, ovenproof cookware.
en How it works Food Accessory/cookware Shelf pos- Heating ition function → Page 7 Swiss roll Baking tray 3 Muffins Muffin tray 3 Small yeast cakes Baking tray 3 Biscuits Baking tray 3 Biscuits, 2 levels Universal pan 3+1 + Baking tray Biscuits, 3 levels 1 pcs 4+3+1 Universal pan + 2 pcs Baking tray Bread, without a tin, 750 g Universal pan 2 or Loaf tin Bread, without a tin, 1500 g Universal pan 2 or Loaf tin Bread, without a tin, 1500 g Universal pan 2 or Loaf tin Bread, witho
How it works Food Leg of lamb, boned, medium, 1.5 kg Fish, grilled, whole, 300 g, e.g. trout 1 Preheat the appliance. en Accessory/cookware Shelf pos- Heating ition function → Page 7 Uncovered cookware 2 Temperature in Cooking time in °C mins 170 - 190 50 - 80 Wire rack 170 - 190 20 - 30 2 3. Mix 150 g of chilled yoghurt into the milk. 4. Pour the mixture into small containers, e.g. cups or Yoghurt Use your appliance to make yoghurt. small jars. Making yoghurt 1.
en How it works Defrosting You can defrost frozen food in your appliance. Tips for defrosting food ¡ You can use the appliance to defrost frozen fruit, vegetables or baked goods. ¡ It is better to defrost poultry, meat and fish in the refrigerator. ¡ Remove frozen food from its packaging before you defrost it. ¡ The recommended settings are for freezer-temperature food (-18 °C).
Installation instructions Food Accessory/cookware Shelf pos- Heating ition function → Page 7 Small cakes, on 2 levels Universal pan 3+1 + Baking tray Small cakes, on 3 levels x2 4+3+1 Baking tray + x1 Universal pan Hot water sponge cake Springform cake tin, 2 diameter 26 cm Hot water sponge cake Springform cake tin, 2 diameter 26 cm Hot water sponge cake, on Springform cake tin, 3+1 2 levels diameter 26 cm 1 Preheat the appliance for five minutes. Do not use the rapid heating function.
en Installation instructions ATTENTION! Carrying the appliance by the door handle could break it. The door handle cannot support the weight of the appliance. ▶ Do not carry or hold the appliance by the door handle. 24.2 Appliance dimensions You will find the dimensions of the appliance here ¡ Wear protective gloves so that you do not cut yourself. Parts that are accessible during installation may have sharp edges. ¡ Dimensions of the figures in mm.
Installation instructions en 24.4 Installation underneath a hob If the appliance is installed under a hob, the following minimum dimensions must be adhered to (including substructure, if applicable). Hob type Induction hob Full-surface induction hob Gas hob Electric hob a raised in mm 37 47 27 27 24.5 Installation in a tall unit Observe the installation dimensions and the installation instructions when installing in a tall unit.
en Installation instructions ¡ Ensure that air exchange is guaranteed in accordance with the diagram. ¡ Contact protection must be guaranteed by the installation. Electrically connect the appliance with the protective contact plug Note: The appliance must only be connected to a protective contact socket that has been correctly installed. ▶ Insert the plug into the protective contact socket. When the appliance is installed, the mains plug of the power cord must be freely accessible.
Installation instructions 3. Centre the appliance. 7. Screw the appliance into place. There must be an air gap of at least 4 mm between the appliance and adjacent unit fronts. 4. Open the appliance door slightly and unscrew panels on the left and right. 8. For handleless kitchens with vertical bar handle en strips: ‒ Attach a suitable filling piece in order to cover any sharp edges and to guarantee a safe installation. ‒ Pre-drill aluminium profiles to establish a screw connection .
Valid within Great Britain: Imported to Great Britain by BSH Home Appliances Ltd.