Oven [en] User manual and installation instructions B57CR22.
en Safety Table of contents USER MANUAL 1 Safety .................................................................... 2 2 Preventing material damage ............................... 4 3 Environmental protection and saving energy ....................................................................... 5 4 Familiarising yourself with your appliance ........ 6 5 Accessories.......................................................... 8 6 Before using for the first time ...........................
Safety en contact with the heating element and catch fire. ▶ Never place greaseproof paper loosely over accessories when preheating the appliance and while cooking. ▶ Always cut greaseproof paper to size and use a plate or baking tin to hold it down. The hinges on the appliance door move when the door is opened and closed, which could trap your fingers. ▶ Keep your hands away from the hinges. Components inside the appliance door may have sharp edges. ▶ Wear protective gloves.
en Preventing material damage ▶ Do not let children play with packaging material. Children may breathe in or swallow small parts, causing them to suffocate. ▶ Keep small parts away from children. ▶ Do not let children play with small parts. ▶ Keep children at a safe distance. If the door seal is damaged, a large amount of heat is generated around the door. ▶ Do not scrub or remove the seal. ▶ Never operate the appliance if the seal is damaged or missing. 1.
Environmental protection and saving energy en ▶ Do not store food in the cooking compartment. ▶ Remove all food remnants from the cooking com- Leaving the appliance to cool down with the door open will damage the front of neighbouring kitchen units over time. ▶ Always allow the cooking compartment to cool down with the door closed after cooking at high temperatures. ▶ Take care not to trap anything in the appliance door.
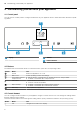
en Familiarising yourself with your appliance 4 Familiarising yourself with your appliance 4.1 Control panel You can use the control panel to configure all functions of your appliance and to obtain information about the operating status. 1 2 1 Display 3 2 2 3 Buttons Control element 4.2 Buttons The buttons are touch-sensitive areas. To select a function, press the corresponding button.
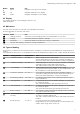
Familiarising yourself with your appliance Button Name Right Use Navigate to the right on the display Up Navigate upwards on the display Down Navigate downwards on the display en 4.4 Display The display shows the current settings, options or relevant information. 4.5 Main menu The main menu provides an overview of your appliance's functions. Press the button to open the main menu.
en Accessories Symbol Heating function Top/bottom heating eco Temperature 50 - 275 °C CircoTherm eco 40 - 200 °C Use For gently cooking selected types of food. Heat is emitted from above and below. This type of heating is most effective between 150 and 250 °C. This type of heating is used to determine the energy consumption in the conventional mode. For gently cooking selected types of food on one level without preheating.
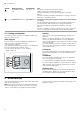
Accessories Accessories Wire rack Universal pan Baking tray Accessory support 5.1 Locking function The locking function prevents the accessories from tilting when they are pulled out. You can pull out the accessories approximately halfway without them tipping. The accessories must be inserted into the cooking compartment correctly for the tilt protection to work properly. en Use ¡ Cake tins ¡ Ovenproof dishes ¡ Cookware ¡ Meat, e.g.
en Before using for the first time Wire rack on universal pan 5.3 Other accessories You can purchase other accessories from our aftersales service, specialist retailers or online. You will find a comprehensive range of products for your appliance in our brochures and online: www.neff-international.com Accessories vary from one appliance to another. When purchasing accessories, always quote the exact product number (E no.) of your appliance.
Basic operation en ¡ If you do not perform any actions on the appliance for an extended period, it will automatically switch itself off. ure. a The temperature will now be changed. 7.2 Switching off the appliance 7.6 Changing the type of heating ▶ Press If you switch to a different heating function, the appliance will reset all the settings. 1. Press to pause operation. 2. Use the or button to select the required heating function. 3. Use the button to navigate to the next row. 4.
en Time-setting options 8 Time-setting options Your appliance has different time-setting options, with which you can control its operation. 8.1 Overview of the time-setting options When you are setting a time, the time values will increase by greater increments as you scroll through the higher values. The cooking time, for example, can be set in 1-minute increments up to 1 hour, and then in 5minute increments thereafter.
Childproof lock 3. Use the or button to change the end time. a The setting will then be applied. Cancelling the Ready at time for delayed starts 1. Press . en 2. Use the button to reset the end time. a The end time corresponds to the current time plus the set cooking time. a The appliance will start heating using the set cooking time. 9 Childproof lock You can secure your appliance to prevent children from accidentally switching it on or changing the settings. 2.
en Rapid heat-up 10 Rapid heat-up You can use the "Rapid heat-up" and "PowerBoost" functions to reduce the heat-up time. Whether the appliance is preheated with the "Rapid heat-up" function or the "PowerBoost" function depends on the heating function that has been set. 10.
Basic settings en 12 Basic settings You can configure the appliance to meet your needs. 12.1 Overview of the basic settings Here you can find an overview of the basic settings and factory settings. The basic settings depend on the features of your appliance.
en Cleaning and servicing 13 Cleaning and servicing To keep your appliance working efficiently for a long time, it is important to clean and maintain it carefully. ▶ Do not use cleaning products with a high alcohol content. ▶ Do not use hard scouring pads or cleaning sponges. 13.1 Cleaning products ▶ Do not use any special cleaners for cleaning the ap- In order to avoid damaging the various oven surfaces on the appliance, do not use unsuitable cleaning products.
Cleaning functions en Cooking compartment Area Enamel surfaces Suitable cleaning agents ¡ Hot soapy water ¡ Vinegar water ¡ Oven cleaner Glass cover for the oven light Rails ¡ Hot soapy water Accessories ¡ Hot soapy water ¡ Oven cleaner ¡ Hot soapy water Information Soak any heavily soiled areas and use a brush or steel wool. Leave the appliance door open to dry the cooking compartment after cleaning it. Notes ¡ It is best to use the cleaning function.
en Cleaning functions ▶ Leave the front of the appliance clear. ▶ Keep children at a safe distance. If the door seal is damaged, a large amount of heat is generated around the door. ▶ Do not scrub or remove the seal. ▶ Never operate the appliance if the seal is damaged or missing. 1. Remove accessories and cookware from the cook- ing compartment. 2. Detach the shelf supports and remove them from the cooking compartment. → "Rails", Page 19 3. Remove coarse dirt from the cooking compartment. 4.
Rails en Note: White residues on the enamel surfaces may be caused by heavy soiling. These food residues are harmless. The deposits do not compromise the functionality of the appliance. 4. Attach the shelf supports. → "Rails", Page 19 a 14.2 EasyClean cleaning aid a You can use the "EasyClean" cleaning aid to clean light soiling from the cooking compartment between full cleans. The "EasyClean" cleaning aid soaks dirt by evaporating soapy water. It is then easier to remove the dirt. 8. 9.
en Appliance door 15.2 Attaching the rails Notes ¡ The rails only fit on the right or left. ¡ For both rails, ensure that the retaining bracket is at the front. 2. Push the rail into the front socket until the rail also rests against the cooking compartment wall, and then press this downwards . 1. First, push the rail into the middle of the rear socket until the rail rests against the cooking compartment wall, and then push this back .
Appliance door 3. Open the appliance door approx. 45° wide. en 5. ATTENTION! Opening and closing the appliance door when it is in the lock position damages the door hinges. ▶ Never force the appliance door open or closed. ▶ If the door hinge has been damaged, call the after-sales service. Move the appliance door up and down until you hear a quiet click. You can still only move the appliance door slightly. 4. Insert the coin in the gap in the lock and rotate as far as it will go .
en Appliance door 5. 16.2 Attaching the appliance door 1. Tip: Ensure that the appliance door is not wedged at an angle and that it is properly fitted in place. Attach the appliance door via the left- and right-hand guide rollers simultaneously . 2. Rotate the door handle upwards slightly WARNING ‒ Risk of injury! If the door locks are unsecured, the appliance door may become detached. ▶ After attaching the appliance door, close the leftand right-hand door locks.
Appliance door 4. Carefully lift the inner pane upwards at an angle and remove it in the direction of the arrow . en 8. WARNING ‒ Risk of injury! Scratched glass in the appliance door may develop into a crack. ▶ Do not use any harsh or abrasive cleaners or sharp metal scrapers to clean the glass on the oven door, as they may scratch the surface. Clean the door panes on both sides with glass cleaner and a soft cloth. 9. Dry the door panes and refit them. 16.4 Fitting the door panes 5.
en Appliance door 4. Insert the second intermediate pane without the spacers and seals, and slide it in the direction of the arrow until it is inserted in the sheet metal frame . The arrow on the intermediate pane must line up with the arrow on the frame . 5. Push down lightly on the first intermediate pane around , slide the retainer in at an angle and push down until it clicks into place. 6. Place the inner pane onto the appliance door so that the number is legible at the bottom right.
Troubleshooting en 17 Troubleshooting You can rectify minor faults on your appliance yourself. Read the troubleshooting information before contacting after-sales service. This will avoid unnecessary costs. WARNING ‒ Risk of injury! Improper repairs are dangerous. ▶ Repairs to the appliance should only be carried out by trained specialist staff. ▶ If the appliance is defective, call Customer Service. WARNING ‒ Risk of electric shock! Incorrect repairs are dangerous.
en Troubleshooting Fault Maximum operating time reached. A message with "D" or "E" appears in the display, e.g. D0111 or E0111. The cooking result is not satisfactory. Cause and troubleshooting To prevent the appliance from continuing to run when it is no longer needed, it automatically stops heating after a few hours if the settings are not changed during this time. A notification appears on the display.
Disposal en 18 Disposal Find out here how to dispose of old appliances correctly. 18.1 Disposing of old appliance Valuable raw materials can be reused by recycling. 1. Unplug the appliance from the mains. 2. Cut through the power cord. 3. Dispose of the appliance in an environmentally friendly manner. Information about current disposal methods are available from your specialist dealer or local authority.
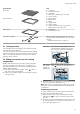
en How it works Baking on one level Tall baked items and tins/dishes on the wire rack Shallow baked items/baking trays Shelf position 2 Roasting in cookware 3 Baking on two or more levels 2 levels ¡ Universal pan ¡ Baking tray 2 levels ¡ Baking tins on two wire racks Shelf position General information about roasting in cookware ¡ Use heat-resistant, ovenproof cookware. ¡ Place the cookware on the wire rack. ¡ Glass cookware is best. ¡ Follow the manufacturer's instructions for your roasting dishes.
How it works en 20.6 List of foods Recommended settings for a variety of foods, sorted into food categories.
en How it works Food Tarte flambée Bake, savoury, cooked ingredients Potato gratin, raw ingredients, 4 cm deep Chicken, 1 kg, unstuffed Small chicken portions, 250 g each Goose, unstuffed, 3 kg Joint of pork without rind, e.g. neck, 1.5 kg Joint of pork without rind, e.g. neck, 1.5 kg Fillet of beef, medium, 1 kg Pot-roasted beef, 1.5 kg Pot-roasted beef, 1.5 kg Sirloin, medium, 1.5 kg Burger, 3-4 cm thick Leg of lamb, boned, medium, 1.5 kg Fish, grilled, whole, 300 g, e.g. trout 1 Preheat the appliance.
How it works 5. Immediately place the meat into the pre-warmed en 6. After low temperature cooking, remove the meat cookware in the cooking compartment. To ensure that the climate in the cooking compartment remains constant, keep the cooking compartment door closed during low temperature cooking. from the cooking compartment.
en Installation instructions ¡ Hot water sponge cake – When baking on two levels, place the springform tins at diagonally opposite corners of the wire racks.
Installation instructions ¡ ¡ ¡ ¡ ¡ ¡ ¡ ¡ with these installation instructions. The installer shall be liable for damages incurred as a result of incorrect installation. Do not use the door handle for the transport or installation. Check the appliance for damage after unpacking it. Do not connect the appliance if it has been damaged in transit. Before starting up the appliance, remove any packaging material and adhesive film from the cooking compartment and the door.
en Installation instructions 21.3 Installation below a worktop Observe the installation dimensions and the installation instructions when installing below a worktop. ¡ To ventilate the appliance, the intermediate floor must have a ventilation cut-out. ¡ The worktop must be secured to the built-in unit. ¡ Observe any available installation instructions for the hob. 21.
Installation instructions 21.6 Installing two appliances on top of each other Your appliance can also be installed above or below another appliance. Observe the installation dimensions and the installation instructions when installing appliances on top of each other. ¡ To ventilate the appliances, the intermediate floor must have a ventilation cut-out. ¡ To ensure sufficient ventilation of the two appliances, there must be a ventilation opening of at least 200 cm² in the base area.
en Installation instructions 21.9 Installing the appliance Note: Do not use a cordless screwdriver to secure the panels. This may damage the panels. 1. If required, you can adjust the gap between the appliance door and the panels using the adjustment screws on the left and right. Turning the screws clockwise makes the gap larger Turning the screws anti-clockwise makes the gap smaller 2. Push the appliance in fully. Do not kink or trap the connection cable, or route it over sharp edges. 3.
Installation instructions en 9. Open the appliance door slightly, then refit the pan- els and screw them in place, first at the top and then at the bottom. Note: The gap between the worktop and the appliance must not be closed by additional battens. Thermal insulation strips must not be fitted to the side panels of the surround unit. 21.10 Removing the appliance 1. Disconnect the appliance from the power supply. 2. Open the appliance door slightly and unscrew the left and right-hand panels. 3.
Valid within Great Britain: Imported to Great Britain by BSH Home Appliances Ltd.