BUILT-IN OVEN [en] INSTRUCTION MANUAL B4ACF1A.
en Table of contents [ en] I NSTRUCTI ON MANUAL 8 Intended use . . . . . . . . . . . . . . . . . . . . . . . . . . . . . 4 ( Important safety information . . . . . . . . . . . . . . . 4 D Cleaning agent . . . . . . . . . . . . . . . . . . . . . . . . . . 16 General information . . . . . . . . . . . . . . . . . . . . . . . . . . . 4 Halogen lamp. . . . . . . . . . . . . . . . . . . . . . . . . . . . . . . . 5 Suitable cleaning agents . . . . . . . . . .
en Intended use 8Intended use Read these instructions carefully. Only then will you be able to operate your appliance safely and correctly. Retain the instruction manual and installation instructions for future use or for subsequent owners. This appliance is only intended to be fully fitted in a kitchen. Observe the special installation instructions. Check the appliance for damage after unpacking it. Do not connect the appliance if it has been damaged in transport.
Important safety information : Warning – Risk of scalding! Halogen lamp ■ : Warning – Risk of burns! The accessible parts become hot during operation. Never touch the hot parts. Keep children at a safe distance. Risk of scalding! ■ When you open the appliance door, hot steam can escape. Steam may not be visible, depending on its temperature. When opening, do not stand too close to the appliance. Open the appliance door carefully. Keep children away.
en Causes of damage ]Causes of damage Causes of damge General information Caution! ■ Accessories, foil, greaseproof paper or ovenware on the cooking compartment floor: do not place accessories on the cooking compartment floor. Do not cover the cooking compartment floor with any sort of foil or greaseproof paper. Do not place ovenware on the cooking compartment floor if a temperature of over 50 ºC has been set. This will cause heat to accumulate.
Environmental protection ■ ■ ■ en Open the appliance door as infrequently as possible when the appliance is in use. It is best to bake several cakes one after the other. The cooking compartment stays warm. This reduces the baking time for the second cake. You can place two cake tins next to each other in the cooking compartment. For longer cooking times, you can switch the appliance off 10 minutes before the end of the cooking time and use the residual heat to finish cooking.
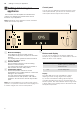
en Getting to know your appliance Control panel *Getting to know your appliance You can set your appliance's various functions on the control panel. Below, you will see an overview of the control panel and the layout of the controls. In this section, we will explain the indicators and controls. You will also find out about the various functions of your appliance. Get i ng t o know your ap l i ance Note: Depending on the appliance model, individual details and colours may differ.
Getting to know your appliance en Types of heating and functions Use the function selector to set the types of heating and other functions.
en Accessories Cooking compartment Various functions in the cooking compartment make your appliance easier to use. For example, the cooking compartment is well lit and a cooling fan prevents the appliance from overheating. Opening the appliance door If you open the appliance door when the appliance is in operation, the appliance will continue to operate as before.
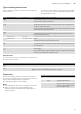
Accessories Locking function The accessories can be pulled out approximately halfway until they lock in place. The locking function prevents the accessories from tilting when they are pulled out. The accessories must be inserted into the cooking compartment correctly for the tilt protection to work properly. When inserting the wire rack, ensure that lug ‚ is at the rear and is facing downwards. The open side must be facing the appliance door and the outer rail must be facing downwards ¾.
en Before using for the first time KBefore using for the first time Before you can use your new appliance, you must make some settings. You must also clean the cooking compartment and accessories. Bef or e usi ng f or t he f i r st t i me Initial use As soon as the appliance is connected to the power supply, ‚ƒ:‹‹ flashes in the display. Setting the time Use the ( or ) buttons to set the current time. After a few seconds, the time that has been set is adopted. Changing the time 1.
Time-setting options Once your food is cooked, turn the function selector to the "Off" position to switch the appliance off. Note: You can set both a cooking time and an end time on the appliance. ~ "Time-setting options" on page 13 Changing The heating function and temperature can be changed at any time using the relevant selector. Heating indicator As soon as the appliance heats up, the / symbol appears in the display.
en Time-setting options Note: When the set time has elapsed, a signal sounds. To end the timer, press the 0 button. Setting the cooking time Once the set cooking time has elapsed, the appliance switches off automatically. The function can only be used in combination with a type of heating. 1. Set the type of heating and temperature. 2. Press the 0 button repeatedly until the x symbol is selected. 3. Use the ( and ) buttons to set the cooking time.
Childproof lock en AChildproof lock QBasic settings Your appliance is equipped with a childproof lock so that children cannot switch it on accidentally or change any settings. There are various settings available to you in order to help use your appliance effectively and simply. You can change these settings as required. Chi l dpr o f l ock Notes ■ If a hob is connected, it will not be affected by the childproof lock on the oven. ■ After a power cut, the childproof lock will no longer be active.
en Cleaning agent 4. Use the v button to continue going through all of the basic settings as described above and to change the settings if necessary using the ( or ) button. 5. To confirm, press and hold the v button again for approx. four seconds. All basic settings have now been applied. You can change the basic settings again at any time. Note: Following a power failure, the basic factory settings are restored.
Cleaning agent Door panels Door handle Hot soapy water: Clean with a dish cloth and then dry with a soft cloth. Do not use a glass scraper or a stainless steel scouring pad. Hot soapy water: Clean with a dish cloth and then dry with a soft cloth. If descaler comes into contact with the door handle, wipe it off immediately. Otherwise, any stains will not be able to be removed.
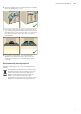
Rails en After cleaning After cleaning the door seal, check whether it is sitting correctly on the left- and right-hand side (fig. !). If the door seal is running over the spacer ‚, push the door seal inwards so that it now runs beside the spacer ‚ (fig. "). 2 1 pRails With good care and cleaning, your appliance will retain its appearance and remain fully functional for a long time to come. This will tell you how to remove the shelves and clean them.
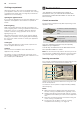
Appliance door Attaching the rails The rails only fit on the right or the left side. For both rails, ensure that the curved rods are at the front. 1. First, insert the rail in the middle of the rear socket ‚, until the rail rests against the cooking compartment wall, and push it back ƒ (figure !). 2. Then insert the rail into the front socket „, until the rail also rests against the cooking compartment wall here, and press it downwards … (figure ").
Appliance door en 2. Open the appliance door approx. 45° (fig. %). : Warning Risk of injury! The door handle may break off. Do not carry the appliance door by the door handle. To carry or remove the appliance door, take hold of it with both hands, one on the left and one on the right. 5. Take hold of the appliance door with both hands, one on the left and one on the right, and rotate the door handle upwards slightly ‚ until you are able to pull up the appliance door and remove it ƒ(fig.°*).
Appliance door 4. Open the appliance door slightly until you hear a quiet click. Close the appliance door. : Warning Risk of injury if the door locks are not closed! The appliance door may become detached. You may be injured and the appliance door damaged. After refitting the door, always close the left- and right-hand door locks. 5. Close the left- and right-hand door locks (fig. %).
Trouble shooting en 3. Insert the inner glass into the holder „ on the left and right (Fig. $). 4. Push the inner glass downwards until it locks into place (Fig. %). F 3Trouble shooting If a fault occurs, there is often a simple explanation. Before calling the after-sales service, please refer to the fault table and attempt to correct the fault yourself. Tr oubl e sho t i ng Rectifying faults yourself F You can often easily rectify technical faults with the appliance yourself.
Customer service en Replacing the bulb in the top of the cooking compartment 4Customer service If the cooking compartment light bulb fails, it must be replaced. Heat-resistant, 25 watt, 230 V halogen bulbs are available from the after-sales service or specialist retailers. When handling the halogen bulb, use a dry cloth. This will increase the service life of the bulb. Only use these bulbs. Our after-sales service is there for you if your appliance needs to be repaired.
en Tested for you in our cooking studio JTested for you in our cooking studio Here, you can find a selection of dishes and the ideal settings for them. We will show you which type of heating and temperature are best suited to your dish. You will get information on suitable cooking accessories and the height at which they should be placed in the oven. You will also get tips about cookware and preparation methods.
Tested for you in our cooking studio Baking on two levels: ■ Universal pan: Level 3 Baking tray: Level 1 ■ Baking tins/dishes on the wire rack First wire rack: Level 3 Second wire rack: Level 1 Baking on 3 levels: ■ Baking tray: Level 4 Universal pan: Level 3 Baking tray: Level 1 en You can cut energy use by up to 45% by preparing items at the same time.
en Tested for you in our cooking studio Baking on two or more levels Food Dish Victoria sponge cake, 2 levels 4x Ø20cm tins Scones, 2 levels 2 baking sheets on 2 wire racks Biscuits, 2 levels 2 baking sheets on 2 wire racks Biscuits, 3 levels 3 baking sheets on 3 wire racks Small Cakes, 2 levels 2x 12-cup-tins Puff pastry slices, 2 levels Universal pan + baking tray Puff pastry slices, 3 levels Baking trays + universal pan Jam tarts, 2 levels 2x 12-cup-tins Meringue, 2 levels 2 baking sheets on 2 wire r
Tested for you in our cooking studio en Roasting, braising and grilling Here, you will find information on roasting, braising and grilling poultry, meat and fish. The settings tables list the optimal settings for a wide range of dishes. Poultry When cooking duck or goose, pierce the skin on the underside of the wings. This allows the fat to run out. If using duck breast, score the skin. Do not turn duck breasts. Add some liquid to the poultry in the dish. Cover the base of the ovenware with approx.
en Tested for you in our cooking studio Place the food to be grilled on the wire rack. In addition, slide the universal pan in at least one shelf position lower, with the slanted edge facing the appliance door. Any dripping fat will be caught. When grilling, try wherever possible to use pieces of food which are of a similar thickness and weight. This will allow them to brown evenly and remain succulent and juicy. Place the food to be grilled directly onto the wire rack.
Tested for you in our cooking studio Food Dish Chicken portion, bone-in, 200-250 g each Duck, 2-3 kg Turkey, crown Turkey, thighs Turkey, whole, 4-8 kg Fish, braised, whole 300 g, e.g. trout Fish, braised, whole 1,5 kg, e.g.
en Tested for you in our cooking studio Food Dish Beef, top side / top rump Cookware, uncovered Lamb, leg (bone-in) Cookware, uncovered Lamb, shoulder (bone-in) Cookware, uncovered Lamb, shoulder (boned and rolled) Cookware, uncovered Rack of lamb** Cookware, uncovered Pork, roast joint Cookware, uncovered Pork, loin joint Cookware, uncovered Pork, belly Cookware, uncovered Pork, gammon joint Cookware, uncovered Chicken drumstick, 150 g each Cookware, uncovered Chicken portion, bone-in, 200-250 g Cookwa
Tested for you in our cooking studio Food Dish Oven chips, Croquettes, frozen Oven chips, frozen, 2 levels Hash browns, frozen Fish fingers, frozen Chicken nuggets, frozen Lasagna, chilled, 500g Lasagna, chilled, 1,5kg Lasagna, frozen, 500g Lasagna, frozen, 1,5kg Universal pan Universal pan + baking tray Universal pan Universal pan Universal pan Ovenproof dish on wire rack Ovenproof dish on wire rack Ovenproof dish on wire rack Ovenproof dish on wire rack Desserts You can make your own soufflés and yogu
en Tested for you in our cooking studio Drying You can achieve outstanding drying results with CircoTherm.With this type of preserving, flavours are concentrated as a result of the dehydration. Only use unblemished, fresh fruit, vegetables and herbs and wash them thoroughly. Line the wire rack with greaseproof paper or parchment paper. Drain the excess water from the fruit and then dry it. If necessary, cut it into equal chunks or thin slices.
Tested for you in our cooking studio Meal Accessory/cookware Vegetables, e.g. carrots 1-litre preserving jars Vegetables, e.g. cucumbers 1-litre preserving jars Shelf posi- Type of tion heating 1 ‚ 1 Step 1. Temperature in °C 160-170 2. 120 ‚ 3. 1. 160-170 160-170 Stone fruit, e.g. cherries, damsons 1-litre preserving jars 1 ‚ 2. 1. Pomes, e.g. apples, strawberries 1 ‚ 2. 1. 160-170 2.
en Tested for you in our cooking studio Dish Accessories/cookware Shelf posi- Heating tion function Temperature in °C Bread, general Cake, moist Cake, dry Baking tray Baking tray Baking tray 2 2 2 50 50 60 Keeping warm You can keep cooked dishes warm using the top/ bottom heating type at 70 °C. This will avoid condensation developing, and means you will not have to wipe out the cooking compartment. Do not keep cooked dishes warm for longer than two hours.
Tested for you in our cooking studio Test dishes These tables have been produced for test institutes to facilitate appliance testing. As per EN 60350-1. 1 2 Baking Items that are placed in the oven on baking trays or in baking tins/dishes at the same time will not necessarily be ready at the same time.
*9001284091* 9001284091 990218 en