
Installation Instruction
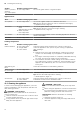
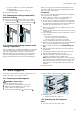
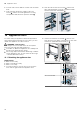
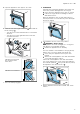
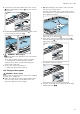

Table Of Contents
- Oven
- en
- Table of contents
- 1 Safety
- 2 Preventing material damage
- 3 Environmental protection and saving energy
- 4 Familiarising yourself with your appliance
- 5 Accessories
- 6 Before using for the first time
- 7 Basic operation
- 8 Time-setting options
- 9 Childproof lock
- 10 Rapid heating
- 11 Basic settings
- 12 Cleaning and servicing
- 13 Shelf supports
- 14 Appliance door
- 15 Troubleshooting
- 16 Disposal
- 17 Customer Service
- 18 How it works
- 19 Installation instructions

en Appliance door
16
¡ For both rails, ensure that the curved rods are at the
front.
1.
First, push the rail into the middle of the rear
socket until the rail rests against the cooking
compartment wall, and then push this back .
2.
Push the rail into the front socket until the rail
also rests against the cooking compartment wall,
and then press this downwards .
14 Appliance door
To ensure that your appliance retains its appearance
and remains fully functioning for a long time, you can
detach the appliance door and clean it.
WARNING‒Risk of injury!
If the hinges are not secured due to an incomplete
lock, they can snap shut with great force.
▶
To detach or attach the appliance door, always turn
the two locks as far as they will go.
▶
If the hinge snaps closed when detaching or attach-
ing the appliance door, do not reach into the hinge
– call the after-sales service.
14.1 Detaching the appliance door
Requirements
¡ Have a torch ready.
¡ Have a screwdriver ready.
¡ Have a coin ready.
1.
To make it easier to see the door lock, shine the
torch into the gap beside the appliance door.
2.
Hold the screwdriver horizontally and use it to
push the door lock (black component) on each side
of the door upwards as far as it will go .
Door lock open
Door lock closed