Oven [en] User manual and installation instructions B4ACF1A.
en Safety Table of contents USER MANUAL 1 Safety .................................................................... 2 2 Preventing material damage ............................... 4 3 Environmental protection and saving energy ....................................................................... 5 4 Familiarising yourself with your appliance ........ 6 5 Accessories.......................................................... 8 6 Before using for the first time .............................
Safety Opening the appliance door creates a draught. Greaseproof paper may come into contact with the heating element and catch fire. ▶ Never place greaseproof paper loosely over accessories when preheating the appliance and while cooking. ▶ Always cut greaseproof paper to size and use a plate or baking tin to hold it down. WARNING ‒ Risk of burns! The appliance and its parts that can be touched become hot during use. ▶ Caution should be exercised here in order to avoid touching heating elements.
en Preventing material damage ▶ Do not let children play with packaging material. Children may breathe in or swallow small parts, causing them to suffocate. ▶ Keep small parts away from children. ▶ Do not let children play with small parts. 1.5 Halogen bulb WARNING ‒ Risk of burns! The bulbs in the cooking compartment get very hot. There is still a risk of burning for some time after they have been switched off. ▶ Do not touch the glass cover. ▶ Avoid contact with your skin when cleaning.
Environmental protection and saving energy en 3 Environmental protection and saving energy Help protect the environment by using your appliance in a way that conserves resources and by disposing of reusable materials properly. 3.1 Disposing of packaging The packaging materials are environmentally compatible and can be recycled. ▶ Sort the individual components by type and dispose of them separately. Information about current disposal methods are available from your specialist dealer or local authority.
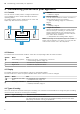
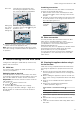
en Familiarising yourself with your appliance 4 Familiarising yourself with your appliance 4.1 Controls 1 You can use the control panel to configure all functions of your appliance and to obtain information about the operating status. On certain models, specific details such as colour and shape may differ from those pictured. 2 3 2 3 1 4 4 Buttons → "Buttons", Page 6 Function selector You can turn the function selector clockwise or anti-clockwise from the zero setting.
Familiarising yourself with your appliance Symbol Type of heating CircoTherm gentle Pizza setting Full-surface grill Circo-roasting Top/bottom heating en What it's used for/how it works Cook selected dishes gently on one level without preheating. The fan distributes the heat from the ring-shaped heating element in the back wall evenly around the cooking compartment. The food is cooked in phases using residual heat. Select a temperature of between 120 °C and 230 °C.
en Accessories You can remove the rails, e. g. for cleaning. → "Shelf supports", Page 15 Lighting The oven light lights up the cooking compartment. With most types of heating and functions, the lighting lights up during operation. When the function selector is turned to bring operation to an end, the lighting goes out. The Oven light setting on the function selector can be used to switch on the light without heating. Cooling fan The cooling fan switches on and off depending on the appliance's temperature.
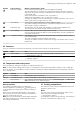
Before using for the first time Wire rack Insert the wire rack with the open side facing the appliance door and the curved lip facing downwards. Baking tray Slide the tray, e.g. the universal pan, E.g. univer- in with the sloping edge facing the sal pan or appliance door. baking tray en Combining accessories You can combine the wire rack with the universal pan to catch any liquid that drips down. 1. Place the wire rack on the universal pan so that both spacers are on the rear edge of the universal pan.
en Basic operation 8. Clean the accessories using soapy water and a dish cloth or soft brush. 7 Basic operation 7.1 Switching on the appliance 3. When your food is ready, switch off the appliance. ▶ Turn the function selector to any position other than Tips ¡ The most suitable type of heating for your food can be found in the description of the type of heating. → "Types of heating", Page 6 ¡ You can also set a cooking time and end time on the appliance.
Time-setting options 8.3 Setting the cooking time You can set a cooking time for operation of up to 23 hours 59 minutes. Requirement: The type of heating and temperature or setting are set. 1. Press the button repeatedly until is highlighted in the display. 2. Use the or button to set the cooking time. Button Default value 10 minutes 30 minutes The cooking time can be set in 1-minute increments up to 1 hour, and then in 5-minute increments.
en Childproof lock 9 Childproof lock You can secure your appliance to prevent children from accidentally switching it on or changing the settings. Notes ¡ You can go to the basic settings → Page 12 to specify whether you want the option to set the childproof lock. ¡ After a power cut, the childproof lock is deactivated. You can use the childproof lock to lock the control elements of the appliance only. 9.1 Automatic childproof lock When the appliance is switched off, it locks automatically.
Cleaning and servicing Display Basic setting Cooling fan run-on time Waiting time until a setting is adopted 1 2 3 Childproof lock can be adjusted → "Childproof lock", Page 12 Water hardness3 en Selection = short = medium = long1 = extra long = 3 seconds1 = 6 seconds = 10 seconds = no = yes1 = softened = soft (up to 1.5 mmol/l) = medium (1.5–2.5 mmol/l) = hard (2.5–3.8 mmol/l) = very hard (above 3.
en Cleaning and servicing Surface Plastic or painted surfaces E.g. control panel Suitable cleaning agents Notes ¡ Hot soapy water Do not use glass cleaner or a glass scraper. Appliance door Area Door panels Door cover Door handle Door seal Suitable cleaning agents Notes ¡ Hot soapy water Do not use a glass scraper or a stainless steel wool. Tip: Remove the door panels in order to clean them thoroughly. → "Appliance door", Page 16 ¡ Made of stainless Do not use glass cleaner or a glass scraper.
Shelf supports For some surfaces, you can use alternative cleaning agents. → "Suitable cleaning agents", Page 13 2. Dry with a soft cloth. ‒ 12.3 Checking the cooking compartment seal after cleaning ▶ If the cooking compartment seal is on the left or right of the spacer , slide the cooking compartment seal inwards until it is beside the spacer . en faces no longer clean themselves adequately during operation, heat up the cooking compartment specifically to the right temperature.
en Appliance door ¡ For both rails, ensure that the curved rods are at the front. 1. First, push the rail into the middle of the rear socket until the rail rests against the cooking compartment wall, and then push this back . 2. Push the rail into the front socket until the rail also rests against the cooking compartment wall, and then press this downwards .
Appliance door 3. Open the appliance door approx. 45° wide. en 5. ATTENTION! Opening and closing the appliance door when it is in the lock position damages the door hinges. ▶ Never force the appliance door open or closed. ▶ If the door hinge has been damaged, call the after-sales service. Move the appliance door up and down until you hear a quiet click. You can still only move the appliance door slightly. 4. Insert the coin in the gap in the lock and rotate as far as it will go .
en Appliance door 5. 14.2 Attaching the appliance door 1. Tip: Ensure that the appliance door is not wedged at an angle and that it is properly fitted in place. Attach the appliance door via the left- and right-hand guide rollers simultaneously . 2. Rotate the door handle upwards slightly WARNING ‒ Risk of injury! If the door locks are unsecured, the appliance door may become detached. ▶ After attaching the appliance door, close the leftand right-hand door locks.
Appliance door 4. Push down on the intermediate pane in the area of , and carefully lift the retainer to pull it out. until you are able 5. Lift the intermediate pane from below it in the direction of the arrow en 1. Tip: When fitting the door panes, make sure that they are in the original order. Insert the intermediate pane in the direction of the arrow and push it in in the direction of the arrow until it is fitted in the frame. and remove .
en Troubleshooting 4. Push the inner pane downwards until it locks into place . 15 Troubleshooting You can rectify minor faults on your appliance yourself. Read the troubleshooting information before contacting after-sales service. This will avoid unnecessary costs. WARNING ‒ Risk of injury! Improper repairs are dangerous. ▶ Repairs to the appliance should only be carried out by trained specialist staff. ▶ If the appliance is defective, call Customer Service.
Disposal en Fault Cause and troubleshooting A message with appears in the Electronics fault display, e.g. - . 1. Press the button. ‒ If required, reset the time. a If the fault was a one-off, the error message disappears. 2. If the error message appears again, call the after-sales service. Quote the exact error message and the E no. of your appliance. → "Customer Service", Page 22 15.2 Replacing the oven light bulb 1.
en Customer Service 17 Customer Service If you have any queries on use, are unable to rectify faults on the appliance yourself or if your appliance needs to be repaired, contact Customer Service. Function-relevant genuine spare parts according to the corresponding Ecodesign Order can be obtained from Customer Service for a period of at least 10 years from the date on which your appliance was placed on the market within the European Economic Area.
How it works Roasting and grilling on the wire rack Roasting on the wire rack works particularly well for large poultry or for multiple pieces at the same time. ¡ Depending on the size and type of the food to be roasted, add up to 1/2 litre water to the universal pan. You can make a sauce from the juices that are caught. This also means that less smoke is produced and the cooking compartment becomes less dirty. ¡ Keep the appliance door closed when using the grill. Never grill with the appliance door open.
en How it works Food Accessories/cookware Victoria sponge cake, 2 levels 4 pcs Ø 20 cm cake tin Baking sheet on wire rack Cookware without lid Cookware without lid Cookware without lid Biscuits, 2 or 3 levels Beef, top side/top rump Lamb leg (on the bone) Pork belly Chicken, whole Turkey, crown Turkey, whole, 4–8 kg Fish, braised, whole 300 g, e. g.
How it works 18.6 Test dishes These overviews have been produced for test institutes to facilitate appliance testing in accordance with EN 60350-1. Baking Observe this information when baking test dishes. General information ¡ The settings apply to food that is placed into a cold cooking compartment. ¡ Observe the notes about preheating in the tables. These setting values apply without rapid heating. ¡ When baking, use the lower of the listed temperatures to begin with.
en Installation instructions Grilling Food Accessories/cookware Shelf pos- Type of ition heating Toasting bread Wire rack 4 1 Preheat the appliance for five minutes. Do not use the rapid heating function. Temperature in Cook°C/grill setting ing time in mins / 1 0.5–1.5 19 Installation instructions Observe this information when installing the appliance. 19.1 General installation instructions Follow these instructions before you start with the installation of the appliance.
Installation instructions en 19.2 Appliance dimensions 19.3 Installation below a worktop You will find the dimensions of the appliance here Observe the installation dimensions and the installation instructions when installing below a worktop. ¡ To ventilate the appliance, the intermediate floor must have a ventilation cut-out. ¡ In combination with induction hobs, the gap between the worktop and appliance must not be sealed using additional strips. ¡ The worktop must be secured to the built-in unit.
en Installation instructions 19.5 Installation in a tall unit Observe the installation dimensions and the installation instructions when installing in a tall unit. ¡ The power cable must be plugged in at the rear of the appliance until you hear a clicking sound. A 3 m power cable can be obtained from the after-sales service. ¡ The power cable must only be replaced with a cable from the original manufacturer. This is available from after-sales service.
Installation instructions 1. If required, you can adjust the gap between the ap- pliance door and the panels using the adjustment screws on the left and right. Turning the screws clockwise makes the gap larger Turning the screws anti-clockwise makes the gap smaller 2. Push the appliance in fully. Do not kink or trap the connecting cable, or route it over sharp edges. 3. Centre the appliance. en 6.
Valid within Great Britain: Imported to Great Britain by BSH Home Appliances Ltd.