Oven [en] User manual and installation instructions B4ACF1A.
en Safety Table of contents USER MANUAL 1 Safety .................................................................... 2 2 Preventing material damage ............................... 4 3 Environmental protection and saving energy ....................................................................... 4 4 Familiarising yourself with your appliance ........ 5 5 Accessories.......................................................... 7 6 Before using for the first time .............................
Safety Opening the appliance door creates a draught. Greaseproof paper may come into contact with the heating element and catch fire. ▶ Never place greaseproof paper loosely over accessories when preheating the appliance and while cooking. ▶ Always cut greaseproof paper to size and use a plate or baking tin to hold it down. WARNING ‒ Risk of burns! The appliance and its parts that can be touched become hot during use. ▶ Caution should be exercised here in order to avoid touching heating elements.
en Preventing material damage Children may breathe in or swallow small parts, causing them to suffocate. ▶ Keep small parts away from children. ▶ Do not let children play with small parts. 1.5 Halogen bulb WARNING ‒ Risk of burns! The bulbs in the cooking compartment get very hot. There is still a risk of burning for some time after they have been switched off. ▶ Do not touch the glass cover. ▶ Avoid contact with your skin when cleaning.
Familiarising yourself with your appliance 3.2 Saving energy If you follow these instructions, your appliance will use less power. Only preheat the appliance if the recipe or the recommended settings tell you to do so. ¡ Not preheating the appliance can reduce the energy used by up to 20%. Use dark-coloured, black-coated or enamelled baking tins. ¡ These types of baking tin absorb the heat particularly well. Open the appliance door as little as possible during operation.
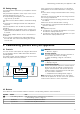
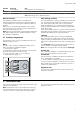
en Familiarising yourself with your appliance 4.3 Display The display shows the current settings, options or relevant information. The red bar above or below a symbol indicates which value is active or can be changed. Symbol Name Childproof lock activated Heating-up indicator Use The childproof lock is activated → "Childproof lock", Page 11 Appliance is heating → "Heat-up indicator", Page 7 4.4 Types of heating Here you can find an overview of the types of heating.
Accessories Symbol 50–275 Function Zero setting Temperature range Grill, intensive en Use The appliance is not heating up. Set the temperature in the cooking compartment in °C. The maximum temperature that can be set for Full-surface grill and Grill, small area (depending on the appliance type). Heat-up indicator Self-cleaning surfaces The appliance indicates when it is heating up. When the appliance is heating, the symbol lights up on the display.
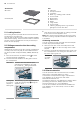
en Accessories Accessories Wire rack Use ¡ Cake tins ¡ Ovenproof dishes ¡ Cookware ¡ Meat, e.g. roasting joints or steak ¡ Frozen meals ¡ Moist cakes ¡ Baked items ¡ Bread ¡ Large roasts ¡ Frozen meals ¡ Catching dripping liquids, e.g. fat when grilling food on the wire rack. Universal pan 5.1 Locking function The locking function prevents the accessories from tilting when they are pulled out. You can pull out the accessories approximately halfway without them tipping.
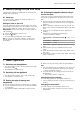
Before using for the first time en 6 Before using for the first time Configure the settings for initial start-up. Clean the appliance and accessories. 6.2 Cleaning the appliance before using it for the first time 6.1 Initial use Clean the cooking compartment and accessories before using the appliance to prepare food for the first time. 1. Remove any accessories and leftover packaging, such as polystyrene pellets, from the cooking compartment. 2.
en Time-setting options 8 Time-setting options Your appliance has different time-setting options, with which you can control its operation. 8.1 Overview of the time-setting options With the tions. button, select the different time-setting op- Time-setting option Timer Cooking time End time Time Use The timer can be set independently of the appliance when it is in operation. It does not affect the appliance.
Childproof lock Requirements ¡ The type of heating and temperature or setting are set. ¡ A cooking time is set. 1. Press the button repeatedly until is highlighted in the display. 2. Press the or button. a The display shows the calculated end time. 3. Use the or button to delay the end time. a After a few seconds, the appliance applies the setting and the display shows the set end time.
en Basic settings a When the rapid heating process ends, an audible signal sounds and the heating indicator goes out. 3. Use the function selector to set a suitable type of heating. 4. Place the food in the cooking compartment. 11 Basic settings You can configure the basic settings for your appliance to meet your needs. 11.1 Overview of the basic settings Here you can find an overview of the basic settings and factory settings. The basic settings depend on the features of your appliance.
Cleaning and servicing en 12 Cleaning and servicing To keep your appliance working efficiently for a long time, it is important to clean and maintain it carefully. 12.1 Cleaning products In order to avoid damaging the various oven surfaces on the appliance, do not use unsuitable cleaning products. WARNING ‒ Risk of electric shock! An ingress of moisture can cause an electric shock. ▶ Do not use steam- or high-pressure cleaners to clean the appliance.
en Cleaning and servicing Cooking compartment Area Enamel surfaces Suitable cleaning agents ¡ Hot soapy water ¡ Vinegar water ¡ Oven cleaner Self-cleaning surfaces Glass cover for the oven light Rails - Information Soak any heavily soiled areas and use a brush or steel wool. Leave the appliance door open to dry the cooking compartment after cleaning it. Notes ¡ Enamel burns at very high temperatures, causing minor discolouration. The functionality of your appliance is not affected by this.
Shelf supports faces no longer clean themselves adequately during operation, heat up the cooking compartment specifically to the right temperature. ATTENTION! If you do not clean the self-cleaning surfaces regularly, they may become damaged. ▶ If dark stains are visible on the self-cleaning surfaces, heat up the cooking compartment. ▶ Do not use oven cleaner or abrasive cleaning aids.
en Appliance door 14 Appliance door To ensure that your appliance retains its appearance and remains fully functioning for a long time, you can detach the appliance door and clean it. 3. Open the appliance door approx. 45° wide. WARNING ‒ Risk of injury! If the hinges are not secured due to an incomplete lock, they can snap shut with great force. ▶ To detach or attach the appliance door, always turn the two locks as far as they will go.
Appliance door 5. ATTENTION! Opening and closing the appliance door when it is in the lock position damages the door hinges. ▶ Never force the appliance door open or closed. ▶ If the door hinge has been damaged, call the after-sales service. Move the appliance door up and down until you hear a quiet click. You can still only move the appliance door slightly. en 14.2 Attaching the appliance door 1. Tip: Ensure that the appliance door is not wedged at an angle and that it is properly fitted in place.
en Appliance door 5. WARNING ‒ Risk of injury! If the door locks are unsecured, the appliance door may become detached. ▶ After attaching the appliance door, close the leftand right-hand door locks. Hold the screwdriver horizontally and use it to push the door lock (black component) on each side of the door downwards as far as it will go . 4. Push down on the intermediate pane in the area of , and carefully lift the retainer to pull it out. until you are able 5.
Troubleshooting 1. Tip: When fitting the door panes, make sure that they are in the original order. Insert the intermediate pane in the direction of the arrow and push it in in the direction of the arrow until it is fitted in the frame. The arrow on the intermediate pane must line up with the arrow on the frame . 2. Push down on the intermediate pane around , slide the retainer in at an angle and push down until it clicks into place. en 3. Centre the inner pane on the appliance door. 4.
en Troubleshooting 15.1 Malfunctions Fault The appliance is not working. The appliance does not switch off fully at the end of a cooking time. Cause and troubleshooting The circuit breaker in the fuse box has tripped. ▶ Check the circuit breaker in the fuse box. There has been a power cut. ▶ Check whether the lighting in your kitchen or other appliances are working. At the end of a cooking time, the appliance stops heating up. The oven light and cooling fan do not switch off.
Disposal 6. Screw the glass cover on. 7. Take the tea towel out of the cooking compartment. en 8. Connect the appliance to the power supply. 16 Disposal Find out here how to dispose of old appliances correctly. 16.1 Disposing of old appliance Valuable raw materials can be reused by recycling. 1. Unplug the appliance from the mains. 2. Cut through the power cord. 3. Dispose of the appliance in an environmentally friendly manner.
en How it works Baking on three levels Baking tray Universal pan Baking tray Height 4 3 1 Notes ¡ When baking on several layers, always use hot air. Baked goods that are placed in the oven at the same time will not necessarily be ready at the same time. ¡ Position baking tins/dishes either next to one another or offset on different shelves so that they are not directly one above the other in the cooking compartment. ¡ For best results, we recommend using dark-coloured metal bakeware. 18.
How it works en 18.
en How it works 18.5 Yoghurt You can use your appliance to make your own yoghurt. 3. Cover the containers with foil, e. g. with cling film. 4. Place the containers on the cooking compartment floor. Preparing yoghurt 5. Set the appliance according to the recommended 1. Remove the accessories and shelf supports from 6. After making the yoghurt, leave it to cool in the refri- the cooking compartment. setting. gerator. 2. Pour the previously prepared yoghurt mixture into small containers, e.g.
Installation instructions Food Accessories/cookware Shelf pos- Type of ition heating Baking tray 3 Universal pan 3+1 + Baking tray Small cakes, 3 levels Universal pan 4+3+1 + Baking tray Hot water sponge cake Springform cake tin, 2 diameter 26 cm Hot water sponge cake Springform cake tin, 2 diameter 26 cm Hot water sponge cake, 2 levels Springform cake tin, 3+1 diameter 26 cm 1 Preheat the appliance for five minutes. Do not use the rapid heating function. 2 Preheat the appliance.
en Installation instructions 19.2 Appliance dimensions You will find the dimensions of the appliance here ¡ Wear protective gloves so that you do not cut yourself. Parts that are accessible during installation may have sharp edges. ¡ Dimensions of the figures in mm. WARNING ‒ Risk of fire! It is dangerous to use an extended power cord and non-approved adapters. ▶ Do not use multiple socket strips. ▶ Only use extension cables that are certified, have a minimum cross section of 1.
Installation instructions Hob type Induction hob Full-surface induction hob Gas hob Electric hob a raised in mm 37 47 30 27 19.5 Installation in a tall unit Observe the installation dimensions and the installation instructions when installing in a tall unit. ¡ To ventilate the appliance, the intermediate floors must have a ventilation cut-out. ¡ If the tall unit has another back panel in addition to the element back panels, this must be removed.
en Installation instructions ¡ The power cable must be plugged in at the rear of the appliance until you hear a clicking sound. A 3 m power cable can be obtained from the after-sales service. ¡ The power cable must only be replaced with a cable from the original manufacturer. This is available from after-sales service. ¡ Contact protection must be guaranteed by the installation. 1.
Installation instructions 6. If required, you can adjust the height of the appli- ance door using the adjustment screws on the left and right. Turning the screws clockwise makes the gap smaller Turning the screws anti-clockwise makes the gap larger 7. Screw the appliance into place. en 9. Open the appliance door slightly, then refit the pan- els and screw them in place, first at the top and then at the bottom.
Valid within Great Britain: Imported to Great Britain by BSH Home Appliances Ltd.