
Installation instructions
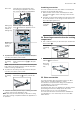
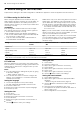
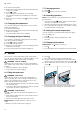
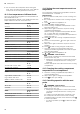
Table Of Contents
- Oven
- en
- Table of contents
- 1 Safety
- 2 Preventing material damage
- 3 Environmental protection and saving energy
- 4 Familiarising yourself with your appliance
- 5 Accessories
- 6 Before using for the first time
- 7 Basic operation
- 7.1 Switching on the appliance
- 7.2 Switching off the appliance
- 7.3 Residual heat indicator
- 7.4 Setting the type of heating and temperature
- 7.5 Changing the temperature
- 7.6 Changing the type of heating
- 7.7 Pausing operation
- 7.8 Cancelling operation
- 7.9 Viewing the current temperature
- 7.10 Displaying information
- 8 Steam
- 9 Time-setting options
- 10 Meat probe
- 11 Baking and roasting assistant
- 12 Steam programs
- 13 Childproof lock
- 14 Rapid heat-up
- 15 Sabbath mode
- 16 Basic settings
- 17 Home Connect
- 18 Cleaning and servicing
- 19 Cleaning functions
- 20 Rails
- 21 Appliance door
- 22 Troubleshooting
- 23 Disposal
- 24 Customer Service
- 25 Declaration of Conformity
- 26 How it works
- 26.1 General cooking tips
- 26.2 Baking tips
- 26.3 Roasting, braising and grilling tips
- 26.4 Steaming
- 26.5 Cooking frozen products
- 26.6 Cooking ready meals
- 26.7 List of foods
- 26.8 Special cooking methods and other applications
- 26.9 Test dishes
- 27 Installation instructions
- 27.1 General installation instructions
- 27.2 Appliance dimensions
- 27.3 Installation below a worktop
- 27.4 Installation underneath a hob
- 27.5 Installation in a tall unit
- 27.6 Installing two appliances on top of each other
- 27.7 Corner installation
- 27.8 Electrical connection
- 27.9 Installing the appliance
- 27.10 Removing the appliance

en Before using for the first time
12
6 Before using for the first time
Implement the settings for the initial configuration. Calibrate the appliance. Clean the appliance and accessories.
6.1 Before using for the first time
Before using the appliance for the first time, ask your
water supplier about the hardness of your tap water. To
ensure that the appliance can reliably remind you to
descale it when required, you must set your water hard-
ness range correctly.
ATTENTION!
If the wrong water hardness has been set, the appli-
ance cannot remind you to descale it at the right time.
▶ Set the water hardness correctly.
Using unsuitable liquids may damage the appliance.
▶ Do not use distilled water, highly chlorinated tap wa-
ter (>40 mg/l) or other liquids.
▶ Only use cold, fresh tap water, softened water or
non-carbonated mineral water.
Malfunctions may occur when using filtered or deminer-
alised water. The appliance may request that you top
up the water tank even though it may be full, or opera-
tion with steam is cancelled after approx. twominutes.
▶ If required, mix filtered or demineralised water with
the bottled non-carbonated mineral water with a ra-
tio of onetoone.
Tip:If you use mineral water, set the water hardness
range to "very hard". If you use mineral water, you must
only use non-carbonated mineral water.
Tip:If your tap water is very hard, we recommend that
you use softened water. If you use only softened water,
you can set your appliance to the "softened" water
hardness range.
Setting Water hardness in
mmol/l
German hardness in
°dH
French hardness °fH
0 (softened)
1
- - -
1 (soft) Up to 1.5 Up to 8.4 Up to 15
2 (moderately hard) 1.5-2.5 8.4-14 15-25
3 (hard) 2.5-3.8 14-21.3 25-38
4 (very hard)
2
Above 3.8 Above 21.3 Above 38
1
Only set this if you will be using solely softened water.
2
Also set for mineral water. Only use non-carbonated mineral water.
6.2 Initial use
When the appliance is connected to the power supply
for the first time or following a lengthy power failure, the
settings that you will need to configure before you can
use it will appear.
Notes
¡ You can change these settings at any time by going
to the basic settings.
→"Basic settings", Page24
¡ You can also use HomeConnect to configure the
settings. If your appliance is connected, follow the
instructions in the app.
Setting the language
1.
Connect the appliance to the power supply.
a The first setting will appear after a few seconds.
2.
Press the bottom row.
3.
Swipe left or right to select the required language.
4.
Press the top row.
Setting the time
1.
Press "Time".
2.
Press the bottom row.
3.
Swipe left or right to select the correct hour.
4.
Press "Minutes".
5.
Swipe left or right to select the correct number of
minutes.
6.
Use the button to save your settings.
Setting the date
1.
Press "Date".
2.
Press the bottom row.
3.
Swipe left or right to select the correct day.
4.
Press "Month".
5.
Swipe left or right to select the correct month.
6.
Press "Year".
7.
Swipe left or right to select the correct year.
8.
Use the button to save your settings.
Setting the water hardness
1.
Press "Water hardness".
2.
Swipe left or right to select the appropriate water
hardness.
→"Before using for the first time", Page12
3.
Use the button to finalise the initial configuration
process.
4.
Open and close the appliance door once.
a The appliance will perform a self-test, after which it
will be ready to use.
a Initial configuration is now complete.