Oven [en] User manual and installation instructions B48FT68.
en Safety Table of contents USER MANUAL 1 Safety .................................................................... 2 2 Preventing material damage ............................... 4 3 Environmental protection and saving energy ....................................................................... 5 4 Familiarising yourself with your appliance ........ 6 5 Accessories.......................................................... 9 6 Before using for the first time ...........................
Safety Loose food remnants, fat and meat juices may catch fire. ▶ Before using the appliance, remove the worst of the food residues and remnants from the cooking compartment, heating elements and accessories. Opening the appliance door creates a draught. Greaseproof paper may come into contact with the heating element and catch fire. ▶ Never place greaseproof paper loosely over accessories when preheating the appliance and while cooking.
en Preventing material damage WARNING ‒ Risk of suffocation! Children may put packaging material over their heads or wrap themselves up in it and suffocate. ▶ Keep packaging material away from children. ▶ Do not let children play with packaging material. Children may breathe in or swallow small parts, causing them to suffocate. ▶ Keep small parts away from children. ▶ Do not let children play with small parts. 1.5 Steam Follow these instructions when using a steam function.
Environmental protection and saving energy ▶ Never operate the appliance if the seal is damaged or missing. Sitting or placing objects on the appliance door may damage it. ▶ Do not place or hang objects on the appliance door. ▶ Do not place cookware or accessories on the appliance door. With certain models, accessories may scratch the door pane when closing the appliance door. ▶ Always push accessories fully into the cooking compartment. 2.2 Steam Follow these instructions when using the steam function.
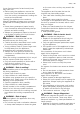
en Familiarising yourself with your appliance 4 Familiarising yourself with your appliance 4.1 Control panel You can use the control panel to configure all functions of your appliance and to obtain information about the operating status. 1 2 1 2 Display Buttons 4.2 Buttons The buttons are touch-sensitive areas. To select a function, press the corresponding button.
Familiarising yourself with your appliance 4.3 Display The display shows the current settings, options or relevant information. Direction Navigate to the left Navigate to the right Control You can configure all the functions on your appliance via the display. To adjust a setting, touch the appropriate place on the display with your finger. The settings area will then be displayed more brightly.
en Familiarising yourself with your appliance Symbol 8 Heating function CircoTherm hot air Temperature 40 - 200 °C Top/bottom heating 50 - 275 °C Circo-roasting 50 - 250 °C CircoTherm Intensive 50 - 275 °C Bread-baking setting 180 - 240 °C Grill, large area 50 - 290 °C Grill, small area 50 - 290 °C Bottom heating 50 - 250 °C Low Temperature Cooking 70 - 120 °C Dough proving 2 settings Sous-vide 50 - 95 °C Defrost 30 - 60 °C Use Bake or roast on one or more levels.
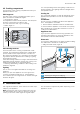
Accessories 4.6 Cooking compartment The functions in the cooking compartment make your appliance easier to use. Shelf supports The rails in the cooking compartment enable you to place accessories at different heights. → "Accessories", Page 9 Your appliance has four shelf positions. The shelf positions are numbered from bottom to top. You can remove the rails, e.g. for cleaning. → "Rails", Page 31 en For most operating modes, the lighting is switched on during operation.
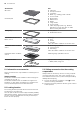
en Accessories Accessories Wire rack Universal pan Baking tray Unperforated steam container, size S Perforated steam container, size S Use ¡ Cake tins ¡ Ovenproof dishes ¡ Cookware ¡ Meat, e.g. roasting joints or steak ¡ Frozen meals ¡ Moist cakes ¡ Baked items ¡ Bread ¡ Large roasts ¡ Frozen meals ¡ Catch dripping liquids, e.g. fat when grilling food on the wire rack or water when cooking with steam.
Accessories Wire rack Insert the wire rack with the open side facing the appliance door and the curved lip facing downwards. Baking tray Slide the tray in with the sloping E.g. univer- edge towards the appliance door. sal pan or baking tray en Combining accessories You can combine the wire rack with the universal pan to catch any liquid that drips down. 1. Place the wire rack on the universal pan so that both spacers are on the rear edge of the universal pan. 2.
en Before using for the first time 6 Before using for the first time Implement the settings for the initial configuration. Calibrate the appliance. Clean the appliance and accessories. 6.1 Before using for the first time Before using the appliance for the first time, ask your water supplier about the hardness of your tap water. To ensure that the appliance can reliably remind you to descale it when required, you must set your water hardness range correctly.
Basic operation 6.3 Calibrating and cleaning the appliance You will need to calibrate the appliance and clean the cooking compartment and accessories before using it to cook food for the first time. Note: The boiling point of water depends on the air pressure. During the calibration process, the appliance makes adjustments to adapt it to the pressure conditions in the location where it is installed. Requirement: The cooking compartment must have cooled down completely. 1.
en Steam 3. Press the temperature. 4. Swipe left or right until the required temperature ap5. a a 6. pears in the middle. Press to start. The cooking time will appear on the display. The heat-up indicator bar visualises the rising temperature. When the food is ready, press to switch the appliance off. 7.5 Changing the temperature You can also change the temperature once you have started the appliance. 1. Press the temperature. 2.
Steam en 5. Fill the water tank with water up to the "max" mark. 6. Slide the full water tank back into the recess . When doing so, make sure that the water tank clicks into place in the retainers . Configuring the Steam heating function 1. Fill the water tank. → "Filling the water tank", Page 14 2. Press to switch the appliance on. 3. Press . 4. Swipe left or right to set "Steam" . 5. Press the bottom row to select the temperature. 6.
en Steam Configuring the Sous-vide heating function Notes ¡ During sous-vide cooking, more condensate forms on the cooking compartment floor than for other types of heating. ¡ If the water tank runs dry while sous-vide cooking, the operation is interrupted. Requirement: The cooking compartment must have cooled down completely. 1. ATTENTION! Risk of damage to kitchen units ▶ Do not fill the water tank a second time for the sous-vide cooking. Fill the water tank completely.
Steam en 5. Use the button to switch on steam assistance. 6. Swipe left or right to select the required steam Drying the cooking compartment intensity : – Low – Medium – High 7. Press to save your settings. 8. Press to start steam-assisted heating. a If the water tank runs dry during steam-assisted heating, "Fill water tank" will appear on the display. The appliance will continue to heat but without injecting steam into the cooking compartment.
en Time-setting options 3. Leave the cooking compartment to dry with the ap- 5. Leave the appliance door open for 1-2 minutes so pliance door open for 1 hour. 4. Remove limescale marks with a cloth soaked in vinegar, then wipe with clean water and dry with a soft cloth. that the cooking compartment dries completely. 9 Time-setting options Your appliance has different time-setting options, with which you can control its operation. 9.
Meat probe en a Once the cooking time has elapsed, an audible signal will sound. 8. Press any button to end the audible signal. Cancelling the Ready at time for delayed starts Changing the Ready at time for delayed starts a The end time corresponds to the current time plus the set cooking time. a The appliance will start heating using the set cooking time. 1. Press . 2. Press "Ready at" . 3. Swipe left or right to change the end time. 1. Press . 2. Swipe right to reset the end time.
en Meat probe ¡ Do not remove the meat probe when turning the food. Once you have turned the food, check that the meat probe is correctly positioned in the food. 10.3 Core temperatures of different foods Here you can find the suggested core temperatures of various different foods. These suggestions depend on the quality and the size/ shape of the food. Do not use frozen food.
Baking and roasting assistant en 11 Baking and roasting assistant The baking and roasting assistant helps you to use your appliance to cook various dishes by suggesting the optimal settings. The baking and roasting assistant helps you to make classic cakes, bread and roasts. The appliance selects the optimal heating function for you. The default temperature and cooking time can be changed according to your requirements. 11.
en Childproof lock ¡ ¡ ¡ ¡ ¡ ¡ ¡ ¡ ¡ ¡ ¡ ¡ ¡ ¡ ¡ ¡ ¡ ¡ ¡ ¡ ¡ ¡ ¡ ¡ ¡ ¡ ¡ ¡ ▶ Keep children at a safe distance.
Rapid heat-up en 2. Swipe left or right to select "MyProfile" . 3. Press the bottom row. 4. Swipe left or right to select the "Automatic childproof 5. 6. 7. 8. a lock". Press the bottom row. Swipe right to set the lock to "Activated". Press . Press "Save" to save your settings. When you switch off the appliance, will appear on the display. 13.3 Interrupting the automatic childproof lock 1. Press and hold the button until "Childproof lock deactivated" appears on the display. 2.
en Sabbath mode 14.5 Deactivating the "PowerBoost" function ▶ Use the button to deactivate the "PowerBoost" function early. 15 Sabbath mode You can set a cooking time of up to 74 hours using Sabbath mode. You can use top/bottom heating to keep food warm between 85 °C and 140 °C during this time without having to switch the appliance on or off. 15.1 Starting Sabbath mode Notes ¡ If you open the appliance door during operation, the appliance stops heating.
Home Connect 16.2 Changing MyProfile 1. 2. 3. 4. 5. 6. 7. 8. 9. Press to switch the appliance on. Press . Swipe left or right to select "MyProfile" . Press the bottom row. Swipe left or right to select a setting. Press the bottom row. Swipe left or right to change the setting. Press . To save your settings, press "Save". ‒ To discard your settings, press "Discard". 16.
en Home Connect Basic setting Wi-Fi Possible settings Switch on Switch off Network Connect to network Disconnect from network Connect to app - Remote control On Off Appliance information Explanation If Wi-Fi is activated, you can use Home Connect. In networked standby mode, the appliance requires a maximum of 2 W. If you disconnect the appliance from the network, all network information will be deleted. This setting is useful if you have new login details for the router.
Cleaning and servicing en Note: Please note that the Home Connect functions can only be utilised with the Home Connect app. Information on data protection can be retrieved in the Home Connect app. 18 Cleaning and servicing To keep your appliance working efficiently for a long time, it is important to clean and maintain it carefully. ▶ Do not use cleaning products with a high alcohol content. ▶ Do not use hard scouring pads or cleaning sponges. 18.
en Cleaning and servicing Cooking compartment Area Enamel surfaces Suitable cleaning agents ¡ Hot soapy water ¡ Vinegar water ¡ Oven cleaner Self-cleaning surfaces - Glass cover for the oven light Rails ¡ Hot soapy water Accessories ¡ Hot soapy water ¡ Oven cleaner Water tank ¡ Hot soapy water Meat probe ¡ Hot soapy water ¡ Hot soapy water Information Soak any heavily soiled areas and use a brush or steel wool. Leave the appliance door open to dry the cooking compartment after cleaning it.
Cleaning function 18.4 Cleaning self-cleaning surfaces in the cooking compartment The back panel in the cooking compartment is selfcleaning. The self-cleaning surfaces are coated with a porous, matte ceramic layer and have a coarse surface. When the appliance is in operation, the self-cleaning surfaces absorb splashes from baking, roasting or grilling and break them down.
en Cleaning function 2. Clean the smooth surfaces in the cooking compart- ment with a dish cloth or a soft brush. Remove stubborn food remnants using a stainless steel scouring pad. 3. Remove limescale with a cloth soaked in vinegar. Then wipe with clean water and rub dry with a soft cloth (including under the door seal). 4. If there is any stubborn dirt that you are unable to remove, run the cleaning aid again once the cooking compartment has cooled down. 5.
Rails en 20 Rails To thoroughly clean the rails and the cooking compartment, or to replace the rails, you can remove the rails. 3. Ensure that the hook is hooked onto the pin . 20.1 Changing the shelf position for the telescopic shelf The bars and telescopic shelves can be positioned in any order. For example, you can fit the telescopic shelf to the shelf position which you use the most frequently.
en Appliance door 21 Appliance door To clean the appliance door thoroughly, you can disassemble the appliance door. 3. Open the appliance door approx. 45° wide. WARNING ‒ Risk of injury! If the hinges are not secured due to an incomplete lock, they can snap shut with great force. ▶ To detach or attach the appliance door, always turn the two locks as far as they will go. ▶ If the hinge snaps closed when detaching or attaching the appliance door, do not reach into the hinge – call the after-sales service.
Appliance door 5. ATTENTION! Opening and closing the appliance door when it is in the lock position damages the door hinges. ▶ Never force the appliance door open or closed. ▶ If the door hinge has been damaged, call the after-sales service. Move the appliance door up and down until you hear a quiet click. You can still only move the appliance door slightly. en 21.2 Attaching the appliance door 1. Tip: Ensure that the appliance door is not wedged at an angle and that it is properly fitted in place.
en Appliance door 5. WARNING ‒ Risk of injury! If the door locks are unsecured, the appliance door may become detached. ▶ After attaching the appliance door, close the leftand right-hand door locks. Hold the screwdriver horizontally and use it to push the door lock (black component) on each side of the door downwards as far as it will go . 4. Slide the screwdriver in between the metal tab and the plastic. 5.
Appliance door 9. WARNING ‒ Risk of injury! Scratched glass in the appliance door may develop into a crack. ▶ Do not use any harsh or abrasive cleaners or sharp metal scrapers to clean the glass on the oven door, as they may scratch the surface. ATTENTION! Damage to the lighting. ▶ Do not clean or touch the LEDs . The LEDs are located on the right- and left-hand side in the appliance door. en 2.
en Troubleshooting 4. Insert the reflector gap and click it into place in the . 5. Insert the second reflector in the same way as the first. 6. Use glass cleaner to remove any finger marks from the reflectors if necessary. 7. Centre the inner pane on the appliance door. 8. Insert the inner pane into the door cover at an angle towards the back . 9. Insert the retaining bracket for the inner pane the opening into . 10.
Troubleshooting en Fault Appliance will not start or cuts out during operation. Cause and troubleshooting Malfunction ▶ Call the after-sales service. → "Customer Service", Page 39 The appliance is not Demo mode is activated in the basic settings. heating; appears 1. Briefly disconnect the appliance from the power supply by switching the circuit breaker in on the display. the fuse box off and then on again. 2. Deactivate Demo mode within the next 3 minutes in the → "Basic settings", Page 24.
en Disposal Fault "Fill water tank" appears in the display even though the water tank has been filled. Buttons are flashing. "Plopping" sounds can be heard when cooking with steam. The appliance hums during operation and after it is switched off. The appliance hums or clicks when the control panel is opened. The interior lighting does not work. Cause and troubleshooting The sensor is defective. ▶ Call the after-sales service. → "Customer Service", Page 39 Condensation has formed behind the control panel.
Customer Service en This appliance is labelled in accordance with European Directive 2012/19/EU concerning used electrical and electronic appliances (waste electrical and electronic equipment - WEEE). The guideline determines the framework for the return and recycling of used appliances as applicable throughout the EU. 24 Customer Service If you have any queries on use, are unable to rectify faults on the appliance yourself or if your appliance needs to be repaired, contact Customer Service.
en How it works 26 How it works Here, you can find the ideal settings for various types of food as well as the best accessories and cookware. We have perfectly tailored these recommendations to your appliance. 26.1 General cooking tips Please take note of the following information when cooking all types of food. ¡ The temperature and cooking time depend on the amount of food and the recipe. Settings ranges are specified for this reason. Try using the lower values to start with.
How it works Roasting in uncovered cookware ¡ Use a deep roasting dish. ¡ If you do not have any suitable cookware, you can use the universal pan. Roasting in covered cookware ¡ Use a suitable lid that seals well. ¡ When roasting meat, there should be at least 3 cm between the food and the lid. The meat may expand. WARNING ‒ Risk of scalding! Very hot steam may escape when the lid is opened after cooking. Steam may not be visible, depending on the temperature.
en How it works Food Sponge cake, 6 eggs Sponge cake, 6 eggs Sponge cake, 6 eggs Shortcrust tart with moist topping Yeast cake with moist topping Swiss roll Swiss roll Small yeast cakes Small yeast cakes Biscuits Biscuits, 2 levels Biscuits, 3 levels Bread, without a tin, 750 g Bread, free-form, 750 g Bread, without a tin, 1500 g Bread, free-form, 1500 g Bread, without a tin, 1500 g Flatbread Bread rolls, fresh Pizza, fresh, on a baking tray Pizza, fresh, on a baking tray, on 2 levels Accessories/coo
How it works Food Potato gratin, raw ingredients, 4 cm deep Chicken, 1 kg, unstuffed Chicken, 1 kg, unstuffed Chicken breast fillet, steaming Small chicken portions, 250 g each Small chicken portions, 250 g each Goose, unstuffed, 3 kg Goose, unstuffed, 3 kg Accessories/cook- Shelf pos- Heating ware ition function → Page 7 Ovenproof dish 2 Temperature in °C Steam in- Cooking time tensity in mins 160 - 190 - 50 - 70 Wire rack Wire rack Steaming tray 2 2 3 200 - 220 190-210 100 Medium - 60
en How it works Food Accessories/cook- Shelf pos- Heating ware ition function → Page 7 Shallow cookware 3 Steaming tray 3 Temperature in °C Steam in- Cooking time tensity in mins Long-grain rice, 1:1.5 100 20 - 30 Eggs, hard-boiled 100 10 - 12 1 Preheat the appliance. 2 At the start, pour approx. 100 ml of liquid into the cookware. The water tank must be topped up during operation. Desserts Making crème caramel or crème brulée 1. Use your preferred recipe to make the mixture for the crème. 2.
How it works en Recommended settings for slow cooking Food Accessory/cookware Duck breast, medium rare, 300 g each Fillet of pork, whole Uncovered ware Uncovered ware Uncovered ware Uncovered ware Uncovered ware Fillet of beef, 1 kg Veal medallions, 4 cm thick Saddle of lamb, boneless, 200 g each 1 Preheat the appliance.
en How it works ▶ Wash and disinfect your hands. ▶ Use disposable gloves, cooking tongs or grill tongs. ▶ Take extra care when preparing critical food, such as poultry, eggs and fish. ▶ Always thoroughly rinse and peel fruit and veget- ables. ▶ Always keep work surfaces and chopping boards clean. ▶ Use different chopping boards for different types of food. ▶ Only interrupt the cold chain briefly to prepare the food.
How it works Food Accessory/cookware Heating function Fillet of beef, piece, medium, 3–4 cm thick Wire rack + Universal pan Wire rack + Universal pan en Tips for sous-vide cooking Temperat- Cooking ure in °C time in mins 62 90 62 70 Wire rack + Universal pan Wire rack + Universal pan Wire rack + Universal pan 58 25 Cut into the layer of fat, season the meat side with a little salt and pepper, and vacuum-seal it along with a small piece of orange peel Vacuum-seal along with some butt
en How it works Proving dough Use the recommended settings when configuring the appliance settings. ‒ Do not open the appliance door while the dough is proving, otherwise moisture will escape. 2. Final fermentation: ‒ Continue processing the dough and turn it into the final shape for baking. ‒ Place the dough in the specified shelf position. 3. Wipe the cooking compartment dry before baking. ‒ Always allow dough to prove in two steps: Once in their entirety (1.
How it works The different added steam levels are suitable for keeping the following foods warm: ¡ Level 1: Joints and briefly roasted food en ¡ Level 2: Bakes and side dishes ¡ Level 3: Stews and soups 26.9 Test dishes The information in this section is provided for test institutes to facilitate testing of the appliance in accordance with EN 60350‑1. Baking ¡ The setting values apply to food that is placed into a cold cooking compartment.
en Installation instructions Steaming ¡ Perforated steaming tray, size XL: Shelf position 2 Slide the universal pan into the cooking compartment one level below the perforated steaming tray (size XL) if instructed to do so in the recommended settings table. Shelf positions when steaming on 2 levels: ¡ Use a maximum of 1.8 kg per level.
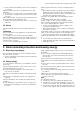
Installation instructions ¡ Cut-out work on the units should be carried out before installing the appliance. Remove any shavings. Otherwise, the correct operation of electrical components may be adversely affected. ¡ The mains socket for the appliance must either be located in the hatched area or outside of the area where the appliance is installed. Any unsecured units must be secured to the wall using a standard bracket . en and comply with the applicable national safety requirements.
en Installation instructions 27.4 Installation underneath a hob If the appliance is installed under a hob, the following minimum dimensions must be adhered to (including substructure, if applicable). Hob type Induction hob Full-surface induction hob Gas hob Electric hob a raised in mm 37 47 27 27 27.5 Installation in a tall unit Observe the installation dimensions and the installation instructions when installing in a tall unit.
Installation instructions ¡ Ensure that air exchange is guaranteed in accordance with the diagram. en ¡ Contact protection must be guaranteed by the installation. Electrically connect the appliance with the protective contact plug Note: The appliance must only be connected to a protective contact socket that has been correctly installed. ▶ Insert the plug into the protective contact socket. When the appliance is installed, the mains plug of the power cord must be freely accessible.
en Installation instructions 3. Centre the appliance. 7. Screw the appliance into place. There must be an air gap of at least 4 mm between the appliance and adjacent unit fronts. 4. Open the appliance door slightly and unscrew panels on the left and right. 8. For handleless kitchens with vertical bar handle strips: ‒ Attach a suitable filling piece in order to cover any sharp edges and to guarantee a safe installation. ‒ Pre-drill aluminium profiles to establish a screw connection .
Valid within Great Britain: Imported to Great Britain by BSH Home Appliances Ltd.