Oven [en] User manual and installation instructions B47VS34.
en Safety Table of contents USER MANUAL ¡ Keep the instruction manual and the product information safe for future reference or for the next owner. ¡ Do not connect the appliance if it has been damaged in transit. 1 Safety .................................................................... 2 1.2 Intended use 2 Preventing material damage ............................... 4 3 Environmental protection and saving energy .......................................................................
Safety Loose food remnants, fat and meat juices may catch fire. ▶ Before using the appliance, remove the worst of the food residues and remnants from the cooking compartment, heating elements and accessories. Opening the appliance door creates a draught. Greaseproof paper may come into contact with the heating element and catch fire. ▶ Never place greaseproof paper loosely over accessories when preheating the appliance and while cooking.
en Preventing material damage WARNING ‒ Danger: Magnetism! Permanent magnets are used in the control panel or in the controls. These may affect electronic implants, e.g. heart pacemakers or insulin pumps. ▶ Wearers of electronic implants must stay at least 10 cm away from the control panel. WARNING ‒ Risk of suffocation! Children may put packaging material over their heads or wrap themselves up in it and suffocate. ▶ Keep packaging material away from children.
Environmental protection and saving energy If the seal is very dirty, the appliance door will no longer close properly during operation. This may damage the front of adjacent kitchen units. ▶ Keep the seal clean at all times. ▶ Never operate the appliance if the seal is damaged or missing. Sitting or placing objects on the appliance door may damage it. ▶ Do not place or hang objects on the appliance door. ▶ Do not place cookware or accessories on the appliance door.
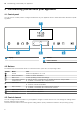
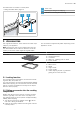
en Familiarising yourself with your appliance 4 Familiarising yourself with your appliance 4.1 Control panel You can use the control panel to configure all functions of your appliance and to obtain information about the operating status. 1 2 1 Display 3 2 2 3 Buttons Control element 4.2 Buttons The buttons are touch-sensitive areas. To select a function, press the corresponding button.
Familiarising yourself with your appliance Button Name Left Use Navigate to the left on the display Right Navigate to the right on the display Up Navigate upwards on the display Down Navigate downwards on the display en 4.4 Main menu The main menu provides an overview of your appliance's functions. Press the button to open the main menu.
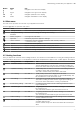
en Familiarising yourself with your appliance Symbol Heating function Dough proving Temperature 2 settings Defrost 30 - 60 °C Use For proving dough and culturing yoghurt. Dough will prove more quickly than at room temperature. The surface of the dough will not dry out. For gently defrosting frozen food. Keep warm 60 - 100 °C For keeping cooked food warm. Top/bottom heating eco 50 - 275 °C CircoTherm eco 40 - 200 °C Reheat 80 - 180 °C For gently cooking selected types of food.
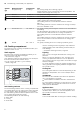
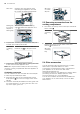
Accessories The water tank is behind the control panel. → "Filling the water tank", Page 13 1 1 2 3 2 en Tank cover Opening for filling and emptying Handle for removing and inserting 3 5 Accessories Use original accessories. These have been made especially for your appliance. Note: Accessories may become deformed if they get hot. Deformation has no effect on function. As the accessory cools down, it will regain its original shape.
en Accessories Wire rack Insert the wire rack with the open side facing the appliance door and the curved lip facing downwards. Baking tray Slide the tray in with the sloping E.g. univer- edge towards the appliance door. sal pan or baking tray Wire rack on universal pan 5.3 Removing accessories from the cooking compartment 1. Pull out the accessory on the telescopic shelf as far as the notch . Wire rack or baking tray 3.
Before using for the first time en 6 Before using for the first time Configure the settings for initial start-up. Clean the appliance and accessories. 6.1 Before using for the first time Before using the appliance for the first time, ask your water supplier about the hardness of your tap water. To ensure that the appliance can reliably remind you to descale it when required, you must set your water hardness range correctly.
en Basic operation 2. Wipe the smooth surfaces in the cooking compart- ment with a soft, damp cloth. 3. Press to switch the appliance on. → "Switching on the appliance", Page 12 4. Fill the water tank. → "Filling the water tank", Page 13 5. Set the required heating function, temperature and steam assistance for the heat-up process and press to start.
Steam en ▶ Press and hold the button until the function that is currently in progress is cancelled. a Operation will stop and all the settings will be reset. a The cooling fan will continue to run until the cooking compartment has cooled down. 7.9 Viewing the current temperature You can view the current temperature while the appliance is heating up. ▶ Press . a The temperature will be displayed for a few seconds. 7.10 Displaying information Requirement: The button must be lit. ▶ Press .
en Steam 7. Slowly slide the control panel downwards and then 5. Use the or button to select the required temperat- push it away from you until it is closed completely. 8.2 Refilling the water tank When "Fill water tank" appears on the display, you must refill the water tank. Notes ¡ Dough proving and Reheat functions: If you do not refill the water tank, the appliance will stop. Refill the water tank.
Steam en Ending steam-assisted heating 1. Press to switch the appliance off. 2. Empty the water tank and dry the cooking compart- ment. → "After every steam operation", Page 15 8.5 After every steam operation The remaining water is pumped back into the water tank after every operation with steam. Then empty and dry the water tank and the cooking compartment. Emptying the water tank WARNING ‒ Risk of burns! The water tank may heat up while the appliance is in operation.
en Time-setting options 9 Time-setting options Your appliance has different time-setting options, with which you can control its operation. 9.1 Overview of the time-setting options When you are setting a time, the time values will increase by greater increments as you scroll through the higher values. The cooking time, for example, can be set in 1-minute increments up to 1 hour, and then in 5minute increments thereafter.
Baking and roasting assistant en 3. Use the or button to change the end time. a The setting will then be applied. Cancelling the Ready at time for delayed starts 1. Press . 2. Use the button to reset the end time. a The end time corresponds to the current time plus the set cooking time. a The appliance will start heating using the set cooking time.
en Steam programs 11 Steam programs The steam programs help you to use your appliance to cook various dishes by selecting the optimal settings automatically. 11.1 Cookware The cooking result depends on the composition of the meat and the size of cookware. You should therefore use heat-resistant cookware that is suitable for temperatures up to 300 °C. Glass or glass ceramic cookware is best. The joint should cover approx. two thirds of the cookware base.
Rapid heat-up en Requirement: The appliance must be switched on. 1. Press . 2. Use the or button to select "MyProfile" . 3. Use the button to navigate to the next row. 4. Use the or button to select "Automatic childproof lock". 5. Use the button to select the required settings. 6. Use the button to set the lock to "Activated". 7. Press . 8. Use the button to save your settings. a When you switch off the appliance, will appear on the display. 12.3 Interrupting the automatic childproof lock 1.
en Sabbath mode a Once the set temperature has been reached, the "PowerBoost" function will switch itself off automatically and an audible signal will sound. will go out on the display. 13.5 Deactivating the "PowerBoost" function ▶ Use the button to deactivate the "PowerBoost" function early. 14 Sabbath mode You can set a cooking time of up to 74 hours using Sabbath mode.
Home Connect 15.2 Changing MyProfile 1. 2. 3. 4. 5. 6. 7. 8. 9. Press to switch the appliance on. Press . Use the or button to select "MyProfile" . Use the button to navigate to the next row. Use the or button to select a setting. Use the button to navigate to the next row. Use the or button to change the setting. Press . To save your settings, use the button to select "Save". ‒ To discard your settings, use the button to select "Discard". 15.
en Home Connect 16.2 Home Connect Settings You can adjust the settings and network settings for Home Connect by going to your appliance's basic settings. Which settings the display shows will depend on whether Home Connect has been set up and whether the appliance is connected to your home network.
Cleaning and servicing 16.6 Data protection Please see the information on data protection. The first time your appliance is registered on a home network connected to the Internet, your appliance will transmit the following types of data to the Home Connect server (initial registration): ¡ Unique appliance identification (consisting of appliance codes as well as the MAC address of the Wi-Fi communication module installed).
en Cleaning and servicing Area Stainless steel interior door frame Door handle Door seal Suitable cleaning agents Information Stainless steel cleaner Discolouration can be removed using stainless steel cleaner. Do not use stainless steel care products. ¡ Hot soapy water To avoid permanent stains, remove any descaling agent that gets onto the surface immediately. ¡ Hot soapy water Do not remove or scrub.
Cleaning functions en 17.3 Checking the cooking compartment seal after cleaning 17.4 Cleaning self-cleaning surfaces in the cooking compartment ▶ If the cooking compartment seal is on the left or The back panel, ceiling and side walls in the cooking compartment are self-cleaning and have a coarse surface. ATTENTION! If you do not clean the self-cleaning surfaces regularly, they may become damaged.
en Cleaning functions Configuring the EcoClean cleaning function WARNING ‒ Risk of burns! The outside of the appliance gets very hot when the cleaning function is in progress. ▶ Never touch the appliance door. ▶ Allow the appliance to cool down. ▶ Keep children at a safe distance. Requirements ¡ Prepare the appliance for the cleaning function. → Page 25 ¡ Do not open the appliance door while the appliance is in operation, as this will abort the cleaning function. 1. Press to switch the appliance on. 2.
Cleaning functions en 18.3 Descaling Setting the descaling process To ensure that your appliance continues to operate correctly, it must be descaled regularly. How frequently you need to run the descaling programme will depend on the water hardness and how many times you have used the steam function. The appliance indicates when only another five or fewer steam-assisted operations are possible. If you do not carry out the descaling, you can no longer set any operation with steam.
en Rails 19 Rails To thoroughly clean the rails and the cooking compartment, or to replace the rails, you can remove the rails. 3. Ensure that the hook is hooked onto the pin . 19.1 Changing the shelf position for the telescopic shelf The bars and telescopic shelves can be positioned in any order. For example, you can fit the telescopic shelf to the shelf position which you use the most frequently.
Appliance door en 20 Appliance door To clean the appliance door thoroughly, you can disassemble the appliance door. 3. Open the appliance door approx. 45° wide. WARNING ‒ Risk of injury! If the hinges are not secured due to an incomplete lock, they can snap shut with great force. ▶ To detach or attach the appliance door, always turn the two locks as far as they will go. ▶ If the hinge snaps closed when detaching or attaching the appliance door, do not reach into the hinge – call the after-sales service.
en Appliance door 5. ATTENTION! Opening and closing the appliance door when it is in the lock position damages the door hinges. ▶ Never force the appliance door open or closed. ▶ If the door hinge has been damaged, call the after-sales service. Move the appliance door up and down until you hear a quiet click. You can still only move the appliance door slightly. 20.2 Attaching the appliance door 1. Tip: Ensure that the appliance door is not wedged at an angle and that it is properly fitted in place.
Appliance door 5. WARNING ‒ Risk of injury! If the door locks are unsecured, the appliance door may become detached. ▶ After attaching the appliance door, close the leftand right-hand door locks. Hold the screwdriver horizontally and use it to push the door lock (black component) on each side of the door downwards as far as it will go . en 4. Push down on the intermediate pane lightly in the area of , and carefully lift the retainer are able to pull it out. 5.
en Troubleshooting 1. Tip: When fitting the door panes, make sure that they are in the original order. Insert the intermediate pane in the direction of the arrow and push it in in the direction of the arrow until it is fitted in the frame. 2. Push down lightly on the first intermediate pane around , slide the retainer in at an angle and push down until it clicks into place. a The retainer has been inserted. The arrow on the intermediate pane must line up with the arrow on the frame . 3.
Troubleshooting en 21.1 Malfunctions Fault The appliance is not working. Cause and troubleshooting The circuit breaker is faulty. ▶ Check the circuit breaker in the fuse box. There has been a power cut. ▶ Check whether the lighting in your kitchen or other appliances are working. "Language English" There has been a power cut. appears on the dis▶ Configure the initial configuration settings. play.
en Troubleshooting Fault "Fill water tank" appears in the display even though the water tank has been filled. Buttons are flashing. "Plopping" sounds can be heard when cooking with steam. The appliance hums during operation and after it is switched off. The appliance hums or clicks when the control panel is opened. The interior lighting does not work. Maximum operating time reached. A message with "D" or "E" appears in the display, e.g. D0111 or E0111. The cooking result is not satisfactory.
Disposal en 22 Disposal Find out here how to dispose of old appliances correctly. This appliance is labelled in accordance with European Directive 2012/19/EU concerning used electrical and electronic appliances (waste electrical and electronic equipment - WEEE). The guideline determines the framework for the return and recycling of used appliances as applicable throughout the EU. 22.1 Disposing of old appliance Valuable raw materials can be reused by recycling. 1. Unplug the appliance from the mains. 2.
en How it works AL BA MD 5 GHz WLAN (Wi-Fi): For indoor use only. ME MK RS UK UA 25 How it works Here, you can find the ideal settings for various types of food as well as the best accessories and cookware. We have perfectly tailored these recommendations to your appliance. 25.1 General cooking tips Please take note of the following information when cooking all types of food. ¡ The temperature and cooking time depend on the amount of food and the recipe.
How it works ¡ Add up to ½ litre of water to the universal pan, depending on the size and type of food that you want to roast. You can make a sauce from the juices that are collected. This also means that less smoke is produced and the cooking compartment does not become as dirty. Roasting in cookware If you cover the cookware when you cook your food, this will keep the cooking compartment cleaner. General information about roasting in cookware ¡ Use heat-resistant, ovenproof cookware.
en How it works Food Accessories/cook- Shelf pos- Heating ware ition function → Page 7 High Ø 23 cm tin 2 Plate Ø 20 cm 2 or Pie tin Plate Ø 20 cm 2 or Pie tin Plate Ø 20 cm 2 or Pie tin Dark coated 3 quiche tin Loaf tin, 1 x 900 g 2 or 2 x 450 g Loaf tin, 1 x 900 g 2 or 2 x 450 g Temperature in °C Steam in- Cooking time tensity in mins 140–160 160–170 - 120–180 55–65 170–190 - 55–70 170–190 - 60–75 190–210 - 35–45 - 20–30 30–40 Loaf tin, 1 x 900 g or 2 x 450 g Baking tray Baking tray 1
How it works Food en Temperature in °C Steam in- Cooking time tensity in mins Turkey, crown, 3 kg Accessories/cook- Shelf pos- Heating ware ition function → Page 7 Wire rack 2 140–150 100–140 Turkey, whole, 4-8 kg Turkey, whole, 7 kg Wire rack Wire rack 2 1 150 - 160 1. 140 - 150 2. 170 - 180 Diced meat, e.g. beef, pork, lamb, 500 g meat Diced meat, e.g.
en How it works To ensure that the climate in the cooking compartment remains constant, keep the cooking compartment door closed during slow cooking. 6. After slow cooking, remove the meat from the cooking compartment. 25.6 Special cooking methods and other applications Information and recommended settings for special cooking methods and other applications, e.g. slow cooking or preserving. Tips for slow cooking Here you will find tips for achieving good results when slow cooking food.
How it works Food Rich dough, e.g. panettone White bread White bread Accessory/cookware Shelf posi- Heating tion function → Page 7 Bowl on wire rack 1. 2 1. Tin/dish on the wire 2. 2 2. rack Bowl on wire rack 1. 2 1. Universal pan 2. 2 2. Bowl on wire rack 1. 2 1. Universal pan 2. 2 2. en Temperature in °C Cooking time in mins 1. 2 2. 2 1. 2. 1. 2. 35–40 35–40 1 1 1. 40–90 2. 30–60 1. 2. 1. 2. 30–40 15–25 30–40 15–25 Defrosting Reheating You can defrost frozen food in your appliance.
en Installation instructions Second wire rack: Shelf position 1 ¡ Shelf positions when baking on 3 levels: – Baking tray: Shelf position 4 – Universal pan: Shelf position 3 – Baking tray: Shelf position 1 ¡ Hot water sponge cake – When baking on two levels, place the springform tins at diagonally opposite corners of the wire racks.
Installation instructions 26.1 General installation instructions Follow these instructions before you start with the installation of the appliance. ¡ The safe operation of this appliance can only be guaranteed if it has been installed to a professional standard in accordance with these installation instructions. The installer shall be liable for damages incurred as a result of incorrect installation. ¡ Do not use the door handle for the transport or installation.
en Installation instructions 26.3 Installation below a worktop Observe the installation dimensions and the installation instructions when installing below a worktop. ¡ To ventilate the appliance, the intermediate floor must have a ventilation cut-out. ¡ The worktop must be secured to the built-in unit. ¡ Observe any available installation instructions for the hob. 26.
Installation instructions 26.6 Corner installation Observe the installation dimensions and the installation instructions when installing in a corner. en An all-pole isolating switch must be integrated into the permanent electrical installation according to the installation regulations. 1. Identify the phase and neutral conductors in the socket. The appliance may be damaged if it is not connected correctly. 2. Connect the hob in accordance with the connection diagram. See the rating plate for the voltage.
en Installation instructions 4. Open the appliance door slightly and unscrew pan- els on the left and right. 8. For handleless kitchens with vertical bar handle strips: ‒ Attach a suitable filling piece in order to cover any sharp edges and to guarantee a safe installation. ‒ Pre-drill aluminium profiles to establish a screw connection . ‒ Secure the appliance using a suitable screw . 5. Close the appliance door. 6.
Valid within Great Britain: Imported to Great Britain by BSH Home Appliances Ltd.