Oven [en] User manual and installation instructions B47VS34.
en Safety Table of contents USER MANUAL 1 Safety .................................................................... 2 2 Preventing material damage ............................... 4 3 Environmental protection and saving energy ....................................................................... 5 4 Familiarising yourself with your appliance ........ 6 5 Accessories.......................................................... 9 6 Before using for the first time ...........................
Safety Loose food remnants, fat and meat juices may catch fire. ▶ Before using the appliance, remove the worst of the food residues and remnants from the cooking compartment, heating elements and accessories. Opening the appliance door creates a draught. Greaseproof paper may come into contact with the heating element and catch fire. ▶ Never place greaseproof paper loosely over accessories when preheating the appliance and while cooking.
en Preventing material damage WARNING ‒ Risk of suffocation! Children may put packaging material over their heads or wrap themselves up in it and suffocate. ▶ Keep packaging material away from children. ▶ Do not let children play with packaging material. Children may breathe in or swallow small parts, causing them to suffocate. ▶ Keep small parts away from children. ▶ Do not let children play with small parts. 1.5 Steam Follow these instructions when using a steam function.
Environmental protection and saving energy ▶ Never operate the appliance if the seal is damaged or missing. Sitting or placing objects on the appliance door may damage it. ▶ Do not place or hang objects on the appliance door. ▶ Do not place cookware or accessories on the appliance door. With certain models, accessories may scratch the door pane when closing the appliance door. ▶ Always push accessories fully into the cooking compartment. 2.2 Steam Follow these instructions when using the steam function.
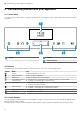
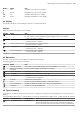
en Familiarising yourself with your appliance 4 Familiarising yourself with your appliance 4.1 Control panel You can use the control panel to configure all functions of your appliance and to obtain information about the operating status. 1 2 1 Display 3 2 2 3 Buttons Control element 4.2 Buttons The buttons are touch-sensitive areas. To select a function, press the corresponding button.
Familiarising yourself with your appliance Button Name Left Use Navigate to the left on the display Right Navigate to the right on the display Up Navigate upwards on the display Down Navigate downwards on the display en 4.4 Display The display shows the current settings, options or relevant information. Symbols Different symbols may appear on the display.
en Familiarising yourself with your appliance Symbol Heating function Top/bottom heating Temperature 50 - 275 °C Circo-roasting 50 - 250 °C CircoTherm Intensive 50 - 275 °C Bread-baking setting 180 - 240 °C Grill, large area 50 - 290 °C Grill, small area 50 - 290 °C Bottom heating 50 - 250 °C Low Temperature Cooking 70 - 120 °C Dough proving 2 settings Defrost 30 - 60 °C Use Traditionally bake or roast on one level. This type of heating is especially good for cakes with moist toppings.
Accessories Self-cleaning surfaces The self-cleaning surfaces in the cooking compartment are coated with a porous, matt ceramic layer and have a rough surface. When the appliance is in operation, the self-cleaning surfaces absorb splashes from roasting or grilling and break them down. The following surfaces are self-cleaning: ¡ Back wall ¡ Ceiling ¡ Side walls Use the cleaning function regularly to help retain the cleaning ability of the self-cleaning surfaces and prevent damage.
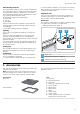
en Accessories 5.1 Locking function The locking function prevents the accessories from tilting when they are pulled out. You can pull out the accessories approximately halfway without them tipping. The accessories must be inserted into the cooking compartment correctly for the tilt protection to work properly. Wire rack or baking tray Position the accessory so that it is below the lug on the pull-out rail. 5.
Before using for the first time 5.4 Other accessories You can purchase other accessories from our aftersales service, specialist retailers or online. You will find a comprehensive range of products for your appliance in our brochures and online: www.neff-international.com en Accessories vary from one appliance to another. When purchasing accessories, always quote the exact product number (E no.) of your appliance.
en Basic operation 2. Use the or button to select the water hardness 3. 4. 5. a a range. → "Before using for the first time", Page 11 Use the button to navigate back to the top row. Use the button to save your settings. Open and close the appliance door once. The appliance will perform a self-test, after which it will be ready to use. Initial configuration is now complete. 5. Set the required heating function, temperature and steam assistance for the heat-up process and press to start.
Steam en 3. Use the button to navigate to the next row. 4. Use the or button to select the required temperat- a The cooling fan will continue to run until the cooking compartment has cooled down. ure. 5. Press to start. 7.7 Pausing operation 1. Press 2. Press . again to resume operation. 7.9 Viewing the current temperature You can view the current temperature while the appliance is heating up. ▶ Press . a The temperature will be displayed for a few seconds. 7.
en Steam 6. Slide the full water tank back into the recess . When doing so, make sure that the water tank clicks into place in the retainers . 9. Press any button to end the audible signal. 10. Empty the water tank and dry the cooking compart- ment. → "After every steam operation", Page 15 Reheat The "Reheat" function is used to warm up food that has already been cooked, or bread and pastries from the day before, without affecting its quality.
Steam en – Low – Medium – High 8. Press to start steam-assisted heating. a If the water tank runs dry during steam-assisted heating, "Fill water tank" will appear on the display. The appliance will continue to heat but without injecting steam into the cooking compartment. → "Refilling the water tank", Page 14 Cancelling steam-assisted cooking ▶ Press . a The appliance will continue to heat but without injecting steam into the cooking compartment. Ending steam-assisted heating 1.
en Time-setting options 5. Leave the appliance door open for 1-2 minutes so that the cooking compartment dries completely. 9 Time-setting options Your appliance has different time-setting options, with which you can control its operation. 9.1 Overview of the time-setting options When you are setting a time, the time values will increase by greater increments as you scroll through the higher values.
Baking and roasting assistant en 6. Use the button to select the required end time. 7. Press to confirm the delayed start. a The appliance will start at the appropriate time. a Once the cooking time has elapsed, an audible signal will sound. 8. Press any button to end the audible signal. Changing the Ready at time for delayed starts 1. Press . 2. Use the button to select "Ready at" . 3. Use the or button to change the end time. a The setting will then be applied.
en Steam programs 11 Steam programs The steam programs help you to use your appliance to cook various dishes by selecting the optimal settings automatically. 11.1 Cookware The cooking result depends on the composition of the meat and the size of cookware. You should therefore use heat-resistant cookware that is suitable for temperatures up to 300 °C. Glass or glass ceramic cookware is best. The joint should cover approx. two thirds of the cookware base.
Rapid heat-up en 1. 2. 3. 4. 5. 6. 7. 8. a Press . Use the or button to select "MyProfile" . Use the button to navigate to the next row. Use the or button to select "Automatic childproof lock". Use the button to select the required settings. Use the button to set the lock to "Activated". Press . Use the button to save your settings. When you switch off the appliance, will appear on the display. 12.3 Interrupting the automatic childproof lock 1.
en Sabbath mode 13.5 Deactivating the "PowerBoost" function ▶ Use the button to deactivate the "PowerBoost" function early. 14 Sabbath mode You can set a cooking time of up to 74 hours using Sabbath mode. You can use top/bottom heating to keep food warm between 85 °C and 140 °C during this time without having to switch the appliance on or off. 14.1 Starting Sabbath mode Notes ¡ If you open the appliance door during operation, the appliance stops heating.
Home Connect 6. 7. 8. 9. Use the button to navigate to the next row. Use the or button to change the setting. Press . To save your settings, use the button to select "Save". ‒ To discard your settings, use the button to select "Discard". 15.3 Changing your favourites In Favourites, you can set the heating functions that you want to appear in the heating functions menu.
en Home Connect Basic setting Wi-Fi Possible settings Switch on Switch off Network Connect to network Disconnect from network Connect to app - Remote control On Off Appliance information Explanation If Wi-Fi is activated, you can use Home Connect. In networked standby mode, the appliance requires a maximum of 2 W. If you disconnect the appliance from the network, all network information will be deleted. This setting is useful if you have new login details for the router.
Cleaning and servicing en Note: Please note that the Home Connect functions can only be utilised with the Home Connect app. Information on data protection can be retrieved in the Home Connect app. 17 Cleaning and servicing To keep your appliance working efficiently for a long time, it is important to clean and maintain it carefully. ▶ Do not use cleaning products with a high alcohol content. ▶ Do not use hard scouring pads or cleaning sponges. 17.
en Cleaning and servicing Cooking compartment Area Enamel surfaces Suitable cleaning agents ¡ Hot soapy water ¡ Vinegar water ¡ Oven cleaner Self-cleaning surfaces - Glass cover for the oven light Rails ¡ Hot soapy water Accessories ¡ Hot soapy water ¡ Oven cleaner ¡ Hot soapy water Water tank ¡ Hot soapy water Information Soak any heavily soiled areas and use a brush or steel wool. Leave the appliance door open to dry the cooking compartment after cleaning it.
Cleaning functions 17.4 Cleaning self-cleaning surfaces in the cooking compartment The back panel, ceiling and side walls in the cooking compartment are self-cleaning and have a coarse surface. ATTENTION! If you do not clean the self-cleaning surfaces regularly, they may become damaged. ▶ If dark stains are visible on the self-cleaning surfaces, use the cleaning function to clean the cooking compartment.
en Cleaning functions 6. Note: Keep the kitchen ventilated while the cleaning a a 7. 8. function is running. Press to start the cleaning function. The cleaning function will start. The duration will count down on the display. Once the cleaning function has run through to the end, an audible signal will sound. Press any button to end the audible signal. After using the cleaning function, wipe down the cooking compartment.
Rails en Preparing descaling ATTENTION! The length of time for which the descaler is left to work is based on the recommended, liquid descaler. Other descalers may damage the appliance. ▶ Only use the liquid descaler recommended by us for the descaling programme. If descaling solution comes into contact with the control panel or other delicate surfaces, it will damage them. ▶ Remove descaling solution immediately with water. 1.
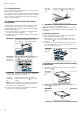
en Appliance door 2. Pull the whole rail to the front Fitting the bar 1. Fit the bar at the back and remove it. . 3. Clean the rail. 2. Slide the bar towards the back and hook it downwards onto the pin . 3. Ensure that the hook is hooked onto the pin . Detaching the rails WARNING ‒ Risk of burns! The shelf supports get very hot ▶ Never touch the shelf supports when hot. ▶ Always allow the appliance to cool down. ▶ Keep children at a safe distance. 1.
Appliance door 2. Hold the screwdriver horizontally and use it to push the door lock (black component) on each side of the door upwards as far as it will go . en 4. Insert the coin in the gap in the lock and rotate as far as it will go . ‒ Turn the lock on the left-hand side in a clockwise direction. ‒ Turn the lock on the right-hand side in an anticlockwise direction. Door lock open Left-hand lock secured The arrows point to each other Door lock closed Left-hand lock released 3.
en Appliance door 6. WARNING ‒ Risk of injury! The appliance door has a weight of 7–10 kg and may fall if it is not handled carefully. ▶ Handle the appliance door carefully. The door handle is not suitable for carrying the appliance door. The door handle may break off. ▶ Never carry the appliance door by the door handle. ▶ Grab hold of the appliance door with both hands on the left and right to carry it.
Appliance door en 6. 20.3 Removing the door panes To facilitate cleaning, you can remove the door pane. WARNING ‒ Risk of injury! Components inside the appliance door may have sharp edges. ▶ Wear protective gloves. Requirement: The appliance door is detached. 1. Lay the appliance door with the front side facing down on a flat surface that is soft and clean. 2. Undo and remove the left- and right-hand screws on the appliance door . 3.
en Troubleshooting 2. Push down lightly on the first intermediate pane around , slide the retainer in at an angle and push down until it clicks into place. 4. Insert the inner pane into the door cover at an angle towards the back the opening a The retainer has been inserted. . 5. Insert the retaining bracket for the inner pane into . 6. Screw both screws back in on the left and right of the appliance door. 3. Centre the inner pane on the appliance door.
Troubleshooting en Fault Appliance will not start or cuts out during operation. Cause and troubleshooting Different causes are possible. ▶ Check any notifications that appear on the display. → "Displaying information", Page 13 Malfunction ▶ Call the after-sales service. → "Customer Service", Page 35 The appliance is not Demo mode is activated in the basic settings. heating; appears 1. Briefly disconnect the appliance from the power supply by switching the circuit breaker in on the display.
en Disposal Fault "Plopping" sounds can be heard when cooking with steam. The appliance hums during operation and after it is switched off. The appliance hums or clicks when the control panel is opened. The interior lighting does not work. Maximum operating time reached. A message with "D" or "E" appears in the display, e.g. D0111 or E0111. The cooking result is not satisfactory. Cause and troubleshooting Water vapour requires the cold/heat effect for frozen food. No action required.
Customer Service en 23 Customer Service If you have any queries on use, are unable to rectify faults on the appliance yourself or if your appliance needs to be repaired, contact Customer Service. Function-relevant genuine spare parts according to the corresponding Ecodesign Order can be obtained from Customer Service for a period of at least 10 years from the date on which your appliance was placed on the market within the European Economic Area.
en How it works 25 How it works Here, you can find the ideal settings for various types of food as well as the best accessories and cookware. We have perfectly tailored these recommendations to your appliance. 25.1 General cooking tips Please take note of the following information when cooking all types of food. ¡ The temperature and cooking time depend on the amount of food and the recipe. Settings ranges are specified for this reason. Try using the lower values to start with.
How it works General information about roasting in cookware ¡ Use heat-resistant, ovenproof cookware. ¡ Place the cookware on the wire rack. ¡ Glass cookware is best. ¡ Follow the manufacturer's instructions for your roasting dishes. Roasting in uncovered cookware ¡ Use a deep roasting dish. ¡ If you do not have any suitable cookware, you can use the universal pan. Roasting in covered cookware ¡ Use a suitable lid that seals well.
en How it works Food Accessories/cook- Shelf pos- Heating ware ition function → Page 7 Plate Ø 20 cm 2 or Pie tin Dark coated 3 quiche tin Loaf tin, 1 x 900 g 2 or 2 x 450 g Loaf tin, 1 x 900 g 2 or 2 x 450 g Temperature in °C Steam in- Cooking time tensity in mins 170–190 - 60–75 190–210 - 35–45 - 20–30 30–40 Loaf tin, 1 x 900 g or 2 x 450 g Baking tray Baking tray 12-cup-tin Baking tray 12-cup-tin Baking tray Pizza tray 2 190–200 Added steam, medium - 180–200 1 140–160 1 140–1
How it works Food en Accessories/cook- Shelf pos- Heating ware ition function → Page 7 Covered cookware 2 Temperature in °C Steam in- Cooking time tensity in mins 140 - 100–120 Wire rack + Wire rack 4+1 180 - Complete meal with chicken, 1.
en How it works Issue You want to slow cook a duck breast. Tip ¡ Place the cold duck breast into a pan. ¡ Sear the skin side first. ¡ Slow cook the duck breast. ¡ After slow cooking, grill the duck breast for 3 to 5 minutes until crispy. Issue You want to serve your slow-cooked meat as hot as possible. Tip ¡ Preheat the serving plate. ¡ Make sure that the sauces that accompany the duck breast are very hot when you serve them.
How it works ¡ When defrosting food, use the following shelf positions: – 1 wire rack: Shelf position 2 – 2 wire racks: Shelf positions 3 + 1 ¡ Stir or turn the food 1-2 times during defrosting. Turn large items several times. Split the food into smaller pieces as it defrosts. Remove pieces that have already defrosted from the cooking compartment. ¡ Once the food has defrosted, switch off the appliance and leave the food in the appliance for another 10 to 30 minutes to allow the temperature to equalise.
en Installation instructions Food Viennese whirls, on 3 levels Small cakes Small cakes Small cakes, on 2 levels Small cakes, on 3 levels Hot water sponge cake Hot water sponge cake Hot water sponge cake Accessories/cook- Shelf pos- Heating ware ition function → Page 7 x2 4+3+1 Baking tray + x1 Universal pan Baking tray 3 Baking tray 3 Universal pan 3+1 + Baking tray x2 4+3+1 Baking tray + x1 Universal pan Springform cake 2 tin, diameter 26 cm Springform cake 2 tin, diameter 26 cm
Installation instructions ¡ Fitted units must be heat-resistant up to 95 °C, and adjacent unit fronts up to 70 °C. ¡ Do not install the appliance behind a decorative door or the door of a kitchen unit. There is a risk of overheating. ¡ Cut-out work on the units should be carried out before installing the appliance. Remove any shavings. Otherwise, the correct operation of electrical components may be adversely affected.
en Installation instructions 26.4 Installation underneath a hob If the appliance is installed under a hob, the following minimum dimensions must be adhered to (including substructure, if applicable). Hob type Induction hob Full-surface induction hob Gas hob Electric hob a raised in mm 37 47 27 27 26.5 Installation in a tall unit Observe the installation dimensions and the installation instructions when installing in a tall unit.
Installation instructions ¡ Ensure that air exchange is guaranteed in accordance with the diagram. en ¡ Contact protection must be guaranteed by the installation. Electrically connect the appliance with the protective contact plug Note: The appliance must only be connected to a protective contact socket that has been correctly installed. ▶ Insert the plug into the protective contact socket. When the appliance is installed, the mains plug of the power cord must be freely accessible.
en Installation instructions 3. Centre the appliance. 7. Screw the appliance into place. There must be an air gap of at least 4 mm between the appliance and adjacent unit fronts. 4. Open the appliance door slightly and unscrew panels on the left and right. 8. For handleless kitchens with vertical bar handle strips: ‒ Attach a suitable filling piece in order to cover any sharp edges and to guarantee a safe installation. ‒ Pre-drill aluminium profiles to establish a screw connection .
Valid within Great Britain: Imported to Great Britain by BSH Home Appliances Ltd.