
Installation Instruction
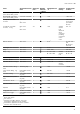
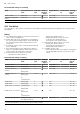


Table Of Contents
- Oven
- en
- Table of contents
- 1 Safety
- 2 Preventing material damage
- 3 Environmental protection and saving energy
- 4 Familiarising yourself with your appliance
- 5 Accessories
- 6 Before using for the first time
- 7 Basic operation
- 7.1 Switching on the appliance
- 7.2 Switching off the appliance
- 7.3 Residual heat indicator
- 7.4 Setting the type of heating and temperature
- 7.5 Changing the temperature
- 7.6 Changing the type of heating
- 7.7 Pausing operation
- 7.8 Cancelling operation
- 7.9 Viewing the current temperature
- 7.10 Displaying information
- 8 Steam
- 9 Time-setting options
- 10 Baking and roasting assistant
- 11 Steam programs
- 12 Childproof lock
- 13 Rapid heat-up
- 14 Sabbath mode
- 15 Basic settings
- 16 Home Connect
- 17 Cleaning and servicing
- 18 Cleaning functions
- 19 Rails
- 20 Appliance door
- 21 Troubleshooting
- 22 Disposal
- 23 Customer Service
- 24 Declaration of Conformity
- 25 How it works
- 25.1 General cooking tips
- 25.2 Baking tips
- 25.3 Roasting, braising and grilling tips
- 25.4 Cooking instructions for ready meals
- 25.5 Steaming
- 25.6 List of foods
- 25.7 Special cooking methods and other applications
- 25.8 Test dishes
- 26 Installation instructions

en How it works
44
Recommended settings for reheating
Food Accessories/cook-
ware
Shelf pos-
ition
Heating
function
→Page7
Temperature in
°C
Steam intens-
ity
Cooking
time in
mins
Pizza, cooked Wire rack 2 170 - 180
1
- 5 - 15
Bread rolls, baguette,
baked
Wire rack 2 160 - 170
1
- 10 - 20
1
Preheat the appliance.
25.8 Test dishes
The information in this section is provided for test institutes to facilitate testing of the appliance in accordance with
EN 60350‑1.
Baking
¡ The setting values apply to food that is placed into a
cold cooking compartment.
¡ Please take note of the information on preheating in
the recommended settings tables. These setting val-
ues assume that the rapid heat-up function is not
being used.
¡ For baking, use the lower of the specified temperat-
ures to start with.
¡ Items that are placed in the appliance on baking
trays or in baking tins/dishes at the same time will
not necessarily be ready at the same time.
¡ Shelf positions when baking on 2levels:
– Universal pan: Shelf position3
Baking tray: Shelf position1
– Baking tins/dishes on the wire rack:
First wire rack: Shelf position3
Second wire rack: Shelf position1
¡ Shelf positions when baking on 3levels:
– Baking tray: Shelf position4
– Universal pan: Shelf position3
– Baking tray: Shelf position1
¡ Hot water sponge cake
– When baking on two levels, place the springform
tins at diagonally opposite corners of the wire
racks.
Recommended settings for baking
Food Accessories/cook-
ware
Shelf pos-
ition
Heating
function
→Page7
Temperature in
°C
Steam intens-
ity
Cooking
time in
mins
Viennese whirls Baking tray 3 140 - 150
1
- 25 - 40
Viennese whirls Baking tray 3 140 - 150
1
- 25 - 40
Viennese whirls, on
2levels
Universal pan
+
Baking tray
3+1 140 - 150
1
- 30 - 40
Viennese whirls, on
3levels
x2
Baking tray
+
x1
Universal pan
4+3+1 130 - 140
1
- 35 - 55
Small cakes Baking tray 3 160
1
- 20 - 30
Small cakes Baking tray 3 150
1
- 25 - 35
Small cakes, on 2levels Universal pan
+
Baking tray
3+1 150
1
- 25 - 35
Small cakes, on 3levels x2
Baking tray
+
x1
Universal pan
4+3+1 140
1
- 35 - 45
Hot water sponge cake Springform cake
tin, diameter 26 cm
2 160 - 170
2
- 25 - 35
1
Preheat the appliance for five minutes. Do not use the rapid heating function.
2
Preheat the appliance. Do not use the rapid heating function.