
Installation Instruction
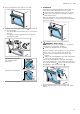
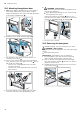
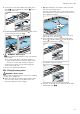

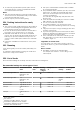
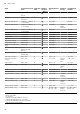
Table Of Contents
- Oven
- en
- Table of contents
- 1 Safety
- 2 Preventing material damage
- 3 Environmental protection and saving energy
- 4 Familiarising yourself with your appliance
- 5 Accessories
- 6 Before using for the first time
- 7 Basic operation
- 7.1 Switching on the appliance
- 7.2 Switching off the appliance
- 7.3 Residual heat indicator
- 7.4 Setting the type of heating and temperature
- 7.5 Changing the temperature
- 7.6 Changing the type of heating
- 7.7 Pausing operation
- 7.8 Cancelling operation
- 7.9 Viewing the current temperature
- 7.10 Displaying information
- 8 Steam
- 9 Time-setting options
- 10 Baking and roasting assistant
- 11 Steam programs
- 12 Childproof lock
- 13 Rapid heat-up
- 14 Sabbath mode
- 15 Basic settings
- 16 Home Connect
- 17 Cleaning and servicing
- 18 Cleaning functions
- 19 Rails
- 20 Appliance door
- 21 Troubleshooting
- 22 Disposal
- 23 Customer Service
- 24 Declaration of Conformity
- 25 How it works
- 25.1 General cooking tips
- 25.2 Baking tips
- 25.3 Roasting, braising and grilling tips
- 25.4 Cooking instructions for ready meals
- 25.5 Steaming
- 25.6 List of foods
- 25.7 Special cooking methods and other applications
- 25.8 Test dishes
- 26 Installation instructions

How it works en
39
¡ To catch any liquids that drip down, place the uni-
versal pan into the cooking compartment at least
one level below the wire rack.
Notes
¡ The grill element switches on and off continuously.
This is normal. The temperature that you set determ-
ines how frequently this occurs.
¡ Smoke may be produced when grilling.
25.4 Cooking instructions for ready
meals
¡ The cooking result greatly depends on the quality of
the food. Pre-browning and irregularities are some-
times already present on the raw product.
¡ Do not use frozen products that are covered with a
thick layer of ice. Remove any ice on the food.
¡ Distribute foods that are in the form of separate
pieces, such as bread rolls and potato products, so
that they are spread out flat and evenly on the ac-
cessory. Leave a little space between the individual
pieces.
¡ Follow the manufacturer's instructions on the pack-
aging.
25.5 Steaming
Cook dishes gently. The food remains particularly suc-
culent.
In contrast to steam-assisted cooking, the meat does
not become crispy on the outside.
¡ Use open, heat-resistant cookware that is suitable
for cooking with steam.
¡ The perforated steam container (size XL) is the best
option here. To catch any liquid that drips down,
slide in the universal pan one level below in the
cooking compartment.
You can also use a glass tray and place this onto
the wire rack.
¡ Cover food that can normally be cooked in a water
bath, with film, e.g. with cling film.
¡ You do not need to turn the food.
¡ For a different flavour, you can sear the meat,
poultry or fish before steaming. Reduce the cooking
time.
¡ Larger pieces require a longer heating-up time and
a longer cooking time.
¡ If you are using several pieces which are the same
weight, the appliance's heating-up time is increased.
The cooking time remains the same.
¡ In the main part of the instruction manual, you can
find information on how to set the steam function.
→"Steam", Page13
Vegetables on several levels
You can easily cook more than one type of food or
even whole menus, e.g. broccoli and potatoes, on two
levels.
Rice or cereals
¡ Add water or liquid in the indicated ratio.
For example, this means 1:1.5 for 100g of rice,
150ml liquid.
25.6 List of foods
Recommended settings for a variety of foods, sorted into food categories.
Recommended settings for various types of food
Food Accessories/cook-
ware
Shelf pos-
ition
Heating
function
→Page7
Temperature in
°C
Steam in-
tensity
Cooking time
in mins
Victoria sponge cake x2
Baking tin, dia.
20cm
2 160–170
1
- 20–25
Victoria sponge cake x 2
Baking tin, dia.
20cm
2 150–160 Added
steam,
low
25–35
Rich fruit cake High Ø23cm tin 2 130–150 - 150–180
Rich fruit cake High Ø23cm tin 2 140–160 - 120–180
Fruit pie Plate Ø20cm
or
Pie tin
2 160–170 - 55–65
Fruit pie Plate Ø20cm
or
Pie tin
2 170–190 - 55–70
1
Preheat the appliance.
2
Bone side down
3
Do not turn
4
Add the food after approx. one hour.
5
Preheat the appliance for 5 minutes.
6
Preheat the appliance for three minutes.
7
Turn the dish several times.