
Installation Instruction

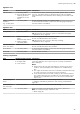
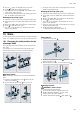
Table Of Contents
- Oven
- en
- Table of contents
- 1 Safety
- 2 Preventing material damage
- 3 Environmental protection and saving energy
- 4 Familiarising yourself with your appliance
- 5 Accessories
- 6 Before using for the first time
- 7 Basic operation
- 7.1 Switching on the appliance
- 7.2 Switching off the appliance
- 7.3 Residual heat indicator
- 7.4 Setting the type of heating and temperature
- 7.5 Changing the temperature
- 7.6 Changing the type of heating
- 7.7 Pausing operation
- 7.8 Cancelling operation
- 7.9 Viewing the current temperature
- 7.10 Displaying information
- 8 Steam
- 9 Time-setting options
- 10 Baking and roasting assistant
- 11 Steam programs
- 12 Childproof lock
- 13 Rapid heat-up
- 14 Sabbath mode
- 15 Basic settings
- 16 Home Connect
- 17 Cleaning and servicing
- 18 Cleaning functions
- 19 Rails
- 20 Appliance door
- 21 Troubleshooting
- 22 Disposal
- 23 Customer Service
- 24 Declaration of Conformity
- 25 How it works
- 25.1 General cooking tips
- 25.2 Baking tips
- 25.3 Roasting, braising and grilling tips
- 25.4 Cooking instructions for ready meals
- 25.5 Steaming
- 25.6 List of foods
- 25.7 Special cooking methods and other applications
- 25.8 Test dishes
- 26 Installation instructions

en Cleaning and servicing
26
Area Suitable cleaning agents Information
Accessories ¡ Hot soapy water
¡ Oven cleaner
Soak any heavily soiled areas and use a brush or steel wool.
Enamelled accessories are dishwasher-safe.
Do not use stainless steel wool on steam containers made from
stainless steel.
Use a vinegar solution to remove any dirt on stainless steel steam
containers caused by starchy foods (e.g. rice).
Water tank ¡ Hot soapy water To remove residual detergent after cleaning, rinse thoroughly with
clean water.
To dry the water tank after cleaning, leave the water tank to dry with
the lid open. Dry the seal on the lid.
Do not clean in the dishwasher.
17.2 Cleaning the appliance
In order to avoid damaging the appliance, you must
clean your appliance only as specified, and with suit-
able cleaning products.
WARNING‒Risk of burns!
The appliance and its parts that can be touched be-
come hot during use.
▶
Caution should be exercised here in order to avoid
touching heating elements.
▶
Young children under 8 years of age must be kept
away from the appliance.
WARNING‒Risk of fire!
Loose food remnants, fat and meat juices may catch
fire.
▶
Before using the appliance, remove the worst of the
food residues and remnants from the cooking com-
partment, heating elements and accessories.
Requirement:Read the information on cleaning
products.
→"Cleaning products", Page24
1.
Clean the appliance using hot soapy water and a
dish cloth.
‒ For some surfaces, you can use alternative
cleaning agents.
→"Suitable cleaning agents", Page24
2.
Dry with a soft cloth.
17.3 Checking the cooking compartment
seal after cleaning
▶
If the cooking compartment seal is on the left or
right of the spacer , slide the cooking compart-
ment seal inwards until it is beside the spacer .
17.4 Cleaning self-cleaning surfaces in
the cooking compartment
The back panel, ceiling and side walls in the cooking
compartment are self-cleaning and have a coarse sur-
face.
ATTENTION!
If you do not clean the self-cleaning surfaces regularly,
they may become damaged.
▶
If dark stains are visible on the self-cleaning sur-
faces, use the cleaning function to clean the cook-
ing compartment.
▶
If a prompt to clean appears in the display, use the
cleaning function to clean the cooking compart-
ment.
▶
Do not use oven cleaner or abrasive cleaning aids.
If oven cleaner accidentally comes into contact with
the self-cleaning surfaces, dab it off immediately us-
ing water and a sponge cloth. Do not rub.
▶
Use the cleaning function.
→"EcoClean cleaning function", Page27