Oven [en] User manual and installation instructions B47FS34.
en Safety Table of contents USER MANUAL ¡ Keep the instruction manual and the product information safe for future reference or for the next owner. ¡ Do not connect the appliance if it has been damaged in transit. 1 Safety .................................................................... 2 1.2 Intended use 2 Preventing material damage ............................... 4 3 Environmental protection and saving energy .......................................................................
Safety Loose food remnants, fat and meat juices may catch fire. ▶ Before using the appliance, remove the worst of the food residues and remnants from the cooking compartment, heating elements and accessories. Opening the appliance door creates a draught. Greaseproof paper may come into contact with the heating element and catch fire. ▶ Never place greaseproof paper loosely over accessories when preheating the appliance and while cooking.
en Preventing material damage WARNING ‒ Danger: Magnetism! Permanent magnets are used in the control panel or in the controls. These may affect electronic implants, e.g. heart pacemakers or insulin pumps. ▶ Wearers of electronic implants must stay at least 10 cm away from the control panel. WARNING ‒ Risk of suffocation! Children may put packaging material over their heads or wrap themselves up in it and suffocate. ▶ Keep packaging material away from children.
Environmental protection and saving energy If the seal is very dirty, the appliance door will no longer close properly during operation. This may damage the front of adjacent kitchen units. ▶ Keep the seal clean at all times. ▶ Never operate the appliance if the seal is damaged or missing. Sitting or placing objects on the appliance door may damage it. ▶ Do not place or hang objects on the appliance door. ▶ Do not place cookware or accessories on the appliance door.
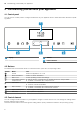
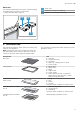
en Familiarising yourself with your appliance 4 Familiarising yourself with your appliance 4.1 Control panel You can use the control panel to configure all functions of your appliance and to obtain information about the operating status. 1 2 1 Display 3 2 2 3 Buttons Control element 4.2 Buttons The buttons are touch-sensitive areas. To select a function, press the corresponding button.
Familiarising yourself with your appliance Button Name Left Use Navigate to the left on the display Right Navigate to the right on the display Up Navigate upwards on the display Down Navigate downwards on the display en 4.4 Main menu The main menu provides an overview of your appliance's functions. Press the button to open the main menu.
en Familiarising yourself with your appliance Symbol Heating function Slow cooking Temperature 70 - 120 °C Dough proving 2 settings Defrost 30 - 60 °C Use For gentle, slow cooking of seared, tender pieces of meat in ovenware without a lid. Heat is emitted evenly from above and below at a low temperature. For proving dough and culturing yoghurt. Dough will prove more quickly than at room temperature. The surface of the dough will not dry out. For gently defrosting frozen food.
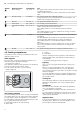
Accessories Water tank You need the water tank for the types of steam heating. The water tank is behind the control panel. → "Filling the water tank", Page 13 1 1 2 3 en Tank cover Opening for filling and emptying Handle for removing and inserting 2 3 5 Accessories Use original accessories. These have been made especially for your appliance. Note: Accessories may become deformed if they get hot. Deformation has no effect on function. As the accessory cools down, it will regain its original shape.
en Accessories 5.1 Information on accessories Some accessories are only suitable for certain types of heating. Wire rack or baking tray Position the accessory so that it is below the lug on the pull-out rail. Steam container The steam containers are suitable for steam-only types of heating up to 120 °C. The steam containers are not suitable for higher temperatures or other types of heating. The containers become permanently discoloured and deformed. 5.
Before using for the first time 5.5 Other accessories You can purchase other accessories from our aftersales service, specialist retailers or online. You will find a comprehensive range of products for your appliance in our brochures and online: www.neff-international.com en Accessories vary from one appliance to another. When purchasing accessories, always quote the exact product number (E no.) of your appliance.
en Basic operation 2. Use the or button to select the water hardness 3. 4. 5. a a range. → "Before using for the first time", Page 11 Use the button to navigate back to the top row. Use the button to save your settings. Open and close the appliance door once. The appliance will perform a self-test, after which it will be ready to use. Initial configuration is now complete. 6.
Steam en 7.3 Residual heat indicator 7.6 Changing the type of heating After you have switched off the appliance, the residual heat indicator will appear on the display. If you switch to a different heating function, the appliance will reset all the settings. 1. Press to pause operation. 2. Use the or button to select the required heating function. 3. Use the button to navigate to the next row. 4. Use the or button to select the required temperature. 5. Press to start.
en Steam Requirement: The water hardness must be set correctly. → "Before using for the first time", Page 11 1. Press . a The control panel will pop out automatically. 2. Pull the control panel towards you with both hands and then push it upwards until it clicks into place . 3. Lift the water tank and remove it from the water tank recess . 8.2 Refilling the water tank When "Fill water tank" appears on the display, you must refill the water tank.
Steam en Use the button to navigate to the next row. If necessary, use the button to set setting 2. Use the button to navigate to the next row. Use the or button to select the required proving time. 8. Press to start the dough proving process. → "Pausing operation", Page 13 → "Cancelling operation", Page 13 a If the water tank runs dry during the dough proving process, dough proving will be paused.
en Steam 8.5 After every steam operation The remaining water is pumped back into the water tank after every operation with steam. Then empty and dry the water tank and the cooking compartment. Emptying the water tank WARNING ‒ Risk of burns! The water tank may heat up while the appliance is in operation. ▶ Wait until the water tank has cooled down from the previous operation. ▶ Remove the water tank from the tank recess.
Time-setting options en 9 Time-setting options Your appliance has different time-setting options, with which you can control its operation. 9.1 Overview of the time-setting options When you are setting a time, the time values will increase by greater increments as you scroll through the higher values. The cooking time, for example, can be set in 1-minute increments up to 1 hour, and then in 5minute increments thereafter.
en Baking and roasting assistant 3. Use the or button to change the end time. a The setting will then be applied. Cancelling the Ready at time for delayed starts 1. Press . 2. Use the button to reset the end time. a The end time corresponds to the current time plus the set cooking time. a The appliance will start heating using the set cooking time.
Steam programs en 11 Steam programs The steam programs help you to use your appliance to cook various dishes by selecting the optimal settings automatically. 11.1 Cookware The cooking result depends on the composition of the meat and the size of cookware. You should therefore use heat-resistant cookware that is suitable for temperatures up to 300 °C. Glass or glass ceramic cookware is best. The joint should cover approx. two thirds of the cookware base.
en Childproof lock 12 Childproof lock You can secure your appliance to prevent children from accidentally switching it on or changing the settings. 2. Press to switch the appliance on and then start it up. 12.1 Locks 12.4 Deactivating the automatic childproof lock Your appliance has two different locks: 1. Press and hold the Lock Automatic childproof lock One-time childproof lock Activate/deactivate Via the MyProfile menu Using the button 12.
Sabbath mode en 13.2 Activating the "Rapid heat-up" function 13.4 Activating the "PowerBoost" function 1. Set Top/bottom heating 1. Place the food on a single level in the cooking com- 2. 2. Set CircoTherm hot air a 3. a a 4. and a temperature of at least 100 °C. Press to start. The button will be lit. Use the button to activate the "Rapid heat-up" function. will appear on the display.
en Home Connect Basic setting Button tone Selection ¡ Off (except for ) ¡ On Display brightness 5 settings Clock display ¡ Digital ¡ Off Lighting ¡ On during operation ¡ Off during operation Automatic childproof ¡ Deactivated lock ¡ Activated Operation after ¡ Main menu switch-on ¡ Types of heating ¡ Steam ¡ Baking and roasting assistant ¡ Steam programs Night-time dimming ¡ Switched off ¡ On (display dimmed between 10 p.m. and 5.59 a.m.
Home Connect en 2. Open the Home Connect app and scan the follow- 16.1 Setting up Home Connect Requirements ¡ The appliance is connected to the power supply and is switched on. ¡ You have a mobile device with a current version of the iOS or Android operating system, e.g. a smartphone. ¡ The mobile device and the appliance are within range of your home network's Wi-Fi signal. 1. Download the Home Connect app. ing QR code. 3. Follow the instructions in the Home Connect app. 16.
en Cleaning and servicing 16.4 Software update 16.6 Data protection Your appliance's software can be updated using the software update function, e.g. for the purposes of optimisation, troubleshooting or security updates. To do this, you must be a registered Home Connect user, have installed the app on your mobile device and be connected to the Home Connect server.
Cleaning and servicing en Appliance front Surface Stainless steel Plastic or painted surfaces E.g. control panel Suitable cleaning agents ¡ Hot soapy water ¡ Special stainless steel cleaning products suitable for hot surfaces ¡ Hot soapy water Information To prevent corrosion, remove any limescale, grease, starch or albumin (e.g. egg white) stains on stainless steel fronts immediately. Apply a thin layer of the stainless steel cleaning product with a soft cloth.
en Cleaning and servicing Area Accessories Water tank Suitable cleaning agents Information ¡ Hot soapy water Soak any heavily soiled areas and use a brush or steel wool. Enamelled accessories are dishwasher-safe. ¡ Oven cleaner Do not use stainless steel wool on steam containers made from stainless steel. Use a vinegar solution to remove any dirt on stainless steel steam containers caused by starchy foods (e.g. rice).
Cleaning functions en 18 Cleaning functions You can use the cleaning functions to clean the appliance. 1. Remove accessories and cookware from the cook- ing compartment. 2. Detach the shelf supports and remove them from 18.1 EcoClean cleaning function Use the "EcoClean" cleaning function regularly to help retain the cleaning ability of the self-cleaning surfaces and prevent damage.
en Cleaning functions 18.2 Floor cleaning aid You can use the "floor cleaning aid" to clean the cooking compartment floor. The "floor cleaning aid" soaks dirt by evaporating soapy water. It is then easier to remove the dirt. Setting the floor cleaning aid WARNING ‒ Risk of scalding! If there is water in the cooking compartment when it is hot, this may create hot steam. ▶ Never pour water into the cooking compartment when the cooking compartment is hot.
Rails en 5. Use the button to navigate to the next row. 6. Press to start the descaling process. a The descaling process will start. The duration will count down on the display. a Once the descaling process has run through to the end, an audible signal will sound. Running the first rinse cycle 1. Open the control panel and remove the water tank. 2. Thoroughly rinse the water tank and fill it with fresh water. 3. Slide in the water tank and close the control panel. 4. Press to start the rinse cycle.
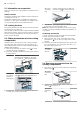
en Appliance door 2. Pull the whole rail to the front and remove it. 1. First, push the rail into the middle of the rear socket until the rail rests against the cooking compartment wall, and then push this back . 2. Push the rail into the front socket until the rail also rests against the cooking compartment wall, and then press this downwards . 3. Clean the rail.
Appliance door 3. Open the appliance door approx. 45° wide. en 5. ATTENTION! Opening and closing the appliance door when it is in the lock position damages the door hinges. ▶ Never force the appliance door open or closed. ▶ If the door hinge has been damaged, call the after-sales service. Move the appliance door up and down until you hear a quiet click. You can still only move the appliance door slightly. 4. Insert the coin in the gap in the lock and rotate as far as it will go .
en Appliance door 20.2 Attaching the appliance door 1. Tip: Ensure that the appliance door is not wedged at an angle and that it is properly fitted in place. Attach the appliance door via the left- and right-hand guide rollers simultaneously . 2. Rotate the door handle upwards slightly 5. WARNING ‒ Risk of injury! If the door locks are unsecured, the appliance door may become detached. ▶ After attaching the appliance door, close the leftand right-hand door locks.
Appliance door 4. Push down on the intermediate pane lightly in the area of , and carefully lift the retainer are able to pull it out. 5. Lift the intermediate pane from below it in the direction of the arrow until you en 1. Tip: When fitting the door panes, make sure that they are in the original order. Insert the intermediate pane in the direction of the arrow and push it in in the direction of the arrow until it is fitted in the frame. and remove .
en Troubleshooting 4. Push the inner pane from above until it locks into place . 21 Troubleshooting You can rectify minor faults on your appliance yourself. Read the troubleshooting information before contacting aftersales service. This will avoid unnecessary costs. WARNING ‒ Risk of injury! Improper repairs are dangerous. ▶ Repairs to the appliance should only be carried out by trained specialist staff. ▶ If the appliance is defective, call Customer Service.
Troubleshooting Fault Time not displayed when appliance switched off. HomeConnect is not working correctly. The control panel cannot be opened. en Cause and troubleshooting Basic setting has been changed. ▶ Change the basic setting for the clock display. → "Basic settings", Page 21 Different causes are possible. ▶ Go to www.home-connect.com. The circuit breaker is faulty. ▶ Check the circuit breaker in the fuse box. There has been a power cut.
en Disposal Fault The appliance hums or clicks when the control panel is opened. The interior lighting does not work. Maximum operating time reached. A message with "D" or "E" appears in the display, e.g. D0111 or E0111. The cooking result is not satisfactory. Cause and troubleshooting Removing the control panel creates operating noise. No action required. The LED light is defective. Note: Do not remove the glass cover. ▶ Call the after-sales service.
Declaration of Conformity This product contains light sources from energy efficiency class G. These light sources are available as a spare part and should only be replaced by trained specialist staff. en 23.1 Product number (E-Nr.) and production number (FD) You can find the product number (E-Nr.) and the production number (FD) on the appliance's rating plate. On some appliances with steam-assisted cooking, you will find the rating plate behind the control panel.
en How it works ATTENTION! When the cooking compartment is hot, any water inside it will create steam. The change in temperature may cause damage. ▶ Never pour water into the cooking compartment when it is still hot. ▶ Never place cookware containing water on the cooking compartment floor. Shelf positions If you are using the CircoTherm hot air heating function, you can choose between shelf positions 1, 2, 3 and 4.
How it works ¡ To catch any liquids that drip down, place the universal pan into the cooking compartment at least one level below the wire rack. Notes ¡ The grill element switches on and off continuously. This is normal. The temperature that you set determines how frequently this occurs. ¡ Smoke may be produced when grilling. 25.4 Cooking instructions for ready meals ¡ The cooking result greatly depends on the quality of the food.
en How it works Food Accessories/cook- Shelf pos- Heating ware ition function → Page 7 Plate Ø 20 cm 2 or Pie tin Dark coated 3 quiche tin Loaf tin, 1 x 900 g 2 or 2 x 450 g Loaf tin, 1 x 900 g 2 or 2 x 450 g Temperature in °C Steam in- Cooking time tensity in mins 170–190 - 60–75 190–210 - 35–45 - 20–30 30–40 Loaf tin, 1 x 900 g or 2 x 450 g Baking tray Baking tray 12-cup-tin Baking tray 12-cup-tin Baking tray Pizza tray 2 190–200 Added steam, medium - 3 3 3 3 3 3 2 180–200 1 140–160 1
How it works Food Accessories/cook- Shelf pos- Heating ware ition function → Page 7 Covered cookware 2 Temperature in °C Covered cookware 2 Wire rack + Wire rack 4+1 Complete meal with chicken, 1.5 kg Wire rack + Wire rack 4+1 Bacon rashers Wire rack 3 275 Sausages, 2-4 cm thick Belly Belly, 1 kg Wire rack Wire rack Wire rack 3 2 2 275 6 200 - 220 1. 170 - 180 2. 190 - 200 Gammon joint Chicken, whole Chicken, whole, 1.
en How it works Food Crème Brulée Crème caramel 1. Boiled potatoes 2. Frozen salmon fillet 3. Broccoli florets Yoghurt 1 2 3 4 5 6 7 Accessories/cook- Shelf pos- Heating ware ition function → Page 7 Individual moulds 3 Individual moulds 3 1. Perforated 1. 4 steaming tray, size 2. 4 S, on the wire rack 3. 3 2. Unperforated steaming tray, size S, on the wire rack 3.
How it works Food Accessory/cookware Fillet of beef, 1 kg Uncovered cookware Uncovered cookware Uncovered cookware Veal medallions, 4 cm thick Saddle of lamb, boneless, 200 g each 1 Preheat the appliance. Shelf pos- Searing ition time in mins 2 4-6 Heating function Temperature Cooking in °C time in → Page 7 mins 80 1 90 - 120 2 4 80 1 30 - 50 2 4 80 1 30 - 45 Proving dough en Use the recommended settings when configuring the appliance settings.
en How it works Recommended settings for reheating Food Pizza, cooked Bread rolls, baguette, baked 1 Preheat the appliance. Accessories/cook- Shelf pos- Heating ware ition function → Page 7 Wire rack 2 Wire rack 2 Temperature in °C 170 - 180 160 - 170 1 1 Steam intens- Cooking ity time in mins 5 - 15 10 - 20 25.8 Test dishes The information in this section is provided for test institutes to facilitate testing of the appliance in accordance with EN 60350‑1.
Installation instructions Food Hot water sponge cake Hot water sponge cake Accessories/cook- Shelf pos- Heating ware ition function → Page 7 Springform cake 2 tin, diameter 26 cm Springform cake 2 tin, diameter 26 cm Temperature in °C 160 - 170 2 1. 150 - 160 2. 150 - 160 Hot water sponge cake, Springform cake 3+1 150 - 170 on 2 levels tin, diameter 26 cm 1 Preheat the appliance for five minutes. Do not use the rapid heating function. 2 Preheat the appliance. Do not use the rapid heating function.
en Installation instructions ¡ ¡ ¡ ¡ ¡ ¡ ¡ ¡ with these installation instructions. The installer shall be liable for damages incurred as a result of incorrect installation. Do not use the door handle for the transport or installation. Check the appliance for damage after unpacking it. Do not connect the appliance if it has been damaged in transit. Before starting up the appliance, remove any packaging material and adhesive film from the cooking compartment and the door.
Installation instructions 26.3 Installation below a worktop Observe the installation dimensions and the installation instructions when installing below a worktop. en ¡ To ventilate the appliance, the intermediate floor must have a ventilation cut-out. ¡ The worktop must be secured to the built-in unit. ¡ Observe any available installation instructions for the hob. 26.
en Installation instructions 26.6 Corner installation Observe the installation dimensions and the installation instructions when installing in a corner. An all-pole isolating switch must be integrated into the permanent electrical installation according to the installation regulations. 1. Identify the phase and neutral conductors in the socket. The appliance may be damaged if it is not connected correctly. 2. Connect the hob in accordance with the connection diagram. See the rating plate for the voltage.
Installation instructions 4. Open the appliance door slightly and unscrew pan- els on the left and right. en 8. For handleless kitchens with vertical bar handle strips: ‒ Attach a suitable filling piece in order to cover any sharp edges and to guarantee a safe installation. ‒ Pre-drill aluminium profiles to establish a screw connection . ‒ Secure the appliance using a suitable screw . 5. Close the appliance door. 6.
Valid within Great Britain: Imported to Great Britain by BSH Home Appliances Ltd.