
Installation instructions
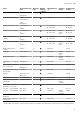
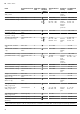

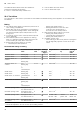
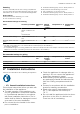
Table Of Contents
- Oven
- en
- Table of contents
- 1 Safety
- 2 Preventing material damage
- 3 Environmental protection and saving energy
- 4 Familiarising yourself with your appliance
- 5 Accessories
- 6 Before using for the first time
- 7 Basic operation
- 7.1 Switching on the appliance
- 7.2 Switching off the appliance
- 7.3 Residual heat indicator
- 7.4 Setting the type of heating and temperature
- 7.5 Changing the temperature
- 7.6 Changing the type of heating
- 7.7 Pausing operation
- 7.8 Cancelling operation
- 7.9 Viewing the current temperature
- 7.10 Displaying information
- 8 Steam
- 9 Time-setting options
- 10 Meat probe
- 11 Baking and roasting assistant
- 12 Steam programs
- 13 Childproof lock
- 14 Rapid heat-up
- 15 Sabbath mode
- 16 Basic settings
- 17 Home Connect
- 18 Cleaning and servicing
- 19 Cleaning function
- 20 Rails
- 21 Appliance door
- 22 Troubleshooting
- 23 Disposal
- 24 Customer Service
- 25 Declaration of Conformity
- 26 How it works
- 26.1 General cooking tips
- 26.2 Baking tips
- 26.3 Roasting, braising and grilling tips
- 26.4 Steaming
- 26.5 Cooking frozen products
- 26.6 Cooking ready meals
- 26.7 List of foods
- 26.8 Special cooking methods and other applications
- 26.9 Test dishes
- 27 Installation instructions
- 27.1 General installation instructions
- 27.2 Appliance dimensions
- 27.3 Installation below a worktop
- 27.4 Installation underneath a hob
- 27.5 Installation in a tall unit
- 27.6 Installing two appliances on top of each other
- 27.7 Corner installation
- 27.8 Electrical connection
- 27.9 Installing the appliance
- 27.10 Removing the appliance

How it works en
47
Proving dough
Always allow dough to prove in two steps: Once in their
entirety (1.-dough fermentation) and a second time
when shaped (2.–final fermentation).
Requirement:The cooking compartment is cold.
1.
Dough fermentation:
‒ Slide the wire rack into the cooking compart-
ment.
‒ Place the dough in a bowl onto the wire rack.
‒ Use the recommended settings when configuring
the appliance settings.
‒ Do not open the appliance door while the dough
is proving, otherwise moisture will escape.
2.
Final fermentation:
‒ Continue processing the dough and turn it into
the final shape for baking.
‒ Place the dough in the specified shelf position.
3.
Wipe the cooking compartment dry before baking.
Recommended settings for proving dough
Food Accessory/cookware Shelf posi-
tion
Heating
function
→Page7
Temperature in °C Cooking time
in mins
Rich dough, e.g. panettone Bowl on wire rack
Tin/dish on the wire
rack
1. 2
2. 2
1.
2.
1. 2
2. 2
1. 40–90
2. 30–60
White bread Bowl on wire rack
Universal pan
1. 2
2. 2
1.
2.
1. 1
2. 1
1. 30–40
2. 15–25
Defrosting
You can defrost frozen food in your appliance.
Tips for defrosting food
¡ The Defrost function is suitable for defrosting frozen
fruit and vegetables.
¡ Use the CircoThermhot air heating function to de-
frost baked goods.
¡ It is better to defrost poultry, meat and fish in the re-
frigerator.
¡ Remove frozen food from its packaging before you
defrost it.
¡ Accessory/cookware:
– Place frozen fruit and vegetables into the perfor-
ated steaming tray (size XL). To catch any liquids
that drip down, place the universal pan into the
cooking compartment below the steaming tray.
– Frozen food for which the liquid is an integral
component and needs to be retained (e.g. frozen
creamed spinach) should be placed into the uni-
versal pan or into a piece of cookware that is
then placed onto the wire rack.
– Place baked goods directly onto the wire rack.
¡ The recommended settings are for freezer-temperat-
ure food (-18°C).
Reheating
You can use steam-assisted reheating to gently warm
up food. The food tastes and looks as though it has
been freshly cooked. You can even warm and crisp up
baked goods from the day before.
Tips for reheating food
¡ Use uncovered, heat-resistant cookware that is suit-
able for cooking with steam.
¡ Use wide, shallow cookware. Reheating takes
longer if you use cold cookware.
¡ Place the cookware on the wire rack.
¡ Place food that you are not reheating in cookware
(e.g. bread rolls) directly onto the wire rack at
level2.
¡ Do not cover the food.
¡ Do not open the cooking compartment door while
the food is being reheated, otherwise large amounts
of steam will escape.
¡ Wipe the cooking compartment dry after using it to
reheat food.
Recommended settings for reheating
Food Accessories/cook-
ware
Shelf pos-
ition
Heating
function
→Page7
Temperature in
°C
Steam intens-
ity
Cooking
time in
mins
Pizza, cooked Wire rack 2 170 - 180
1
- 5 - 15
Bread rolls, baguette,
baked
Wire rack 2 160 - 170
1
- 10 - 20
1
Preheat the appliance.
Keeping food warm
Tips for keeping food warm
¡ You can keep cooked food warm at 70°C using
the "top/bottom heating" function. This prevents con-
densation from forming and you will not have to
wipe down the cooking compartment.
¡ Do not cover the food.
¡ Do not keep food warming for longer than 2 hours.
¡ Be aware that some types of food will actually con-
tinue cooking when you are keeping them warm in
the oven.