
Installation instructions
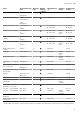
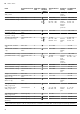

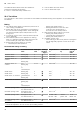
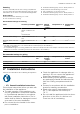
Table Of Contents
- Oven
- en
- Table of contents
- 1 Safety
- 2 Preventing material damage
- 3 Environmental protection and saving energy
- 4 Familiarising yourself with your appliance
- 5 Accessories
- 6 Before using for the first time
- 7 Basic operation
- 7.1 Switching on the appliance
- 7.2 Switching off the appliance
- 7.3 Residual heat indicator
- 7.4 Setting the type of heating and temperature
- 7.5 Changing the temperature
- 7.6 Changing the type of heating
- 7.7 Pausing operation
- 7.8 Cancelling operation
- 7.9 Viewing the current temperature
- 7.10 Displaying information
- 8 Steam
- 9 Time-setting options
- 10 Meat probe
- 11 Baking and roasting assistant
- 12 Steam programs
- 13 Childproof lock
- 14 Rapid heat-up
- 15 Sabbath mode
- 16 Basic settings
- 17 Home Connect
- 18 Cleaning and servicing
- 19 Cleaning function
- 20 Rails
- 21 Appliance door
- 22 Troubleshooting
- 23 Disposal
- 24 Customer Service
- 25 Declaration of Conformity
- 26 How it works
- 26.1 General cooking tips
- 26.2 Baking tips
- 26.3 Roasting, braising and grilling tips
- 26.4 Steaming
- 26.5 Cooking frozen products
- 26.6 Cooking ready meals
- 26.7 List of foods
- 26.8 Special cooking methods and other applications
- 26.9 Test dishes
- 27 Installation instructions
- 27.1 General installation instructions
- 27.2 Appliance dimensions
- 27.3 Installation below a worktop
- 27.4 Installation underneath a hob
- 27.5 Installation in a tall unit
- 27.6 Installing two appliances on top of each other
- 27.7 Corner installation
- 27.8 Electrical connection
- 27.9 Installing the appliance
- 27.10 Removing the appliance

How it works en
43
Food Accessories/cook-
ware
Shelf pos-
ition
Heating
function
→Page7
Temperature in
°C
Steam in-
tensity
Cooking time
in mins
Sliced carrots, steaming Steaming tray 3 100 - 10 - 20
Spinach, steaming Steaming tray 3 100 - 2 - 3
Unpeeled boiled pota-
toes, whole
Steaming tray 3 100 - 35 - 45
Long-grain rice, 1:1.5 Shallow cookware 3 100 - 20 - 30
Eggs, hard-boiled Steaming tray 3 100 - 10 - 12
1
Preheat the appliance.
2
At the start, pour approx. 100 ml of liquid into the cookware. The water tank must be topped up during operation.
Desserts
Making crème caramel or crème brulée
1.
Use your preferred recipe to make the mixture for
the crème.
2.
Pour the mixture into moulds – keep pouring until
the mixture is 2-3cm deep.
3.
Place the moulds into the perforated steaming tray
(size XL).
4.
Cover food that you would normally cook in a bain
marie with film, e.g. cling film.
5.
Use the recommended settings when configuring
the appliance settings.
6.
If the moulds are made from very thick material, ex-
tend the cooking time.
Making yoghurt
1.
Remove the accessories and shelves from the
cooking compartment.
2.
Heat 1litre of whole milk (3.5% fat) to 90°C on the
hob and then leave it to cool down to 40°C.
It is sufficient to heat UHT milk to 40°C.
3.
Mix 150g of chilled yoghurt into the milk.
4.
Pour the mixture into small containers, e.g. cups or
small jars.
5.
Cover the containers with film, e.g. cling film.
6.
Place the containers on the cooking compartment
floor.
7.
Use the recommended settings when configuring
the appliance settings.
8.
After making the yoghurt, leave it to cool in the refri-
gerator for at least 12hours.
Recommended settings for desserts and compote
Food Accessories/cook-
ware
Shelf pos-
ition
Heating
function
→Page7
Temperature in
°C
Steam intens-
ity
Cooking
time in
mins
Crème brulée Individual moulds 3 85 - 20 - 30
Crème caramel Individual moulds 3 85 - 25 - 35
Steamed yeast dump-
lings
Universal pan 3 100 - 20 - 30
Yoghurt Individual moulds Cooking
compart-
ment floor
1 - 300 - 360
Rice pudding, 1:2.5 Universal pan 3 1. 1
2. 1
- 35 - 45
Fruit compote, 1/3 water Universal pan 3 1. 1
2. 1
- 10 - 20
26.8 Special cooking methods and other
applications
Information and recommended settings for special
cooking methods and other applications, e.g. slow
cooking or preserving.
Slow cooking
Cook prime cuts of meat slowly at a low temperature,
e.g. tender cuts of beef, veal, lamb or poultry.
Low temperature cooking poultry or meat
Note:When using the low temperature cooking type of
heating, you cannot delay the start of the programme
by setting an end time.
Requirement:The cooking compartment is cold.
1.
Use fresh, clean, hygienic meat without bones.
2.
Place the cookware onto the wire rack at level 2 in
the cooking compartment.
3.
Preheat the cooking compartment and cookware for
approx. 15minutes.
4.
Sear the meat on all sides on the hob at a very high
heat.
5.
Immediately place the meat into the pre-warmed
cookware in the cooking compartment.
To ensure that the climate in the cooking compart-
ment remains constant, keep the cooking compart-
ment door closed during low temperature cooking.
6.
After low temperature cooking, remove the meat
from the cooking compartment.