
Installation instructions

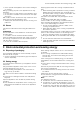
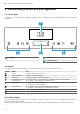
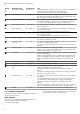
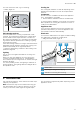
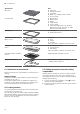
Table Of Contents
- Oven
- en
- Table of contents
- 1 Safety
- 2 Preventing material damage
- 3 Environmental protection and saving energy
- 4 Familiarising yourself with your appliance
- 5 Accessories
- 6 Before using for the first time
- 7 Basic operation
- 7.1 Switching on the appliance
- 7.2 Switching off the appliance
- 7.3 Residual heat indicator
- 7.4 Setting the type of heating and temperature
- 7.5 Changing the temperature
- 7.6 Changing the type of heating
- 7.7 Pausing operation
- 7.8 Cancelling operation
- 7.9 Viewing the current temperature
- 7.10 Displaying information
- 8 Steam
- 9 Time-setting options
- 10 Meat probe
- 11 Baking and roasting assistant
- 12 Steam programs
- 13 Childproof lock
- 14 Rapid heat-up
- 15 Sabbath mode
- 16 Basic settings
- 17 Home Connect
- 18 Cleaning and servicing
- 19 Cleaning function
- 20 Rails
- 21 Appliance door
- 22 Troubleshooting
- 23 Disposal
- 24 Customer Service
- 25 Declaration of Conformity
- 26 How it works
- 26.1 General cooking tips
- 26.2 Baking tips
- 26.3 Roasting, braising and grilling tips
- 26.4 Steaming
- 26.5 Cooking frozen products
- 26.6 Cooking ready meals
- 26.7 List of foods
- 26.8 Special cooking methods and other applications
- 26.9 Test dishes
- 27 Installation instructions
- 27.1 General installation instructions
- 27.2 Appliance dimensions
- 27.3 Installation below a worktop
- 27.4 Installation underneath a hob
- 27.5 Installation in a tall unit
- 27.6 Installing two appliances on top of each other
- 27.7 Corner installation
- 27.8 Electrical connection
- 27.9 Installing the appliance
- 27.10 Removing the appliance

en Accessories
10
Accessories Use
Wire rack ¡ Cake tins
¡ Ovenproof dishes
¡ Cookware
¡ Meat, e.g. roasting joints or steak
¡ Frozen meals
Universal pan ¡ Moist cakes
¡ Baked items
¡ Bread
¡ Large roasts
¡ Frozen meals
¡ Catch dripping liquids, e.g. fat when
grilling food on the wire rack or water
when cooking with steam.
Baking tray ¡ Tray bakes
¡ Small baked items
Unperforated steam con-
tainer, size S
Cooking:
¡ Rice
¡ Pulses
¡ Cereals
Place the steam container on the wire rack.
Perforated steam container,
size S
¡ Steaming vegetables.
¡ Juicing berries.
¡ Defrosting.
Place the steam container on the wire rack.
Perforated steam container,
size XL
Steaming large quantities of food.
Meat thermometer High-precision roasting or cooking.
→"Meat probe", Page19
5.1 Information on accessories
Some accessories are only suitable for certain types of
heating.
Steam container
The steam containers are suitable for steam-only types
of heating up to 120°C.
The steam containers are not suitable for higher tem-
peratures or other types of heating. The containers be-
come permanently discoloured and deformed.
5.2 Locking function
The locking function prevents the accessories from tilt-
ing when they are pulled out.
You can pull out the accessories approximately halfway
without them tipping. The accessories must be inserted
into the cooking compartment correctly for the tilt pro-
tection to work properly.
5.3 Sliding accessories into the cooking
compartment
Always slide the accessory into the cooking compart-
ment the right way round. This is the only way to en-
sure that accessories can be pulled out approximately
halfway without tipping.
1.
Turn the accessories so that the notch is at the
rear and is facing downwards.
2.
Insert the accessory between the two guide rods for
a shelf position.