
Assembly & Installation Instructions

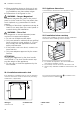
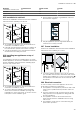
Table Of Contents
- Oven
- en
- Table of contents
- 1 Safety
- 2 Preventing material damage
- 3 Environmental protection and saving energy
- 4 Familiarising yourself with your appliance
- 5 Accessories
- 6 Before using for the first time
- 7 Basic operation
- 7.1 Switching on the appliance
- 7.2 Switching off the appliance
- 7.3 Residual heat indicator
- 7.4 Setting the type of heating and temperature
- 7.5 Changing the temperature
- 7.6 Changing the type of heating
- 7.7 Pausing operation
- 7.8 Cancelling operation
- 7.9 Viewing the current temperature
- 7.10 Displaying information
- 8 Steam
- 9 Time-setting options
- 10 Baking and roasting assistant
- 11 Steam programs
- 12 Childproof lock
- 13 Rapid heat-up
- 14 Sabbath mode
- 15 Basic settings
- 16 Home Connect
- 17 Cleaning and servicing
- 18 Cleaning function
- 19 Rails
- 20 Appliance door
- 21 Troubleshooting
- 22 Disposal
- 23 Customer Service
- 24 Declaration of Conformity
- 25 How it works
- 25.1 General cooking tips
- 25.2 Baking tips
- 25.3 Roasting, braising and grilling tips
- 25.4 Steaming
- 25.5 Cooking frozen products
- 25.6 Cooking ready meals
- 25.7 List of foods
- 25.8 Special cooking methods and other applications
- 25.9 Test dishes
- 26 Installation instructions
- 26.1 General installation instructions
- 26.2 Appliance dimensions
- 26.3 Installation below a worktop
- 26.4 Installation underneath a hob
- 26.5 Installation in a tall unit
- 26.6 Installing two appliances on top of each other
- 26.7 Corner installation
- 26.8 Electrical connection
- 26.9 Installing the appliance
- 26.10 Removing the appliance

How it works en
43
6.
Use scissors to open the vacuum-sealing bag. Place
all of the food and liquid into the container.
You can use the stock or marinade to make a
sauce.
7.
Prepare the food for serving.
Food Cooking tips
Meat ¡ Dab the meat with a tea towel be-
fore placing it into hot oil, in order
to avoid fat spitting out of the pan.
¡ Sear the meat at a very high tem-
perature for a few seconds on
each side. This gives the meat a
nice crust and the flavours you
would expect from frying, without
overcooking it.
Food Cooking tips
Fish ¡ Season the fish and coat with hot
butter.
¡ To give the fish a nice crust and
the flavours you would expect
from frying, sear it for a few
seconds on each side.
¡ Fry the food for longer if has not
been sufficiently well cooked dur-
ing the sous-vide cooking stage.
¡ Serve the fish on preheated plates
and with a hot sauce or butter, as
sous-vide cooking takes place at
low temperatures.
Vegetables ¡ Sear the vegetables briefly to give
them the flavours you would ex-
pect from frying.
¡ Season the vegetables or mix
them with other ingredients.
Recommended settings for sous-vide cooking
Food Accessory/cookware Heating
function
Temperat-
ure in °C
Cooking
time in
mins
Tips for sous-vide cooking
Fillet of beef, piece, rare,
3–4cm thick
Wire rack
+
Universal pan
58 100 Vacuum-seal along with
some butter and rosemary
Fillet of beef, piece, me-
dium, 3–4cm thick
Wire rack
+
Universal pan
62 90 Vacuum-seal along with
some butter and rosemary
Duck breast, 350g each Wire rack
+
Universal pan
62 70 Cut into the layer of fat,
season the meat side with
a little salt and pepper, and
vacuum-seal it along with a
small piece of orange peel
Cod, 140g each Wire rack
+
Universal pan
58 25 Vacuum-seal along with
some butter and a little salt
Mushrooms, quartered,
500g
Wire rack
+
Universal pan
85 20–25 Vacuum-seal along with
some butter, rosemary, a
little garlic and salt
Carrots, in 0.5cm slices,
600g
Wire rack
+
Universal pan
90 70–80 Recipe tip: Vacuum-seal
along with some orange
juice, curry powder/paste
and butter.
Potatoes, peeled,
quartered, 800g
Wire rack
+
Universal pan
95 35–45 Recipe tip: Vacuum-seal
along with some butter and
salt. Can easily be used for
making dishes such as
salad.
Pineapple, in 1.5cm slices,
400g
Wire rack
+
Universal pan
85 70–80 Recipe tip: Vacuum-seal
along with some butter,
honey and vanilla.