
Assembly & Installation Instructions
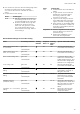

Table Of Contents
- Oven
- en
- Table of contents
- 1 Safety
- 2 Preventing material damage
- 3 Environmental protection and saving energy
- 4 Familiarising yourself with your appliance
- 5 Accessories
- 6 Before using for the first time
- 7 Basic operation
- 7.1 Switching on the appliance
- 7.2 Switching off the appliance
- 7.3 Residual heat indicator
- 7.4 Setting the type of heating and temperature
- 7.5 Changing the temperature
- 7.6 Changing the type of heating
- 7.7 Pausing operation
- 7.8 Cancelling operation
- 7.9 Viewing the current temperature
- 7.10 Displaying information
- 8 Steam
- 9 Time-setting options
- 10 Baking and roasting assistant
- 11 Steam programs
- 12 Childproof lock
- 13 Rapid heat-up
- 14 Sabbath mode
- 15 Basic settings
- 16 Home Connect
- 17 Cleaning and servicing
- 18 Cleaning function
- 19 Rails
- 20 Appliance door
- 21 Troubleshooting
- 22 Disposal
- 23 Customer Service
- 24 Declaration of Conformity
- 25 How it works
- 25.1 General cooking tips
- 25.2 Baking tips
- 25.3 Roasting, braising and grilling tips
- 25.4 Steaming
- 25.5 Cooking frozen products
- 25.6 Cooking ready meals
- 25.7 List of foods
- 25.8 Special cooking methods and other applications
- 25.9 Test dishes
- 26 Installation instructions
- 26.1 General installation instructions
- 26.2 Appliance dimensions
- 26.3 Installation below a worktop
- 26.4 Installation underneath a hob
- 26.5 Installation in a tall unit
- 26.6 Installing two appliances on top of each other
- 26.7 Corner installation
- 26.8 Electrical connection
- 26.9 Installing the appliance
- 26.10 Removing the appliance

en How it works
42
¡ The quality of the cooking result is 100% influenced
by the quality of the ingredients you use. Use only
fresh, top-quality food. This is the only way to guar-
antee a consistent cooking result that delivers im-
peccable flavour.
Vacuum-sealing food
To ensure an even transfer of heat and an optimised
cooking result, use a chamber vacuum-sealing ma-
chine that can create a 99% vacuum when vacuum-
sealing food.
Tip:To prevent gases escaping from the food, e.g.
from vegetables, vacuum-seal the food no more than
one day before you cook it. The gases inhibit the trans-
fer of heat or cause the texture of the food to change,
thus altering how it cooks, as a result of the vacuum
pressure.
Note:Do not use a core temperature probe.
1.
Season food with half the usual the amount of
spices.
Cooking in a vacuum means that the flavours can-
not escape. The usual quantities of flavourings such
as spices, herbs and garlic affect the taste much
more and intensify it.
Tip:You can intensify the natural flavours of high-
quality food simply by adding a small knob of butter
and a little salt to the vacuum-sealing bag.
Different ingredients affect how the food cooks:
– Salt and sugar reduce the cooking time.
– Acidic ingredients such as lemon juice or vinegar
make food firmer.
– Alcohol and garlic give the food an unpleasant
after-taste.
2.
To fill the vacuum-sealing bag, fold over the edge of
the bag 3-4cm from the top and place the bag
into a receptacle such as a measuring jug.
When you fill the vacuum-sealing bag, make sure
that there are no traces of food left on the seam
area of the vacuum-sealing bag.
3.
Before cooking the food, check that the vacuum in
the bag is intact.
Make sure that:
– There is no air in the vacuum-sealing bag.
– The heat-sealed seam is perfectly sealed.
– There are no holes in the vacuum-sealing bag.
– Pieces of meat or fish that have been vacuum-
sealed together are not pressed directly against
one another.
4.
If the vacuum-sealing bag is not filled as it should
be, place the food into a new bag and vacuum-seal
it again.
Preparing food for sous-vide cooking
There are germs on the surface of virtually all food.
WARNING‒Risk of harm to health!
Sous-vide cooking is a method of cooking at low tem-
peratures and, if the instructions for use and hygiene
instructions are not adhered to, it may result adverse
health effects.
▶ Only use high-quality, perfectly fresh food.
▶ Wash and disinfect your hands.
▶ Use disposable gloves, cooking tongs or grill tongs.
▶ Take extra care when preparing critical food, such
as poultry, eggs and fish.
▶ Always thoroughly rinse and peel fruit and veget-
ables.
▶ Always keep work surfaces and chopping boards
clean.
▶ Use different chopping boards for different types of
food.
▶ Only interrupt the cold chain briefly to prepare the
food.
▶ Store vacuum-sealed food in the refrigerator before
you starting the cooking process.
▶ Once the food is cooked, consume it immediately.
Do not store it after cooking – not even in the refri-
gerator. It is not suitable for reheating.
▶
To kill the germs, dip the vacuum-sealing bag con-
taining the uncooked food into boiling water for no
more than 3seconds.
a This minimises the germs on your ingredients and
maximises hygiene, so your food is now ready for
sous-vide cooking.
Cooking food sous-vide
Requirements
¡ The food is vacuum-sealed. →Page42
¡ The food is prepared. →Page42
1.
Place the food onto the wire rack.
To ensure that the heat is distributed evenly around
the food, do not place the vacuum-sealed food
items on top of one another or close together on the
wire rack.
2.
To catch any drops of condensate, slide the univer-
sal pan in at level1.
3.
ATTENTION!
Risk of damage to kitchen units
▶ Do not fill the water tank a second time for the
sous-vide cooking.
Use the recommended settings when configuring
the appliance settings.
The recommended settings are based on how long
one tankful of water lasts. As a general rule, de-
pending on the set temperature, the following max-
imum cooking times apply when the water tank is
completely full:
Temperature in °C Max. cooking time in
minutes
50 270
60 210
70 150
80 120
90 90
4.
WARNING‒Risk of scalding!
Hot water collects on the vacuum-sealing bag dur-
ing cooking.
▶ Use an oven cloth to carefully lift the vacuum-
sealing bag so that the hot water runs off into the
universal pan or the cooking container.
▶ Use the oven cloth to carefully remove the va-
cuum-sealing bag.
Once the food is cooked, allow the cooking com-
partment to cool and then use a sponge to wipe
away the water.
5.
Dry the outside of the vacuum-sealing bag and
place it in a clean container.