Oven [en] User manual and installation instructions B47FS22.
en Safety Table of contents USER MANUAL 1 Safety .................................................................... 2 2 Preventing material damage ............................... 4 3 Environmental protection and saving energy ....................................................................... 5 4 Familiarising yourself with your appliance ........ 6 5 Accessories.......................................................... 9 6 Before using for the first time ...........................
Safety Loose food remnants, fat and meat juices may catch fire. ▶ Before using the appliance, remove the worst of the food residues and remnants from the cooking compartment, heating elements and accessories. Opening the appliance door creates a draught. Greaseproof paper may come into contact with the heating element and catch fire. ▶ Never place greaseproof paper loosely over accessories when preheating the appliance and while cooking.
en Preventing material damage WARNING ‒ Risk of suffocation! Children may put packaging material over their heads or wrap themselves up in it and suffocate. ▶ Keep packaging material away from children. ▶ Do not let children play with packaging material. Children may breathe in or swallow small parts, causing them to suffocate. ▶ Keep small parts away from children. ▶ Do not let children play with small parts. 1.5 Steam Follow these instructions when using a steam function.
Environmental protection and saving energy 2.2 Steam Follow these instructions when using the steam function. ATTENTION! Silicone bakeware is not suitable for combined operation with steam. ▶ Cookware must be heat- and steam-resistant. Using cookware with rust spots may cause corrosion in the cooking compartment. Even the smallest spots of rust can cause corrosion. ▶ Do not use cookware with rust spots. Dripping liquids make the cooking compartment floor dirty.
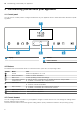
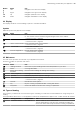
en Familiarising yourself with your appliance 4 Familiarising yourself with your appliance 4.1 Control panel You can use the control panel to configure all functions of your appliance and to obtain information about the operating status. 1 2 1 Display 3 2 2 3 Buttons Control element 4.2 Buttons The buttons are touch-sensitive areas. To select a function, press the corresponding button.
Familiarising yourself with your appliance Button Name Left Use Navigate to the left on the display Right Navigate to the right on the display Up Navigate upwards on the display Down Navigate downwards on the display en 4.4 Display The display shows the current settings, options or relevant information. Symbols Different symbols may appear on the display.
en Familiarising yourself with your appliance Symbol Heating function Top/bottom heating Temperature 50 - 275 °C Circo-roasting 50 - 250 °C CircoTherm Intensive 50 - 275 °C Bread-baking setting 180 - 240 °C Grill, large area 50 - 290 °C Grill, small area 50 - 290 °C Bottom heating 50 - 250 °C Low Temperature Cooking 70 - 120 °C Dough proving 2 settings Sous-vide 50 - 95 °C Defrost 30 - 60 °C Use Traditionally bake or roast on one level.
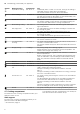
Accessories You can remove the rails, e.g. for cleaning. → "Rails", Page 28 en Cooling fan The cooling fan switches on and off depending on the appliance's temperature. The hot air escapes above the door. ATTENTION! Do not cover the ventilation slot above the appliance door. The appliance overheats. ▶ Ensure that the ventilation slots are unobstructed. To ensure that the appliance cools down more quickly after operation, the cooling fan continues to run for a certain period afterwards.
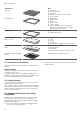
en Accessories Accessories Wire rack Universal pan Baking tray Unperforated steam container, size S Perforated steam container, size S Perforated steam container, size XL 5.1 Information on accessories Some accessories are only suitable for certain types of heating. Steam container The steam containers are suitable for steam-only types of heating up to 120 °C. The steam containers are not suitable for higher temperatures or other types of heating.
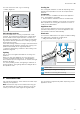
Before using for the first time Wire rack Insert the wire rack with the open side facing the appliance door and the curved lip facing downwards. en Note: Take any accessories that you will not be using out of the cooking compartment while the appliance is in operation. Combining accessories Baking tray Slide the tray in with the sloping E.g. univer- edge towards the appliance door. sal pan or baking tray Steam container, perforated, size XL 3.
en Before using for the first time Setting Water hardness in German hardness in mmol/l °dH 1 0 (softened) 1 (soft) Up to 1.5 Up to 8.4 2 (moderately hard) 1.5-2.5 8.4-14 3 (hard) 2.5-3.8 14-21.3 2 4 (very hard) Above 3.8 Above 21.3 1 Only set this if you will be using solely softened water. 2 Also set for mineral water. Only use non-carbonated mineral water. French hardness °fH Up to 15 15-25 25-38 Above 38 6.2 Initial use 6.
Basic operation Heating up Type of heating Temperature Duration en 12. Empty the water tank and dry the cooking compart- CircoTherm hot air Maximum 30 minutes 8. Ventilate the kitchen while the appliance is heating. 9. Press to switch off the appliance after 30 minutes. → "Switching off the appliance", Page 13 10. Allow the appliance to cool down. 11. Clean the smooth surfaces with soapy water and a dish cloth. ment. 13.
en Steam 7.10 Displaying information Requirement: The button must be lit. ▶ Press . a The information will be displayed for a few seconds. 8 Steam Food can be cooked particularly gently using steam. You can use the special types of steam heating, or use steam assistance with certain types of heating. 5. Fill the water tank with water up to the "max" mark. WARNING ‒ Risk of scalding! Hot steam may escape when you open the appliance door. Steam may not be visible, depending on the temperature.
Steam en Steam With the "Steam" heating function, the food is enveloped by hot steam, which helps to retain the nutrients. This cooking method also helps to retain the shape, colour and typical flavour of the food. Configuring the Steam heating function 1. Fill the water tank. → "Filling the water tank", Page 14 2. Press to switch the appliance on. 3. Press . 4. Use the or button to set "Steam" . 5. Use the button to navigate to the next row. 6.
en Steam a If the water tank runs dry during the defrosting process, defrosting will be paused. → "Refilling the water tank", Page 14 a Once the duration has elapsed, an audible signal will sound and the appliance will stop heating. → "Switching off the appliance", Page 13 9. Press any button to end the audible signal. 10. Empty the water tank and dry the cooking compartment.
Time-setting options Drying the cooking compartment To dry the cooking compartment, you can either use the "Dry" function or you can dry the cooking compartment manually. Drying the cooking compartment with the Dry function The "Dry" function heats up the cooking compartment so that the moisture in the cooking compartment evaporates. You will then need to open the appliance door to allow the steam to escape. en 8. Press to start drying the appliance.
en Baking and roasting assistant a Once the timer duration has elapsed, an audible signal will sound. 5. Press any button to end the audible signal. 3. To continue without setting a cooking time, press Changing the timer Cancelling the timer With this function, the appliance automatically switches itself on, and then switches itself off at the preselected end time. To enable it to do this, you set the cooking time (duration) and specify when you want your food to be ready.
Steam programs en ¡ ¡ ¡ ¡ ¡ ¡ ¡ Meat loaf (1 kg) Sirloin, medium, 1.5 kg Beef pot roast Leg of lamb, boned Chicken, whole Chicken legs Goose, whole (3-4 kg) 10.2 Configuring the baking and roasting assistant Note: Use fresh and, ideally, chilled food. Use frozen food straight from the freezer. Requirement: The cooking compartment must have cooled down. 1. Press to switch the appliance on. 2. Press . 3. Use the or button to select the "Baking and roasting assistant" . 4.
en Childproof lock ¡ ¡ ¡ ¡ ¡ ¡ Yoghurt in glass jars Rice pudding Fruit compote Eggs, soft-boiled Eggs, hard-boiled Bottles, sterilise 5. Use the button to navigate to the next row. 6. Use the or button to select the required steam program. 7. Use the button to navigate to the next row. 8. Use the or button to select the appropriate weight. 9. Use the 11.3 Preparing food for the steam program Note: Use fresh and, ideally, chilled food. Use frozen food straight from the freezer.
Rapid heat-up en 12.5 Activating the one-time childproof lock The one-time childproof lock disables the control panel to prevent children from accidentally switching on the appliance. To switch on the appliance, deactivate the one-time childproof lock. After you have switched off the appliance, the control panel will no longer be disabled. Note: When you activate the automatic childproof lock, the appliance will immediately disable the control panel. The and buttons will not be disabled.
en Basic settings 7. Press to start Sabbath mode. a The cooking time appears on the display. The cooking time counts down. 8. Once the cooking time has elapsed, an audible signal sounds. A note appears on the display confirming that the operation has finished. The appliance stops heating up and responds again as usual outside of Sabbath mode. Press to switch the appliance off. The appliance automatically switches off after approx. 10 to 20 minutes. ‒ 14.
Home Connect 11. To save your settings, use the button to select ‒ "Save". To discard your settings, use the lect "Discard". en button to se- 16 Home Connect This appliance is network-capable. Connecting your appliance to a mobile device lets you control its functions via the Home Connect app, adjust its basic settings and monitor its operating status. The Home Connect services are not available in every country.
en Cleaning and servicing 16.3 Operating the appliance with the Home Connect app When the Remote start function is activated, you can use the Home Connect app to remotely configure the appliance's settings and start it. Note: Some operating modes can only be started on the oven itself. Requirements ¡ The appliance must be switched on. ¡ The appliance must be connected to your home network and to the Home Connect app.
Cleaning and servicing Using oven cleaner in a hot cooking compartment damages the enamel. ▶ Never use oven cleaner in the cooking compartment when it is still warm. en ▶ Remove all food remnants from the cooking com- partment and the appliance door before you next heat up the appliance. New sponge cloths contain residues from production. ▶ Wash new sponge cloths thoroughly before use. Suitable cleaning agents Only use cleaning agents that are suitable for the different surfaces on your appliance.
en Cleaning and servicing Area Rails Accessories Water tank Suitable cleaning agents Information ¡ Hot soapy water Soak any heavily soiled areas and use a brush or steel wool. Note: To clean thoroughly, detach the rails. → "Rails", Page 28 ¡ Hot soapy water Soak any heavily soiled areas and use a brush or steel wool. Enamelled accessories are dishwasher-safe. ¡ Oven cleaner Do not use stainless steel wool on steam containers made from stainless steel.
Cleaning function 4. 5. 6. 7. 8. – From the smooth enamel surfaces – From the inside of the appliance door – From the glass cover on the oven light This prevents stains that cannot be removed. Remove any objects from the cooking compartment. The cooking compartment must be empty. Set the Bread-baking setting. Set the maximum temperature. Start the operation. Switch off the appliance after one hour. en 9. Once the appliance has cooled down, wipe the cooking compartment with a damp cloth.
en Rails Preparing descaling ATTENTION! The length of time for which the descaler is left to work is based on the recommended, liquid descaler. Other descalers may damage the appliance. ▶ Only use the liquid descaler recommended by us for the descaling programme. If descaling solution comes into contact with the control panel or other delicate surfaces, it will damage them. ▶ Remove descaling solution immediately with water. 1.
Appliance door en 20 Appliance door To clean the appliance door thoroughly, you can disassemble the appliance door. 3. Open the appliance door approx. 45° wide. WARNING ‒ Risk of injury! If the hinges are not secured due to an incomplete lock, they can snap shut with great force. ▶ To detach or attach the appliance door, always turn the two locks as far as they will go. ▶ If the hinge snaps closed when detaching or attaching the appliance door, do not reach into the hinge – call the after-sales service.
en Appliance door 5. ATTENTION! Opening and closing the appliance door when it is in the lock position damages the door hinges. ▶ Never force the appliance door open or closed. ▶ If the door hinge has been damaged, call the after-sales service. Move the appliance door up and down until you hear a quiet click. You can still only move the appliance door slightly. 20.2 Attaching the appliance door 1. Tip: Ensure that the appliance door is not wedged at an angle and that it is properly fitted in place.
Appliance door 5. WARNING ‒ Risk of injury! If the door locks are unsecured, the appliance door may become detached. ▶ After attaching the appliance door, close the leftand right-hand door locks. Hold the screwdriver horizontally and use it to push the door lock (black component) on each side of the door downwards as far as it will go . en 4. Push down on the intermediate pane lightly around , and carefully lift the retainer to pull it out. until you are able 5.
en Troubleshooting 1. Tip: When fitting the door panes, make sure that they are in the original order. Insert the intermediate pane in the direction of the arrow and push it in in the direction of the arrow until it is fitted in the frame. The arrow on the intermediate pane must line up with the arrow on the frame . 2. Push down lightly on the first intermediate pane around , slide the retainer in at an angle and push down until it clicks into place. 3. Centre the inner pane on the appliance door.
Troubleshooting en 21.1 Malfunctions Fault The appliance is not working. Cause and troubleshooting The circuit breaker is faulty. ▶ Check the circuit breaker in the fuse box. There has been a power cut. ▶ Check whether the lighting in your kitchen or other appliances are working. "Language English" There has been a power cut. appears on the dis▶ Configure the initial configuration settings. play.
en Troubleshooting Fault The appliance requests descaling without the counter appearing in advance. The appliance prompts you to rinse it. "Fill water tank" appears in the display even though the water tank has been filled. Buttons are flashing. "Plopping" sounds can be heard when cooking with steam. The appliance hums during operation and after it is switched off. The appliance hums or clicks when the control panel is opened. The interior lighting does not work. Maximum operating time reached.
Disposal en 22 Disposal Find out here how to dispose of old appliances correctly. This appliance is labelled in accordance with European Directive 2012/19/EU concerning used electrical and electronic appliances (waste electrical and electronic equipment - WEEE). The guideline determines the framework for the return and recycling of used appliances as applicable throughout the EU. 22.1 Disposing of old appliance Valuable raw materials can be reused by recycling. 1. Unplug the appliance from the mains. 2.
en How it works 25 How it works Here, you can find the ideal settings for various types of food as well as the best accessories and cookware. We have perfectly tailored these recommendations to your appliance. 25.1 General cooking tips Please take note of the following information when cooking all types of food. ¡ The temperature and cooking time depend on the amount of food and the recipe. Settings ranges are specified for this reason. Try using the lower values to start with.
How it works ¡ If you do not have any suitable cookware, you can use the universal pan. Roasting in covered cookware ¡ Use a suitable lid that seals well. ¡ When roasting meat, there should be at least 3 cm between the food and the lid. The meat may expand. WARNING ‒ Risk of scalding! Very hot steam may escape when the lid is opened after cooking. Steam may not be visible, depending on the temperature. ▶ Lift the lid in such a way that the hot steam can escape away from you.
en How it works Food Sponge cake, 6 eggs Sponge cake, 6 eggs Sponge cake, 6 eggs Shortcrust tart with moist topping Yeast cake with moist topping Swiss roll Swiss roll Accessories/cook- Shelf pos- Heating ware ition function → Page 7 Springform cake 2 tin, diameter 28 cm Springform cake 2 tin, diameter 28 cm Temperature in °C Springform cake 2 tin, diameter 28 cm Universal pan 3 1 - 30–50 1. 10 2.
How it works Food en Accessories/cook- Shelf pos- Heating ware ition function → Page 7 Pizza, fresh, on a baking Universal pan 3+1 tray, on 2 levels + Baking tray Pizza, fresh, thin-crust, on Pizza tray 2 a pizza tray Quiche Tart dish or tin 3 , Black tray Tarte flambée Universal pan 3 Bake, savoury, cooked Ovenproof dish 2 ingredients Temperature in °C Steam in- Cooking time tensity in mins 180 - 200 - 35 - 45 220 - 230 - 20 - 30 190–210 - 30–40 10 - 18 40 - 50 Potato gratin,
en How it works Food Accessories/cook- Shelf pos- Heating ware ition function → Page 7 Covered cookware 2 Wire rack 2 Uncovered cook2 ware Temperature in °C Steam in- Cooking time tensity in mins 200 - 220 220 - 230 190 - 200 140 - 160 60 - 70 65 - 80 Burger, 3-4 cm thick Leg of lamb, boned, medium, 1.5 kg Leg of lamb, boned, medium, 1.5 kg Wire rack Uncovered cookware Uncovered cookware 4 2 275 170 - 190 Added steam, low - 2 170 - 180 80 - 90 Fish, grilled, whole, 300 g, e.g.
How it works Food Steamed yeast dumplings Yoghurt en Accessories/cook- Shelf pos- Heating ware ition function → Page 7 Universal pan 3 Temperature in °C 100 Steam intens- Cooking ity time in mins 20 - 30 Individual moulds 1 - 300 - 360 - 35 - 45 - 10 - 20 Rice pudding, 1:2.5 Universal pan Cooking compartment floor 3 Fruit compote, 1/3 water Universal pan 3 1 1 1 1 1. 2. 1. 2. Requirement: The cooking compartment is cold. 1. Use fresh, clean, hygienic meat without bones.
en How it works ¡ The quality of the cooking result is 100% influenced by the quality of the ingredients you use. Use only fresh, top-quality food. This is the only way to guarantee a consistent cooking result that delivers impeccable flavour. ▶ Always thoroughly rinse and peel fruit and veget- Vacuum-sealing food To ensure an even transfer of heat and an optimised cooking result, use a chamber vacuum-sealing machine that can create a 99% vacuum when vacuumsealing food.
How it works 6. Use scissors to open the vacuum-sealing bag. Place all of the food and liquid into the container. You can use the stock or marinade to make a sauce. 7. Prepare the food for serving. Food Meat Cooking tips ¡ Dab the meat with a tea towel before placing it into hot oil, in order to avoid fat spitting out of the pan. ¡ Sear the meat at a very high temperature for a few seconds on each side. This gives the meat a nice crust and the flavours you would expect from frying, without overcooking it.
en How it works Food Accessory/cookware Heating function Apples, peeled, in 0.5 cm slices, x 2–4 Wire rack + Universal pan Temperat- Cooking ure in °C time in mins 85 15–25 Vanilla sauce, 0.5 l Wire rack + Universal pan 80 Sterilisation and hygiene You can sterilise heat-resistant cookware or baby bottles that are in perfect condition. The process is equivalent to normal sterilisation by boiling. Sterilising bottles 1. Clean the bottles with a bottle brush immediately after use.
How it works ¡ Use the CircoTherm hot air heating function to defrost baked goods. ¡ It is better to defrost poultry, meat and fish in the refrigerator. ¡ Remove frozen food from its packaging before you defrost it. ¡ Accessory/cookware: – Place frozen fruit and vegetables into the perforated steaming tray (size XL). To catch any liquids that drip down, place the universal pan into the cooking compartment below the steaming tray.
en How it works Recommended settings for baking Food Viennese whirls Viennese whirls Viennese whirls, on 2 levels Viennese whirls, on 3 levels Small cakes Small cakes Small cakes, on 2 levels Small cakes, on 3 levels Hot water sponge cake Hot water sponge cake Hot water sponge cake Accessories/cook- Shelf pos- Heating ware ition function → Page 7 Baking tray 3 Baking tray 3 Universal pan 3+1 + Baking tray x2 4+3+1 Baking tray + x1 Universal pan Baking tray 3 Baking tray 3 Universal pa
Installation instructions Food Accessory/cookware Shelf posi- Heating Temperature in °C tion function → Page 7 Broccoli, fresh, 300 g Steam containers, XL 3 100 3 size Broccoli, fresh, one conSteam containers, XL 3 100 3 tainer size 1 The test is over when 85 °C is reached at the coldest spot (see IEC 60350-1). 2 The test is over when 85 °C is reached at the coldest spot (see IEC 60350-1). 3 Preheat the appliance.
en Installation instructions ¡ Wear protective gloves so that you do not cut yourself. Parts that are accessible during installation may have sharp edges. ¡ Dimensions of the figures in mm. 26.2 Appliance dimensions You will find the dimensions of the appliance here WARNING ‒ Danger: Magnetism! Permanent magnets are used in the control panel or in the controls. They may affect electronic implants, e.g. pacemakers or insulin pumps.
Installation instructions Hob type Full-surface induction hob Gas hob Electric hob a raised in mm 47 27 27 26.5 Installation in a tall unit Observe the installation dimensions and the installation instructions when installing in a tall unit. ¡ To ventilate the appliance, the intermediate floors must have a ventilation cut-out. ¡ If the tall unit has another back panel in addition to the element back panels, this must be removed.
en Installation instructions ¡ The power cable must be plugged in at the rear of the appliance until you hear a clicking sound. A 3 m power cable can be obtained from the after-sales service. ¡ The power cable must only be replaced with a cable from the original manufacturer. This is available from after-sales service. ¡ Contact protection must be guaranteed by the installation. 1.
Installation instructions 6. If required, you can adjust the height of the appli- ance door using the adjustment screws on the left and right. Turning the screws clockwise makes the gap smaller Turning the screws anti-clockwise makes the gap larger 7. Screw the appliance into place. en 9. Open the appliance door slightly, then refit the pan- els and screw them in place, first at the top and then at the bottom.
Valid within Great Britain: Imported to Great Britain by BSH Home Appliances Ltd.