BUILT-IN OVEN [en] INSTRUCTION MANUAL B47CS34H0B
en Table of contents [ en] I NSTRUCTI ON MANUAL 8 Intended use . . . . . . . . . . . . . . . . . . . . . . . . . . . . . 4 ( Important safety information . . . . . . . . . . . . . . . 5 General information . . . . . . . . . . . . . . . . . . . . . . . . . . . 5 Halogen lamp. . . . . . . . . . . . . . . . . . . . . . . . . . . . . . . . 6 Cleaning function . . . . . . . . . . . . . . . . . . . . . . . . . . . . . 6 ] Causes of damage . . . . . . . . . . . . . . . . . . . . . . . . 6 General information .
en Intended use J Tested for you in our cooking studio. . . . . . . . 31 Silicone moulds . . . . . . . . . . . . . . . . . . . . . . . . Baking . . . . . . . . . . . . . . . . . . . . . . . . . . . . . . . Roasting and braising . . . . . . . . . . . . . . . . . . . Grilling . . . . . . . . . . . . . . . . . . . . . . . . . . . . . . . Convenience products . . . . . . . . . . . . . . . . . . . Yogurt . . . . . . . . . . . . . . . . . . . . . . . . . . . . . . . Eco heating functions. . . . . . . . . . . .
Important safety information (Important safety information I mpor t ant saf et y i nf or mat i on General information : Warning – Risk of fire! Combustible items stored in the cooking compartment may catch fire. Never store combustible items in the cooking compartment. Never open the appliance door if there is smoke inside. Switch off the appliance and unplug it from the mains or switch off the circuit breaker in the fuse box. Risk of fire! ■ Loose food remnants, fat and meat juices may catch fire.
en Causes of damage Halogen lamp : Warning – Risk of burns! The bulbs in the cooking compartment become very hot. There is still a risk of burning your skin for some time after they have been switched off. Do not touch the glass cover. Avoid contact with your skin when cleaning. : Warning – Risk of electric shock! When replacing the cooking compartment bulb, the bulb socket contacts are live.
Environmental protection 7Environmental protection ■ en Open the appliance door as infrequently as possible when the appliance is in use. Your new appliance is particularly energy-efficient. Here you can find tips on how to save even more energy when using the appliance, and how to dispose of your appliance properly. Envi r onment al pr ot ect i on Saving energy ■ ■ Only preheat the appliance if this is specified in the recipe or in the tables in the operating instructions.
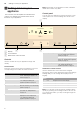
en Getting to know your appliance Note: Depending on the appliance model, individual details and colours may differ. *Getting to know your appliance Control panel In this section, we will explain the indicators and controls. You will also find out about the various functions of your appliance. You can set your appliance's various functions on the control panel. The current settings are shown in the display.
Getting to know your appliance Main menu 4 Touch the 0 touch button to access the main menu.
en ž Accessories CircoTherm eco 40–200 °C -------- For gently cooking selected types of food on one level without preheating. The fan distributes the heat from the ring-shaped heating element in the back panel around the cooking compartment. This heating function is most effective between 125 and 200 °C. This type of heating is used to measure both the energy consumption in air recirculation mode and the energy-efficiency class.
Accessories Inserting accessories The cooking compartment has four shelf positions. The shelf positions are counted from the bottom up. In some appliances, the top shelf position in the cooking compartment features a grill symbol. : Warning – Risk of burns! The telescopic shelves become hot when the appliance is in use. Take special care not to get burnt when they are pulled out. en Locking function The accessories can be pulled out approximately halfway until they lock in place.
en Before using for the first time Optional accessories You can purchase optional accessories from the aftersales service and specialist retailers, or on the Internet. You will find a comprehensive range of products for your appliance in our brochures and on the Internet. Both availability and whether it is possible to order online differ between countries. Please see your sales documents for more details.
Operating the appliance Cleaning the cooking compartment To eliminate the new-appliance smell, heat up the cooking compartment without anything in it and with the oven door closed. 1. Remove the accessories from the cooking compartment. 2. Remove any leftover packaging, such as polystyrene en 1Operating the appliance You have already learnt about the controls and how they work. Now we will explain how to set your appliance.
en Operating the appliance 4. Use the ( or ) button to select the temperature. CircoTherm 17:20 170 °C Note: Depending on the operating mode, different settings are available. For each further setting, use the & button to navigate to the next line. Use the ( or ) button to select the setting. 5. Touch the # touch button to start the appliance operation. The heating bar and run time appear on the display.
Time-setting options Activating the "PowerBoost" function 1. Set CircoTherm hot air ‚ or the bread baking setting … and the temperature. Note: Set a temperature above 100 °C to allow the appliance to preheat quickly. 2. Place the food on a single level in the cooking compartment. 3. Touch the # touch button to start the appliance operation. 4. Touch the ° touch button to activate the "PowerBoost" function. The ° symbol appears on the display.
en Childproof lock Setting the cooking time Once the set cooking time has elapsed, the appliance switches off automatically. The function can only be used in combination with a type of heating. 1. Touch the # touch button. 2. Set the type of heating and temperature. 3. Touch the 0 touch button. The time-setting options are shown in the display. 4. Use the ( or ) button to set the cooking time. – Default value for the ( button = 10 minutes – Default value for the ) button = 30 minutes 5.
Basic settings One-time childproof lock The control panel is locked so that the appliance cannot be switched on. To switch it on, the one-time childproof lock must be deactivated. After the appliance is switched off, the control panel is no longer locked. Activating and deactivating 1. Press and hold the 0 touch button until "Childproof lock activated" appears on the display. The childproof lock is activated. 2. Press and hold the 0 touch button until "Childproof lock deactivated" appears on the display.
en Baking and roasting assistant Fan run-on time Recommended Minimum Pull-out system* Not retrofitted (rack or single pull-out system) Retrofitted (double or triple pull-out system) Home Connect Switching WiFi on or off ~ "Home Connect" on page 20 Establishing a connection via Home Connect Factory settings Restore *) Depending on the appliance model, this basic setting cannot be selected nBaking and roasting assistant The baking and roasting assistant helps you to prepare meals with ease.
Baking and roasting assistant Dishes Lasagne, chilled Roast pork Top rump Slow roasting joint Leg of lamb Whole chicken Chicken drumsticks Duck en Switching off the appliance Touch the # touch button to switch off the appliance. Setting the food You will be guided through the entire setting process for your chosen food. 1. Touch the # touch button to switch on the appliance. 2. Touch the 0 touch button. 3. Use the ( or ) button to select the "Baking and roasting assistant".
en Sabbath mode FSabbath mode You can set a time of up to 74 hours using Sabbath mode. The food in the cooking compartment remains warm, without you having to switch the appliance on or off. Sab at h mode Starting Sabbath mode Before you can use Sabbath mode, you must activate it under "Favourites" in the basic settings. Once the Sabbath mode has been activated, you can select it under the menu for the types of heating. The appliance heats up with top/bottom heating.
Home Connect Activating remote start Home Connect settings 1. Touch the # touch button to switch on the You can adjust Home Connect to suit your requirements at any time. appliance. 2. Touch the 0 touch button. The main menu appears. 3. Use the ( or ) button to select "Remote start" F. 4. Press the & button to activate remote start. F appears in the display. Basic setting Wi-Fi Network Connect to app Remote control Appliance information ! Explanation You can switch the radio module on and off.
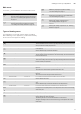
en Cleaning agent DCleaning agent With good care and cleaning, your appliance will retain its appearance and remain fully functioning for a long time to come. We will explain here how you should correctly care for and clean your appliance. Door panels Cl eani ng agent Door handle Suitable cleaning agents To ensure that the different surfaces are not damaged by using the wrong cleaning agent, observe the information in the table.
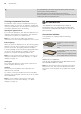
Cleaning agent en Surfaces in the cooking compartment After cleaning The back wall, ceiling and side parts in the cooking compartment are self-cleaning. You can tell this from the rough surface. The cooking compartment floor is enamelled and has smooth surfaces. After cleaning the door seal, check whether it is sitting correctly on the left- and right-hand side (fig. !). If the door seal is running over the spacer ‚, push the door seal inwards so that it now runs beside the spacer ‚ (fig. ").
en Cleaning function .Cleaning function Your appliance is equipped with EcoClean and the floor cleaning aid. The EcoClean cleaning function is used to clean the self-cleaning surfaces in the cooking compartment. Use the floor cleaning aid before starting EcoClean or for intermediate cleaning of the cooking compartment floor. Dirt is soaked beforehand using the floor cleaning aid. It can then be removed more easily.
Rails End As soon as the cleaning aid has run through, a signal sounds and the appliance ends the operation automatically. As soon as you open the appliance door, the interior lighting is switched on so that you can rinse the cooking compartment more easily. The remaining water in the cooking compartment must be removed promptly. Do not leave the remaining water in the cooking compartment for a long time (e.g. overnight). The appliance must not be operated when the cooking compartment is still wet or damp.
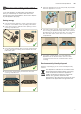
en Appliance door 2. Push the bar towards the back ‚ and down ƒ onto the pin „ (Fig. "). 3. Ensure that the hook is hooked onto the pin „ (Fig. #). 2 F qAppliance door With good care and cleaning, your appliance will retain its appearance and remain fully functional for a long time to come. This will tell you how to remove the appliance door and clean it. Ap l i ance do r Removing and fitting the appliance door To clean the door panels, you can detach the appliance door.
Appliance door 2. Open the appliance door approx. 45° (fig. %). en : Warning Risk of injury! The door handle may break off. Do not carry the appliance door by the door handle. To carry or remove the appliance door, take hold of it with both hands, one on the left and one on the right. 5. Take hold of the appliance door with both hands, one on the left and one on the right, and rotate the door handle upwards slightly ‚ until you are able to pull up the appliance door and remove it ƒ(fig.°*).
Appliance door en 4. Open the appliance door slightly until you hear a quiet click. Close the appliance door. : Warning Risk of injury if the door locks are not closed! The appliance door may become detached. You may be injured and the appliance door damaged. After refitting the door, always close the left- and right-hand door locks. 5. Close the left- and right-hand door locks (fig. %).
Trouble shooting 3. Insert the inner glass into the holder „ on the left and right (Fig. $). 4. Push the inner glass downwards until it locks into place (Fig. %). F en 3Trouble shooting If a fault occurs, there is often a simple explanation. Before calling the after-sales service, please refer to the fault table and attempt to correct the fault yourself. Tr oubl e sho t i ng Tip: If a meal does not turn out exactly as you wanted, refer to the "Tested for you in our cooking studio" section.
Trouble shooting en Maximum operating time exceeded Glass cover Your appliance ends the operation automatically when no cooking time is set and the setting has not been changed for a long time. The actual cooking time until the operation is stopped automatically varies according to the selected settings. The appliance display indicates that the operation will end automatically. Afterwards, the operation is stopped. To use the appliance again, switch it off beforehand.
Customer service 4Customer service Our after-sales service is there for you if your appliance needs to be repaired. We will always find an appropriate solution, also in order to avoid after-sales personnel having to make unnecessary visits. Cust omer ser vi ce E number and FD number When calling us, please give the full product number (E no.) and the production number (FD no.) so that we can provide you with the correct advice.
en Tested for you in our cooking studio Baking on two levels Use CircoTherm. Baked items that are placed into the oven on trays or in baking tins/dishes at the same time will not necessarily be ready at the same time. ■ Universal pan: Level 3 Baking tray: Level 1 ■ Baking tins/dishes on the wire rack First wire rack: Level 3 Second wire rack: Level 1 By preparing several dishes at the same time, you can make energy savings of up to 45 per cent.
Tested for you in our cooking studio Dish Accessories/cookware Scones Scones Biscuits Biscuits Small Cakes Small Cakes Puff pastry slices Jam tarts Jam tarts Meringue Pavlova Soufflé Soufflé Choux pastry Meat Pie Meat Pie Yorkshire pudding Jacket potatoes Pizza, homemade Pizza, homemade Pizza, homemade, thin base Pizza, homemade, thin base Multishelf baking Victoria Sponge Cake, 2 levels Scones, 2 levels Biscuits, 2 levels Biscuits, 3 levels Small cakes, 2 levels Puff pastry slices, 2 levels Puff pastry s
en Tested for you in our cooking studio The cake is generally too light in colour. The cake is too light on top, and too dark underneath. The cake is too dark on top, and too light underneath. Cakes baked in a tray or tin are too brown at the back. The whole cake is too dark. The cake is unevenly browned. You were baking on several levels. The items on the top baking tray are darker than those on the lower baking tray. The cake looks good, but is not cooked properly in the middle.
Tested for you in our cooking studio Observe the manufacturer's instructions for your roasting cookware. Roasting in uncovered cookware It is best to use a deep roasting tin/dish for roasting poultry and meat. Place the tin/dish onto the wire rack. If you do not have any suitable cookware, use the universal pan. Braising in covered cookware When preparing food with covered cookware, the cooking compartment remains considerably cleaner. Ensure that the lid fits well and closes properly.
en Tested for you in our cooking studio Dish Accessories/cookware Type of heating ‚ ‚ ‚ ‚ ‚ Temperature in °C 190-200 180-190 150-160 170-180 150-160 Time in min.
Tested for you in our cooking studio Meat Baste lean meat with fat as required or cover it with strips of bacon. Score the rind crosswise. If you turn the joint when cooking, ensure that the rind is underneath at first. When the joint is ready, turn off the oven and allow it to rest for another 10 minutes in the cooking compartment. This allows the meat juices to be better distributed. Wrap the joint in aluminium foil if necessary. The recommended resting time is not included in the cooking time indicated.
en Tested for you in our cooking studio Recommended setting values In the table, you can find the ideal heating type for your poultry, meat and fish, in addition to toast. Temperature and cooking time depend on the quantity, composition and temperature of the food. Settings ranges are indicated for this reason. Try using the lower values at first. You can use a higher setting next time if necessary.
Tested for you in our cooking studio Dish Accessories Sausages, thickness 2 -4 cm Roasting joint Loin joint Belly Gammon joint Poultry Chicken drumstick, 150 g each Chicken breast, boned, 150 g each Chicken, whole Chicken, portion, bone-in, 200- 250 g each****** Duck, 2-3 kg Turkey, thighs Turkey, whole, 4-8 kg Fish Trout, whole, 300 g each Fillets, each 150 g Type of heating ˆ ‡ ‡ ‡ ‡ Temperature in °C 290**** 180-200 180-200 200-220 180-200 Time in min.
en Tested for you in our cooking studio Universal pan or baking tray Slide the universal pan or the baking tray in carefully as far as the limit stop with the bevelled edge facing the appliance door. Greaseproof paper Only use greaseproof paper that is suitable for the selected temperature. Always cut greaseproof paper to size. Recommended setting values In the table, you can find the ideal heating type for various dishes. Temperature and cooking time depend on the quantity and composition of the product.
Tested for you in our cooking studio en 1. Heat 1 litre of milk (3.5% fat) to 90 °C on the hob Yogurt You can make your own yogurt using your appliance. Making yoghurt Remove accessories and shelf supports from the cooking compartment. The cooking compartment must be empty. Do not open the appliance door while the appliance is in operation. 2. 3. 4. 5. and then leave it to cool down to 40 °C. It is sufficient to heat UHT milk to 40 °C. Stir in 150 g (chilled) yoghurt.
en Tested for you in our cooking studio Dish Accessories/cookware high Ø20 cm tin high Ø23 cm tin flat glass dish springform cake tin Ø26 cm swiss roll tin plate Ø20 cm or pie tin quiche tin (dark coated) loaf tin (1x 900 g or 2x 450 g) baking tray 12-cup-tin 1,2L-soufflé dish rectangular pie tin baking tray Shelf position 2 2 3 2 3 2 3 2 3 3 2 2 3 Type of heating ž ž ž ž ž ž ž ž ž ž ž ž ž Temperature in °C 150-170 140-160 160-180 160-170 180-190 170-190 190-210 190-200 190-210 180-200 160-170 190-200
Tested for you in our cooking studio special cooking method, the meat looks pink, but is not raw or undercooked. Note: Delayed-start operation with an end time is not possible for the slow cooking heating type. Cookware Use shallow cookware, e.g. a glass/porcelain serving dish. Place the cookware into the cooking compartment to preheat it. Always place the uncovered cookware onto the wire rack at level 2. You can find additional information in the tips on slow cooking attached to the settings table.
en Tested for you in our cooking studio Drying You can achieve outstanding drying results with CircoTherm. With this type of preserving, flavourings are concentrated by the dehydration. Only use unblemished fruit, vegetables and herbs and wash them thoroughly. Line the wire rack with greaseproof paper or parchment paper. Drain the excess water from the fruit and dry it. If necessary, cut it into equal chunks or thin slices. Place unpeeled fruit onto the dish with the sliced surfaces facing upwards.
Tested for you in our cooking studio After preserving, remove the jars from the cooking compartment and place them onto a clean cloth. Do not place these hot jars onto a cold or damp surface, as they may crack. Cover the preserving jars to protect them from draughts. Only remove the clamps once the jars are cold. influenced by room temperature, the number of jars, quantity, heat and quality of the jar contents. The specifications are based on 1-litre round jars.
en Tested for you in our cooking studio Defrosting The defrost setting is suitable for defrosting frozen fruit, vegetables and baked items. Poultry, meat and fish should ideally be defrosted in the refrigerator. Use the following shelf positions when defrosting: ■ 1 wire rack: Level 2 ■ 2 wire racks: Level 3+1 Recommended setting values The times in the table are average values. They are dependent on the quality, freezing temperature (-18 °C) and composition of the food. Time ranges are indicated.
Tested for you in our cooking studio Dish Accessory Baking Shortbread Baking tray Shortbread Baking tray Shortbread, 2 levels Universal pan + baking tray Shortbread, 3 levels Baking trays + universal pan Small cakes Baking tray Small cakes Baking tray Small cakes, 2 levels Universal pan + baking tray Small cakes, 3 levels Baking trays + universal pan Fatless sponge cake Springform cake tin, diameter 26 cm Fatless sponge cake Springform cake tin, diameter 26 cm Fatless sponge cake, 2 levels Springform cake
Valid within Great Britain: Imported to Great Britain by BSH Home Appliances Ltd.