
Assembly & Installation Instructions
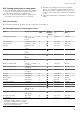
Table Of Contents
- Oven
- en
- Table of contents
- 1 Safety
- 2 Preventing material damage
- 3 Environmental protection and saving energy
- 4 Familiarising yourself with your appliance
- 5 Accessories
- 6 Before using for the first time
- 7 Basic operation
- 7.1 Switching on the appliance
- 7.2 Switching off the appliance
- 7.3 Residual heat indicator
- 7.4 Setting the type of heating and temperature
- 7.5 Changing the temperature
- 7.6 Changing the type of heating
- 7.7 Pausing operation
- 7.8 Cancelling operation
- 7.9 Viewing the current temperature
- 7.10 Displaying information
- 8 Time-setting options
- 9 Baking and roasting assistant
- 10 Childproof lock
- 11 Rapid heat-up
- 12 Sabbath mode
- 13 Basic settings
- 14 Home Connect
- 15 Cleaning and servicing
- 16 Cleaning functions
- 17 Rails
- 18 Appliance door
- 19 Troubleshooting
- 20 Disposal
- 21 Customer Service
- 22 Declaration of Conformity
- 23 How it works
- 24 Installation instructions
- 24.1 General installation instructions
- 24.2 Appliance dimensions
- 24.3 Installation below a worktop
- 24.4 Installation underneath a hob
- 24.5 Installation in a tall unit
- 24.6 Installing two appliances on top of each other
- 24.7 Corner installation
- 24.8 Electrical connection
- 24.9 Installing the appliance
- 24.10 Removing the appliance

How it works en
33
5.
Immediately place the meat into the pre-warmed
cookware in the cooking compartment.
To ensure that the climate in the cooking compart-
ment remains constant, keep the cooking compart-
ment door closed during low temperature cooking.
6.
After low temperature cooking, remove the meat
from the cooking compartment.
Tips for slow cooking
Here you will find tips for achieving good results when
slow cooking food.
Issue Tip
You want to slow
cook a duck breast.
¡ Place the cold duck breast
into a pan.
¡ Sear the skin side first.
¡ Slow cook the duck breast.
¡ After slow cooking, grill the
duck breast for 3 to
5minutes until crispy.
You want to serve
your slow-cooked
meat as hot as pos-
sible.
¡ Preheat the serving plate.
¡ Make sure that the sauces
that accompany the duck
breast are very hot when
you serve them.
Recommended settings for slow cooking
Food Accessory/cook-
ware
Shelf pos-
ition
Searing
time in
mins
Heating function
→Page6
Temperature
in °C
Cooking
time in
mins
Duck breast, medium
rare, 300g each
Uncovered cook-
ware
2 6 - 8 90
1
45 - 60
Fillet of pork, whole Uncovered cook-
ware
2 4 - 6 80
1
45 - 70
Fillet of beef, 1kg Uncovered cook-
ware
2 4 - 6 80
1
90 - 120
Veal medallions, 4cm
thick
Uncovered cook-
ware
2 4 80
1
30 - 50
Saddle of lamb, bone-
less, 200g each
Uncovered cook-
ware
2 4 80
1
30 - 45
1
Preheat the appliance.
Defrosting
You can defrost frozen food in your appliance.
Tips for defrosting food
¡ You can use the appliance to defrost frozen fruit, ve-
getables or baked goods.
¡ It is better to defrost poultry, meat and fish in the re-
frigerator.
¡ Remove frozen food from its packaging before you
defrost it.
¡ The recommended settings are for freezer-temperat-
ure food (-18°C).
¡ When defrosting food, use the following shelf posi-
tions:
– 1 wire rack: Shelf position 2
– 2 wire racks: Shelf positions 3+1
¡ Stir or turn the food 1-2times during defrosting.
Turn large items several times. Split the food into
smaller pieces as it defrosts.
Remove pieces that have already defrosted from the
cooking compartment.
¡ Once the food has defrosted, switch off the appli-
ance and leave the food in the appliance for another
10 to 30minutes to allow the temperature to equal-
ise.
23.7 Test dishes
The information in this section is provided for test institutes to facilitate testing of the appliance in accordance with
EN 60350‑1.
Baking
¡ The setting values apply to food that is placed into a
cold cooking compartment.
¡ Please take note of the information on preheating in
the recommended settings tables. These setting val-
ues assume that the rapid heat-up function is not
being used.
¡ For baking, use the lower of the specified temperat-
ures to start with.
¡ Items that are placed in the appliance on baking
trays or in baking tins/dishes at the same time will
not necessarily be ready at the same time.
¡ Shelf positions when baking on 2levels:
– Universal pan: Shelf position3
Baking tray: Shelf position1
– Baking tins/dishes on the wire rack:
First wire rack: Shelf position3
Second wire rack: Shelf position1