Oven [en] User manual and installation instructions B47CS34.
en Safety Table of contents USER MANUAL 1 Safety .................................................................... 2 2 Preventing material damage ............................... 4 3 Environmental protection and saving energy ....................................................................... 5 4 Familiarising yourself with your appliance ........ 5 5 Accessories.......................................................... 8 6 Before using for the first time ...........................
Safety Opening the appliance door creates a draught. Greaseproof paper may come into contact with the heating element and catch fire. ▶ Never place greaseproof paper loosely over accessories when preheating the appliance and while cooking. ▶ Always cut greaseproof paper to size and use a plate or baking tin to hold it down. WARNING ‒ Risk of burns! The appliance and its parts that can be touched become hot during use. ▶ Caution should be exercised here in order to avoid touching heating elements.
en Preventing material damage WARNING ‒ Risk of suffocation! Children may put packaging material over their heads or wrap themselves up in it and suffocate. ▶ Keep packaging material away from children. ▶ Do not let children play with packaging material. Children may breathe in or swallow small parts, causing them to suffocate. ▶ Keep small parts away from children. ▶ Do not let children play with small parts. ▶ Avoid contact with your skin when cleaning. 1.
Environmental protection and saving energy en 3 Environmental protection and saving energy 3.1 Disposing of packaging When baking multiple dishes, do so in succession or in parallel. ¡ The cooking compartment is heated after baking the first dish. This reduces the baking time for the second cake. If the cooking time is relatively long, you can switch the appliance off 10 minutes before the cooking time ends. ¡ There will be enough residual heat to finish cooking the dish.
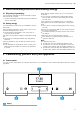
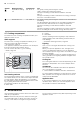
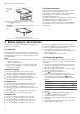
en Familiarising yourself with your appliance 2 Buttons 3 Control element 4.2 Buttons The buttons are touch-sensitive areas. To select a function, press the corresponding button.
Familiarising yourself with your appliance Function Name Heating functions Use Select the required heating function and temperature for your food Baking and roasting assistant MyProfile Recommended settings for baking and roasting Home Connect Floor cleaning aid Connect the oven to a mobile end device and remotely control it.
en Accessories Symbol Heating function Top/bottom heating eco Temperature 50 - 275 °C CircoTherm eco 40 - 200 °C Use For gently cooking selected types of food. Heat is emitted from above and below. This type of heating is most effective between 150 and 250 °C. This type of heating is used to determine the energy consumption in the conventional mode. For gently cooking selected types of food on one level without preheating.
Accessories Accessories Wire rack Use ¡ Cake tins ¡ Ovenproof dishes ¡ Cookware ¡ Meat, e.g. roasting joints or steak ¡ Frozen meals ¡ Moist cakes ¡ Baked items ¡ Bread ¡ Large roasts ¡ Frozen meals ¡ Catch dripping liquids, e.g. fat when grilling food on the wire rack. Universal pan 5.1 Locking function The locking function prevents the accessories from tilting when they are pulled out. You can pull out the accessories approximately halfway without them tipping.
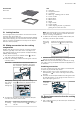
en Before using for the first time 5.4 Other accessories Wire rack or baking tray 2. Hold the accessory on both sides in the area marked and remove it. Wire rack or baking tray You can purchase other accessories from our aftersales service, specialist retailers or online. You will find a comprehensive range of products for your appliance in our brochures and online: www.neff-international.com Accessories vary from one appliance to another.
Basic operation en 7 Basic operation 7.1 Switching on the appliance 7.5 Changing the temperature ▶ Press to switch the appliance on. Notes ¡ In the basic settings, you can specify whether the heating functions or the main menu should appear when you switch on the appliance. → "Basic settings", Page 15 ¡ If you do not perform any actions on the appliance for an extended period, it will automatically switch itself off. You can also change the temperature once you have started the appliance. 1.
en Time-setting options 8 Time-setting options Your appliance has different time-setting options, with which you can control its operation. 8.1 Overview of the time-setting options When you are setting a time, the time values will increase by greater increments as you scroll through the higher values. The cooking time, for example, can be set in 1-minute increments up to 1 hour, and then in 5minute increments thereafter.
Baking and roasting assistant en 3. Use the or button to change the end time. a The setting will then be applied. Cancelling the Ready at time for delayed starts 1. Press . 2. Use the button to reset the end time. a The end time corresponds to the current time plus the set cooking time. a The appliance will start heating using the set cooking time.
en Childproof lock 10 Childproof lock You can secure your appliance to prevent children from accidentally switching it on or changing the settings. 2. Press to switch the appliance on and then start it up. 10.1 Locks 10.4 Deactivating the automatic childproof lock Your appliance has two different locks: 1. Press and hold the Lock Automatic childproof lock One-time childproof lock Activate/deactivate Via the MyProfile menu Using the button 10.
Sabbath mode en 11.2 Activating the "Rapid heat-up" function 11.4 Activating the "PowerBoost" function 1. Set Top/bottom heating 1. Place the food on a single level in the cooking com- 2. 2. Set CircoTherm hot air a 3. a a 4. and a temperature of at least 100 °C. Press to start. The button will be lit. Use the button to activate the "Rapid heat-up" function. will appear on the display.
en Home Connect Basic setting Lighting Selection ¡ On during operation ¡ Off during operation Automatic childproof ¡ Deactivated lock ¡ Activated Operation after ¡ Main menu switch-on ¡ Types of heating ¡ Baking and roasting assistant Night-time dimming ¡ Switched off ¡ On (display dimmed between 10 p.m. and 5.59 a.m.
Home Connect en 1. Download the Home Connect app. 2. Open the Home Connect app and scan the follow- ing QR code. 3. Follow the instructions in the Home Connect app. 14.2 Home Connect Settings You can adjust the settings and network settings for Home Connect by going to your appliance's basic settings. Which settings the display shows will depend on whether Home Connect has been set up and whether the appliance is connected to your home network.
en Cleaning and servicing Notes ¡ You can continue to use your appliance as normal while updates are downloading. Depending on your personal settings in the app, software updates can also be set to download automatically. ¡ We recommend that you install security updates as soon as possible. 14.
Cleaning and servicing en Appliance door Area Door panels Door cover Stainless steel interior door frame Door handle Door seal Suitable cleaning agents Information ¡ Hot soapy water Do not use a glass scraper or a stainless steel wool. Tip: Remove the door panels in order to clean them thoroughly. → "Appliance door", Page 23 ¡ Made of stainless Do not use glass cleaner or a glass scraper. steel: Do not use stainless steel care products.
en Cleaning functions 15.3 Checking the cooking compartment seal after cleaning 15.4 Cleaning self-cleaning surfaces in the cooking compartment ▶ If the cooking compartment seal is on the left or The back panel, ceiling and side walls in the cooking compartment are self-cleaning and have a coarse surface. ATTENTION! If you do not clean the self-cleaning surfaces regularly, they may become damaged.
Cleaning functions Configuring the EcoClean cleaning function WARNING ‒ Risk of burns! The outside of the appliance gets very hot when the cleaning function is in progress. ▶ Never touch the appliance door. ▶ Allow the appliance to cool down. ▶ Keep children at a safe distance. Requirements ¡ Prepare the appliance for the cleaning function. → Page 20 ¡ Do not open the appliance door while the appliance is in operation, as this will abort the cleaning function. 1. Press to switch the appliance on. 2.
en Rails 17 Rails To thoroughly clean the rails and the cooking compartment, or to replace the rails, you can remove the rails. 3. Ensure that the hook is hooked onto the pin . 17.1 Changing the shelf position for the telescopic shelf The bars and telescopic shelves can be positioned in any order. For example, you can fit the telescopic shelf to the shelf position which you use the most frequently.
Appliance door en 18 Appliance door To clean the appliance door thoroughly, you can disassemble the appliance door. 3. Open the appliance door approx. 45° wide. WARNING ‒ Risk of injury! If the hinges are not secured due to an incomplete lock, they can snap shut with great force. ▶ To detach or attach the appliance door, always turn the two locks as far as they will go. ▶ If the hinge snaps closed when detaching or attaching the appliance door, do not reach into the hinge – call the after-sales service.
en Appliance door 5. ATTENTION! Opening and closing the appliance door when it is in the lock position damages the door hinges. ▶ Never force the appliance door open or closed. ▶ If the door hinge has been damaged, call the after-sales service. Move the appliance door up and down until you hear a quiet click. You can still only move the appliance door slightly. 18.2 Attaching the appliance door 1. Tip: Ensure that the appliance door is not wedged at an angle and that it is properly fitted in place.
Appliance door 5. WARNING ‒ Risk of injury! If the door locks are unsecured, the appliance door may become detached. ▶ After attaching the appliance door, close the leftand right-hand door locks. Hold the screwdriver horizontally and use it to push the door lock (black component) on each side of the door downwards as far as it will go . en 4. Push down on the intermediate pane lightly around , and carefully lift the retainer to pull it out. until you are able 5.
en Troubleshooting 1. Tip: When fitting the door panes, make sure that they are in the original order. Insert the intermediate pane in the direction of the arrow and push it in in the direction of the arrow until it is fitted in the frame. The arrow on the intermediate pane must line up with the arrow on the frame . 2. Push down lightly on the first intermediate pane around , slide the retainer in at an angle and push down until it clicks into place. 3. Centre the inner pane on the appliance door.
Troubleshooting en 19.1 Malfunctions Fault The appliance is not working. Cause and troubleshooting The circuit breaker is faulty. ▶ Check the circuit breaker in the fuse box. There has been a power cut. ▶ Check whether the lighting in your kitchen or other appliances are working. "Language English" There has been a power cut. appears on the dis▶ Configure the initial configuration settings. play.
en Disposal 19.2 Replacing the oven light bulb 1. Place a tea towel in the cooking compartment to If the light in the cooking compartment fails, change the oven light bulb. Note: Heat-resistant, 40-watt, 230 V halogen bulbs are available from the after-sales service or specialist retailers. Only use these bulbs. Hold the new halogen bulbs only with a clean, dry towel. This increases the service life of the bulb. 2. Turn the glass cover anti-clockwise to remove it 3.
Declaration of Conformity en 21.1 Product number (E-Nr.) and production number (FD) You can find the product number (E-Nr.) and the production number (FD) on the appliance's rating plate. The rating plate bearing these numbers can be found on the base of the appliance when you open the appliance door. Make a note of your appliance's details and the Customer Service telephone number to find them again quickly.
en How it works Shelf positions If you are using the CircoTherm hot air heating function, you can choose between shelf positions 1, 2, 3 and 4. Baking on one level Tall baked items and tins/dishes on the wire rack Shallow baked items/baking trays Shelf position 2 3 ¡ To catch any liquids that drip down, place the universal pan, with the wire rack inside it, into the cooking compartment at the specified shelf height.
How it works 23.4 Cooking instructions for ready meals ¡ The cooking result greatly depends on the quality of the food. Pre-browning and irregularities are sometimes already present on the raw product. ¡ Do not use frozen products that are covered with a thick layer of ice. Remove any ice on the food. en ¡ Distribute foods that are in the form of separate pieces, such as bread rolls and potato products, so that they are spread out flat and evenly on the accessory.
en How it works Food Accessory/cookware Shelf pos- Heating ition function → Page 6 Wire rack 2 Wire rack 2 Wire rack 2 Wire rack 2 Covered cookware 2 Temperature in Cooking time in °C mins Covered cookware 2 140 100–120 4+1 180 Bacon rashers Wire rack + Wire rack Wire rack 3 290 Sausages, 2-4 cm thick Belly Gammon joint Chicken, whole Yoghurt Wire rack Wire rack Wire rack Wire rack Individual moulds 3 2 2 2 Cooking compartment floor 290 4 200 - 220 180 - 200 200–2
How it works 5. Immediately place the meat into the pre-warmed Issue You want to slow cook a duck breast. cookware in the cooking compartment. To ensure that the climate in the cooking compartment remains constant, keep the cooking compartment door closed during low temperature cooking. 6. After low temperature cooking, remove the meat from the cooking compartment. Tips for slow cooking Here you will find tips for achieving good results when slow cooking food.
en Installation instructions ¡ Shelf positions when baking on 3 levels: – Baking tray: Shelf position 4 – Universal pan: Shelf position 3 – Baking tray: Shelf position 1 ¡ Hot water sponge cake – When baking on two levels, place the springform tins at diagonally opposite corners of the wire racks.
Installation instructions ¡ ¡ ¡ ¡ ¡ ¡ ¡ ¡ with these installation instructions. The installer shall be liable for damages incurred as a result of incorrect installation. Do not use the door handle for the transport or installation. Check the appliance for damage after unpacking it. Do not connect the appliance if it has been damaged in transit. Before starting up the appliance, remove any packaging material and adhesive film from the cooking compartment and the door.
en Installation instructions 24.3 Installation below a worktop Observe the installation dimensions and the installation instructions when installing below a worktop. ¡ To ventilate the appliance, the intermediate floor must have a ventilation cut-out. ¡ The worktop must be secured to the built-in unit. ¡ Observe any available installation instructions for the hob. 24.
Installation instructions 24.6 Installing two appliances on top of each other Your appliance can also be installed above or below another appliance. Observe the installation dimensions and the installation instructions when installing appliances on top of each other. ¡ To ventilate the appliances, the intermediate floor must have a ventilation cut-out. ¡ To ensure sufficient ventilation of the two appliances, there must be a ventilation opening of at least 200 cm² in the base area.
en Installation instructions 24.9 Installing the appliance Note: Do not use a cordless screwdriver to secure the panels. This may damage the panels. 1. If required, you can adjust the gap between the appliance door and the panels using the adjustment screws on the left and right. Turning the screws clockwise makes the gap larger Turning the screws anti-clockwise makes the gap smaller 2. Push the appliance in fully. Do not kink or trap the connection cable, or route it over sharp edges. 3.
Installation instructions en 9. Open the appliance door slightly, then refit the pan- els and screw them in place, first at the top and then at the bottom. Note: The gap between the worktop and the appliance must not be closed by additional battens. Thermal insulation strips must not be fitted to the side panels of the surround unit. 24.10 Removing the appliance 1. Disconnect the appliance from the power supply. 2. Open the appliance door slightly and unscrew the left and right-hand panels. 3.
Valid within Great Britain: Imported to Great Britain by BSH Home Appliances Ltd.