BUILT-IN OVEN [en] INSTRUCTION MANUAL B17CR32.
en Table of contents [ en] I NSTRUCTI ONMANUL 8 Intended use . . . . . . . . . . . . . . . . . . . . . . . . . . . . . 4 ( Important safety information . . . . . . . . . . . . . . . 5 F Sabbath mode . . . . . . . . . . . . . . . . . . . . . . . . . . 16 General information . . . . . . . . . . . . . . . . . . . . . . . . . . . 5 Halogen lamp. . . . . . . . . . . . . . . . . . . . . . . . . . . . . . . . 5 Cleaning function . . . . . . . . . . . . . . . . . . . . . . . . . . . . . 6 D Cleaning agent . .
en Intended use www.neff-international.com and in the online shop www.neff-eshop.com 8Intended use Read these instructions carefully. Only then will you be able to operate your appliance safely and correctly. Retain the instruction manual and installation instructions for future use or for subsequent owners. This appliance is only intended to be fully fitted in a kitchen. Observe the special installation instructions. Check the appliance for damage after unpacking it.
Important safety information (Important safety information General information I mpor t ant saf et y i nf or mat i on : Warning – Risk of fire! Combustible items stored in the cooking compartment may catch fire. Never store combustible items in the cooking compartment. Never open the appliance door if there is smoke inside. Switch off the appliance and unplug it from the mains or switch off the circuit breaker in the fuse box. Risk of fire! ■ Loose food remnants, fat and meat juices may catch fire.
en Causes of damage : Warning – Risk of electric shock! When replacing the cooking compartment bulb, the bulb socket contacts are live. Before replacing the bulb, unplug the appliance from the mains or switch off the circuit breaker in the fuse box. Cleaning function : Warning – Risk of burns! ; The appliance becomes very hot on the outside during the cleaning function. Never touch the appliance door. Allow the appliance to cool down. Keep children at a safe distance.
Environmental protection 7Environmental protection ■ en Open the appliance door as infrequently as possible when the appliance is in use. Your new appliance is particularly energy-efficient. Here you can find tips on how to save even more energy when using the appliance, and how to dispose of your appliance properly. Envi r onment al pr ot ect i on Saving energy ■ ■ Only preheat the appliance if this is specified in the recipe or in the tables in the operating instructions.
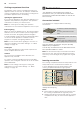
en Getting to know your appliance Note: Depending on the appliance model, individual details and colours may differ. *Getting to know your appliance Control panel In this section, we will explain the indicators and controls. You will also find out about the various functions of your appliance. You can set your appliance's various functions on the control panel. The current settings are shown in the display.
Getting to know your appliance Main menu " Touch the 0 touch button to access the main menu.
en Accessories Cooking compartment functions The features of the cooking compartment make your appliance easier to use. This, for example, enables the cooking compartment to be well lit and a cooling fan to prevent the appliance from overheating. Opening the appliance door If you open the appliance door while the appliance is in operation, this pauses the programme. The operation continues to run when you close the door.
Accessories Locking function The accessories can be pulled out approximately halfway until they lock in place. The locking function prevents the accessories from tilting when they are pulled out. The accessories must be inserted into the cooking compartment correctly for the tilt protection to work properly. When inserting the wire rack, ensure that the lug ‚ is at the rear and is facing downwards. The open side must be facing the appliance door and the curvature must be facing downwards ¾.
en Before using for the first time KBefore using for the first time Before you can use your new appliance, you must make some settings. You must also clean the cooking compartment and accessories. 4. Use the # touch button to switch on the appliance. 5. Set the specified type of heating and temperature, then start the appliance.
Operating the appliance Setting and starting the appliance operation Example: CircoTherm hot air ‚ at 170 °C 1. Touch the # touch button to switch on the appliance. You are taken directly to the ¢ menu for the types of heating. CircoTherm en Displaying the current temperature To show the current temperature on the display, press the ! touch button. The current temperature is shown briefly only when heating up. Further information If the ! touch button lights up, information can be displayed.
en Time-setting options Activating the "Rapid heat-up" function 1. Set top/bottom heating ƒ and the temperature. Note: Set a temperature above 100 °C to allow the appliance to preheat quickly. 2. Touch the # touch button to start the appliance operation. 3. Touch the ° touch button to activate the "Rapid heat-up" function. The ° symbol appears on the display. 4. Once the set temperature has been reached, the "Rapid heat-up" function switches itself off automatically.
Childproof lock 1. Slide food into the cooking compartment on a 2. 3. 4. 5. 6. 7. 8. suitable accessory and close the appliance door. Touch the # touch button. Set the type of heating and temperature. Touch the 0 touch button. The time-setting options are shown on the display. Select the cooking time using the ) button. Use the & button to navigate to the "* Ready at" line. Select the end time using the ) button. Touch the # touch button.
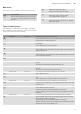
en Basic settings QBasic settings Fan run-on time Recommended Minimum Pull-out system No Yes (double or triple pull-out system retrofitted) Factory settings Load *) Depending on the appliance model, this basic setting cannot be selected There are various settings available to you in order to help use your appliance effectively and simply. You can change these settings as required. Basi c set i ngs Changing the basic settings 1. 2. 3. 4. 5. 6. 7. 8. 9. Touch the # touch button.
Cleaning agent 4. 5. 6. 7. Use the ( or ) button to select the temperature. Use the & button to navigate to the next line. Use the ( or ) button to select the cooking time. Touch the # touch button. The appliance starts the operation. Notes Once Sabbath mode has started, you can no longer change any settings or cancel the operation using the # touch button. ■ The operation is not interrupted if you open the appliance door. ■ Once the Sabbath mode duration has elapsed, a signal sounds.
en Cleaning function Pull-out system Accessories Hot soapy water: Clean with a dish cloth or a brush. Do not remove the lubricant while the pull-out rails are pulled out – it is best to clean them when they are pushed in. Do not clean in the dishwasher. Hot soapy water: Soak and clean with a dish cloth or brush. If there are heavy deposits of dirt, use a stainless steel scouring pad.
Cleaning function en If your appliance is already prematurely very dirty or if you notice dark patches on the back panel, do not wait until your appliance recommends cleaning to do so. This is because the more often the appliance is cleaned, the longer the self-cleaning surfaces will retain their cleaning capability. You can clean your appliance at any time as required using the cleaning function.
en Rails Running the rapid drying function for the cooking compartment 1. After the cleaning aid has been run through, leave the appliance door ajar in the stop position (approx. 30°). 2. Touch the # touch button. 3. Start CircoTherm hot air at 50 °C. 4. After five minutes, switch off the appliance and close the appliance door. Removing heavy deposits of dirt You have several options for removing particularly stubborn deposits of dirt.
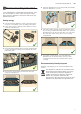
Appliance door qAppliance door With good care and cleaning, your appliance will retain its appearance and remain fully functional for a long time to come. This will tell you how to clean the appliance door. Ap l i ance do r Detaching and refitting the appliance door For cleaning purposes or to remove the door panels, you can detach the appliance door. The appliance door hinges each have a locking lever. When the locking levers are closed (fig. !), the appliance door is secured in place.
Appliance door en Fitting and removing the glass panels To facilitate cleaning, you can remove the glass panels from the appliance door. If required, for example if the appliance is installed higher up, you can remove the entire door and lay it on a flat surface. 4. Take off the seal on both sides and remove it (fig. $). Locking the appliance door 1. Open the appliance door fully. 2. Open the two locking levers on the left and right (fig. !). 3. Close the appliance door as far as it goes (fig. ").
Appliance door Fitting panels en 5. Push in the inner glass panel. Before sliding the panel in, make sure that the glossy side of the panel is on the outside and the cut-outs on the left and right are at the top. The panel must be sitting correctly at the bottom in the retainer (fig. %). 1. Open the appliance door fully and refit the condensate trough. To do this, insert the trough from above and rotate it at the bottom (fig. !). 1 2.
en Trouble shooting 3Trouble shooting If a fault occurs, there is often a simple explanation. Before calling the after-sales service, please refer to the fault table and attempt to correct the fault yourself. Tr oubl e sho t i ng Tip: If a meal does not turn out exactly as you wanted, refer to the "Tested for you in our cooking studio" section.Here, you will find plenty of cooking tips and notes. : Warning – Risk of injury! Incorrect repairs are dangerous.
Customer service en Replacing the bulb in the top of the cooking compartment 4Customer service If the cooking compartment light bulb fails, it must be replaced. Heat-resistant, 40 watt, 230 V halogen bulbs are available from the after-sales service or specialist retailers. When handling the halogen bulb, use a dry cloth. This will increase the service life of the bulb. Only use these bulbs. Our after-sales service is there for you if your appliance needs to be repaired.
en Tested for you in our cooking studio JTested for you in our cooking studio Here, you can find a selection of dishes and the ideal settings for them. We will show you which type of heating and temperature are best suited to your dish. You will get information on suitable cooking accessories and the height at which they should be placed in the oven. You will also get tips about cookware and preparation methods.
Tested for you in our cooking studio similar baked items in the table as reference.Additional information can be found in the baking tips listed after the settings table. Remove unused accessories from the cooking compartment. This will ensure that you achieve the best possible cooking results and energy savings of up to 20 per cent.
en Tested for you in our cooking studio Dish Accessories/cookware Scones, 2 levels 2 baking trays Shelf position 3+1 Biscuits, 2 levels 2 baking trays 3+1 Biscuits, 3 levels 3 baking trays 4+3+1 Small cakes, 2 levels 2x 12-cup-tins 3+1 Puff pastry slices, 2 levels 2 baking trays 3+1 Puff pastry slices, 3 levels 3 baking trays 4+3+1 Jam tarts, 2 levels 2x 12-cup-tins 3+1 Meringues, 2 levels 2 baking trays 3+1 Jacket potatoes, 2 levels universal pan + baking tray 3+1 (White) Bre
Tested for you in our cooking studio Roasting and braising Here, you can find information on roasting and braising poultry and meat. You can find the ideal settings for many dishes in the settings tables. Poultry For duck or goose, pierce the skin on the underside of the wings. This allows the fat to run out. If using duck breast, score the skin. Do not turn duck breasts. When you turn poultry, ensure that the breast side or the skin side is underneath at first.
en Tested for you in our cooking studio cooking results and energy savings of up to 20 per cent. Cooking time calculation (e. g. 20+35): Please calculate the cooking time with 20 minutes per 500 g meat + 35 minutes additional time. For 1,5 kg the calculated cooking time would be 95 minutes. Cooking time range (e. g. 10-15): The food is done within the stated minutes. Type of heating used: ■ ‚ CircoTherm Dish Accessories/cookware Shelf position Type of heating Temperature in °C Time in min.
Tested for you in our cooking studio en Tips on roasting and braising The cooking compartment becomes very dirty. The roast is too dark and the crackling is burned in places, and/or the roast is too dry. The crackling is too thin. The roast looks good but the juices are burnt. The roast looks good but the juices are too clear and watery. The meat gets burned during braising. Prepare your food in an enclosed roasting dish with higher temperature or use the grill tray.
en Tested for you in our cooking studio compartment remains considerably cleaner. Ensure that the lid fits well and closes properly. Place the cookware onto the wire rack. The distance between the meat and the lid must be at least 3 cm. The meat may rise. Very hot steam may escape when opening the lid after cooking. Lift the lid at the rear, so that the hot steam can escape away from you. If necessary, braise the meat first by searing it.
Tested for you in our cooking studio en Dish Accessories Shelf position Type of heating Temperature in °C Time in min.
en Tested for you in our cooking studio Dish Accessories Shelf position Type of heating Temperature in °C Time in min. Toast Grilling white bread** wire rack 4 ˆ 290 4-6 * Preheat ** Do not preheat *** Preheat 3 minutes **** Preheat 3 minutes, turn over several times ***** Preheat 5 minutes ****** Skin side down Convenience products Here, you can find the ideal settings for preparing chilled and frozen food. Only use original accessories supplied with your appliance.
Tested for you in our cooking studio Types of heating used: ■ ‚ CircoTherm ■ ƒ Top/bottom heating ■ ■ en „ Circotherm intensive … Bread baking Dish Accessories/cookware Shelf position Type of heating Temperature in °C Cooking time in mins.
en Tested for you in our cooking studio Eco heating functions CircoTherm eco and Top/bottom heating eco are intelligent heating functions that allow you to gently cook meat, fish and baked items. The appliance optimally controls the supply of energy to the cooking compartment. The food is cooked in phases using residual heat.This means that it remains more succulent and browns less. Depending on the method of preparation and the type of food, it is possible to save energy.
Tested for you in our cooking studio en Dish Accessories/cookware Shelf position Type of heating Temperature in °C Cooking time in mins. Meat Beef, slow roast joint wire rack 2 ž 140-150 35+40 Casserole Diced meat (beef, pork, lamb), 500 g meat cookware, covered 2 140 100-120 Braising steak cookware, covered 2 ž ž 140 65+60 Fish Fish, braised, whole 300 g, e. g. trout cookware, covered 2 190-210 25-35 Fish, braised, whole 1,5kg, e. g.
en Tested for you in our cooking studio Type of heating used: Dish Š Low temperature cooking ■ Cookware Shelf posi- Heating tion function Searing time Temperain mins ture in °C Cooking time in mins 2 6-8 90* 45-60 2 Š Š 4 120* 45-60 2 Š 6-8 120* 110-130 Cookware, uncovered 2 Š 6-8 80* 130-180 Cookware, uncovered 2 Š 4-6 80* 45-70 Cookware, uncovered 2 Š 6-8 100* 150-180 Cookware, uncovered 2 4-6 80* 90-120 Sirloin, 5-6 cm thick Cookware, uncovered 2 6-8 80*
Tested for you in our cooking studio Recommended setting values In the table, you can find settings for drying various foodstuffs. The temperature and cooking time are dependent on the type, moisture, ripeness and thickness of the food to be dried. The longer you leave the food to be dried, the better it will be preserved. The thinner the slices are, the quicker the drying process en will be and the more aromatic the dried food will remain. Setting ranges are indicated for this reason.
en Tested for you in our cooking studio Type of heating used: ‚ CircoTherm ■ Preserving Cookware Vegetables, e.g. carrots 1-litre preserving jars Shelf posi- Type of tion heating 1 ‚ Vegetables, e.g. cucumbers 1-litre preserving jars 1 ‚ Stone fruit, e.g. cherries, damsons 1-litre preserving jars 1 ‚ Pomes, e.g.
Tested for you in our cooking studio Defrosting Use heating type "CircoTherm" to defrost frozen fruit, vegetables and baked items. Poultry, meat and fish should ideally be defrosted in the refrigerator. Use the following shelf positions when defrosting: ■ 1 wire rack: Level 2 ■ 2 wire racks: Level 3+1 Recommended setting values The times in the table are average values. They are dependent on the quality, freezing temperature (-18 °C) and composition of the food. Time ranges are indicated.
en Tested for you in our cooking studio Types of heating used: ■ ‚ CircoTherm ■ ■ ƒ Top/bottom heating „ Circotherm intensive Dish Accessory Shelf posi- Type of tion heating Temperature in °C Cooking time in mins.
Valid within Great Britain: Imported to Great Britain by BSH Home Appliances Ltd.