WT600 Projector User’s Manual English Deutsch Français Italiano Español Svenska WARNING TO CALIFORNIA RESIDENTS: Handling the cables supplied with this product, will expose you to lead, a chemical known to the State of California to cause birth defects or other reproductive harm. Wash hands after handling.
Important Information RF Interference Safety Cautions Precautions WARNING The Federal Communications Commission does not allow any modifications or changes to the unit EXCEPT those specified by NEC Soluctions (America), Inc. in this manual. Failure to comply with this government regulation could void your right to operate this equipment. This equipment has been tested and found to comply with the limits for a Class B digital device, pursuant to Part 15 of the FCC Rules.
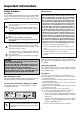
Important Information 6. Do not eject the PC card or LAN card while its data is being accessed. Doing so can damage your PC card or LAN card. Fire and Shock Precautions 1. Ensure that there is sufficient ventilation and that vents are unobstructed to prevent the build-up of heat inside your projector. Allow at least 4 inches (10 cm) of space between your projector side and a wall. Lamp Replacement • To replace the lamp, follow all instructions provided on page 7-1. • 3.
Table of Contents Important Information ..................................................... ii Selecting Noise Reduction Level ........................................................... 6-9 Signal Type ........................................................................................... 6-9 Picture Management .................................................................................. 6-9 User Adjust (when using User 1 to 4) ...................................................
1. Introduction • Supports most IBM VGA, SVGA, XGA, Macintosh, component signal (YCbCr/YPbPr) or other RGB signals within a horizontal frequency range of 15 to 100 kHz and a vertical frequency range of 50 to 120 Hz. This includes NTSC, NTSC4.43, PAL, PAL-M, PAL-N, PAL60 and SECAM standard video signals 1-1. Introduction to the Projector This section introduces you to the WT600 Projector and describes key features and controls.
1. Introduction 1-2. Part Names of the Projector Mirror cover Mirror cover lock switch Front indicator Lights blue to indicate that the projector is turned on or in the Idle mode.
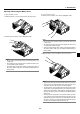
1. Introduction Opening and Closing the Mirror Cover To close the mirror cover: 1. Slowly close the mirror cover while holding both ends. To open the mirror cover: 1. Slide the mirror cover lock switch to the unlock position. 1 1 2. Slowly open the mirror cover holding both ends. NOTE: • Do not release your hold of the mirror cover until the mirror cover is fully closed. • Do not apply excessively strong pressure against the mirror cover or mirror surface while closing it.
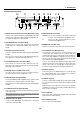
1. Introduction 6. PC CARD Access Indicator Top Features Lights while accessing a PC card. 6 13 PC CARD 7. ENTER Button FOCUS Executes your menu selection and activates items selected from the menu. SOURCE 4 MENU 10 8. CANCEL Button 9 8 7 ENTER 5 9. SELECT 왖왔왗왘 (+) (–) / Volume Buttons CANCEL 왖왔: Use these buttons to select the menu of the item you wish to adjust. When no menus appear, these buttons work as a volume control. 3D REFORM AUTO ADJUST 1 POWER ON/ STAND BY STATUS LAMP 1.
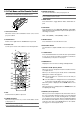
1. Introduction Terminal Panel Features 10 11 14 REMOTE PCCONTROL IN AUDIO IN 15 13 PC CARD VIDEO IN 12 4 USB 2 6 AUDIO IN AUDIO OUT DVI-I RGB S-VIDEO IN DVI-I IN RGB IN RGB OUT 7 3 1 5 L /MONO R 9 8 1. RGB IN / Component Input Connector (Mini D-Sub 15 Pin) 9. VIDEO AUDIO IN Jacks (RCA) Connect your computer using the supplied RGB cable. This connector also supports a component signal and SCART output signal. See page 2-4 for more details.
1. Introduction 6. POWER OFF Button 1-3. Part Names of the Remote Control You can use this button to turn your projector off. NOTE: If you are using a Macintosh computer, you can click either the right-click or left-click button to activate the mouse. NOTE: To turn off the projector, press and hold the POWER OFF button for a minimum of two seconds. CT LE SE 7. VIDEO Button LAS ER VIE WE R Press this button to toggle between Video and S-Video inputs. AUTO RG B ADJ.
1. Introduction 4 6 20. HELP Button 21. POINTER Button MENU SELECT 13 22. PIC-MUTE Button POWER RGB VIDEO 7 10 Provides the online help or the set information. 5 8 9 11 ON OFF VIEWER LASER AUTO ADJ. Press this button to display pointers; press again to hide the pointer. You can move your pointer icon to the area you want on the screen using the Select 왖왔왗왘 button. See page 4-2.
1. Introduction Battery Installation Remote Control Precautions 1. Press the catch and remove the battery cover. • Handle the remote control carefully. • If the remote control gets wet, wipe it dry immediately. • Avoid excessive heat and humidity. • If you will not be using the remote control for a long time, remove the batteries. • Do not place the batteries upside down.
2. Installation and Connections This section describes how to set up your projector and how to connect video and audio sources. When installing the projector for the first time, read the WT600 Setup Guide carefully. Your projector is simple to set up and use. But before you get started you must first: 1. Set up a screen and the projector. NOTE: Using a warped screen can cause an image to appear distorted. 2. Connect your computer or video equipment to the projector. See page 2-3 to 2-7. 3.
2. Installation and Connections 2-1. Setting Up the Screen and the Projector Selecting a Location The further your projector is from the screen or wall, the larger the image. The minimum size the image can be is approximately 40" (1.0 m) measured diagonally when the projector is roughly 2.5 inches (64mm) from the wall or screen. The largest the image can be is 100" (2.54m) when the projector is about 26 inches (660mm) from the wall or screen. Use the drawing below as a guide.
2. Installation and Connections 2-2. Making Connections NOTE: When using with a notebook PC, be sure to connect between the projector and the notebook PC before turning on the power to the notebook PC. In most cases signal cannot be output from RGB output unless the notebook PC is turned on after connecting with the projector. * If the screen goes blank while using your notebook PC, it may be the result of the computer's screen-saver or power management software.
2. Installation and Connections To connect SCART output (RGB) Before connections: An exclusive SCART adapter (ADP-SC1) and a commercially available SCART cable are required for this connection. NOTE: Audio signal is not available for this connection. Projector Video equipment such as DVD player RGB IN REMOTE PCCONTROL IN AUDIO IN R VIDEO IN USB PC CARD S-VIDEO IN DVI-I IN AUDIO IN AUDIO OUT DVI-I RGB RGB IN RGB OUT L /MONO To RGB IN Female Commercially available SCART cable ADP-SC1 1.
2. Installation and Connections Connecting an External Monitor RGB OUT REMOTE PCCONTROL IN AUDIO IN R VIDEO IN PC CARD S-VIDEO IN USB DVI-I IN AUDIO IN AUDIO OUT DVI-I RGB RGB IN RGB OUT L /MONO RGB signal cable (commercially available or supplied with an external monitor) To mini D-Sub 15-pin connector on the projector. It is recommended that you use a commercially available distribution amplifier if connecting a signal cable longer than the supplied one.
2. Installation and Connections Connecting Your DVD Player AUDIO IN RGB RGB IN REMOTE PCCONTROL IN AUDIO IN R VIDEO IN USB PC CARD S-VIDEO IN DVI-I IN AUDIO IN AUDIO OUT DVI-I RGB RGB IN RGB OUT L /MONO Optional 15-pin-to-RCA (female)⳯3 cable (ADP-CV1) Component video RCA⳯3 cable (not supplied) Audio Equipment DVD player AUDIO IN L R Y Cb Cr Component Audio cable (not supplied) You can connect your projector to a DVD player with component output or Video output. To do so, simply: 1.
2. Installation and Connections Connecting Your VCR or Laser Disc Player S-VIDEO IN VIDEO IN AUDIO IN REMOTE PCCONTROL IN AUDIO IN R VIDEO IN PC CARD S-VIDEO IN USB DVI-I IN AUDIO IN AUDIO OUT DVI-I RGB RGB IN RGB OUT L /MONO Video cable (not supplied) Audio cable (not supplied) S-video cable (not supplied) Audio equipment VCR/ Laser disc player L R VIDEO S-VIDEO AUDIO OUT AUDIO IN VIDEO OUT L R Audio cable (not supplied) 3. Turn on the projector and the VCR or laser disc player.
3. Projecting an Image (Basic Operation) 3. The Basic menu will be displayed in the language you have selected. This section describes how to turn on the projector and to project a picture onto the screen. 3-1. Turning on the Projector NOTE: • When plugging in or unplugging the supplied power cable, make sure that the main power switch is pushed to the off[O] position. Failure to do so may cause damage to the projector.
3. Projecting an Image (Basic Operation) 3-3. Adjusting the Picture Size and Position 3-2. Selecting a Source Selecting the computer or video source Using the Remote Control 1. Place the projector on a flat level surface and ensure that the projector is square to the screen. 2. Make the image square Move the projector left or right to center the image horizontally on the screen. ON OFF POWER RGB VIDEO VIEWER LASER AUTO ADJ. MENU Press any one of the RGB, VIDEO or VIEWER buttons.
3. Projecting an Image (Basic Operation) 5. Adjust the focus Use the FOCUS <+/–> button on the remote control or the projector cabinet to reduce keystone distortion. When the top edge of an image is shorter than the bottom one, press the FOCUS + button to correct the distortion. Focus adjustment will slightly change the picture position. If required, reposition the projector. NOTE: • The “Horizontal/Vertical Position” option can be adjusted within a range of 100%. 100% 100% 80% 100% 6.
3. Projecting an Image (Basic Operation) 3-4. Optimizing RGB Picture Automatically 3-5. Turning Up or Down Volume Sound level from the speaker and the AUDIO OUT jack (RCA) on the projector can be adjusted. increase volume decrease volume Adjusting the Image Using Auto Adjust Optimizing RGB image automatically Press the Auto Adjust button to optimize an RGB image automatically.
3. Projecting an Image (Basic Operation) Setting the function switch There are two switches on the bottom of the battery case: an applicable projector selector switch (1) and laser enable/disable switch (2). On this model, an applicable projector selector switch (1) is not used. Decide whether to enable or disable laser, then set this switch as necessary using the tip of a thin ball-point pen.
4. Convenient Features Switching operation mode between computer and projector 4-1. Using the Remote Mouse Function The three shaded buttons shown on the drawing work as a computer mouse in the Computer mode. In the Computer mode the PJ button is not lit. The built-in remote mouse function enables you to operate your computer's mouse functions from the remote control (Computer mode). It is a great convenience for clicking through your computer-generated presentations.
4. Convenient Features • When the MENU button is pressed, the PJ button lights red to indicate that you are in the Projector mode, which allows the projector menu operation using the three buttons. 4-2. Turning Off the Image and Sound • When the POINTER button is pressed, the PJ button lights red to indicate that you are in the Projector mode and that the SELECT 왖왔왗왘 button works as a moving button for the POINTER or magnified image.
4. Convenient Features 4-5. Enlarging and Moving a Picture 4-6. Getting the On-line Help You can enlarge the area you want up to 400 percent. To do so: You get the contents about Help. Display Help 1. Press the POINTER button to display the pointer. Exit Help PJ OFF ON POWER PJ HELP ASPECT FREEZE 3D REFORM HELP VIDEO ASPECT FREEZE 3D REFORM POINTER PIC-MUTE VOLUME MAGNIFY RGB VIEWER LASER AUTO ADJ.
4. Convenient Features 6. Select "OK" and press the ENTER button. This completes changing a logo for the background. Examples Click (or press and hold) the mouse button 왗 or 왘 to adjust the brightness. Or click and drag the mouse button on the slide bar horizontally to adjust it. To save the adjustments, click . The display is closed. If you click anywhere in the background while displaying adjustment and setting menu or dialog box, you will return to the main menu.
4. Convenient Features 4-10 USB Memory Device or USB Memory Card Reader Support The projector is compatible with either a USB memory device or USB memory card reader which supports the viewer and security features. • To use a USB memory device or USB memory card reader, connect the device to the USB port (type A). • Select one of the Drive icons in the Viewer toolbar, Capture toolbar and PC Card File setting screen. Up to four drives can be accepted.
5. Using the Viewer Inserting and Removing a PC Card NOTE: • To use the Viewer, first you need to create presentation materials on your PC using the Dynamic Image Utility 2.0 contained on the supplied NEC Projector User Supportware CD-ROM. For installation, see the printed NEC Software Utility Installation Guide. For creating presentation materials, see the Slide show function on the on-line manual of the Dynamic Image Utility 2.0. • Selecting Viewer sets the audio input for DVI input.
5. Using the Viewer 5-2. Operating the Viewer Function from the Projector (playback) NOTE: If no memory card is inserted in the PC CARD slot, there is no signal, and a black, blue or logo background is displayed, depending on the setting. Playback is stopped when SLIDE +/- button on the remote control or 왗왘 button on the cabinet is pressed in Auto Play mode. Up to 12 indexes can be displayed on the list of folders.
5. Using the Viewer NOTE: You can also use the 왗 and 왘 button on the remote control to select folders or slides. If you use the 왗 and 왘 button on the remote control for Viewer operation, press the PJ button to switch to the Projector mode and the PJ button lights red. The Capture features allows you to capture an image from a source that is currently being displayed. The image is saved as JPEG in the PC card. When you select Capture from the menu, you will get a tool bar.
5. Using the Viewer NOTE: You can compress a captured file (JPEG) using the Capture Options in the Setup dialog. See page 6-15. Captured images with higher resolution than the projector's native resolution cannot be displayed correctly. • File size of the captured image varies depending on the resolution of an input signal. • An hourglass indicating that an image is being captured appears on the projector's display. Do not eject the PC card or turn off the projector's power while this icon is displayed.
6. Using On-Screen Menu 3. In order for the changes to take effect, use the SELECT 왗 or 왘 button on the remote control or the projector cabinet to highlight "OK", then press the ENTER button. To cancel the changes, use the SELECT 왖 or 왔 buttons to highlight "Cancel" and press the ENTER button. To return to the factory default, select "Reset" then press the ENTER button. 6-1.
6. Using On-Screen Menu 6-2.
6.
6.
6. Using On-Screen Menu 6-3. Menu Elements Highlight Help Button Title bar Close Button Tab Radio button OK Button Cancel Button Solid triangle Check box Slide bar Tool bar Menu windows or dialog boxes typically have the following elements: OK button ........ Press to confirm your setting. You will return to the previous menu. Title bar ........... Indicates the menu title. Cancel button .. Press to cancel your setting. You will return to the previous menu. Highlight ..........
6. Using On-Screen Menu Viewer This feature enables you to make presentations using a PC card that contains captured images and slides created with the exclusive Dynamic Image Utility 2.0 contained in the CD-ROM. See the supplied Software Utility Installation Guide for installing the Dynamic Image Utility 2.0. The starting screen for the Viewer varies depending on the settings of the Setup's Page 2. See Setup on page 6-15. 6-4.
6. Using On-Screen Menu Entry List When complete, select OK and press ENTER. To exit without storing setting, select Cancel. Select "Source Name" and press ENTER to display the Source Name Edit window. You can change source name on this window. Press [왔] to display the software keyboard, which you can enter alphanumeric characters. See page 10-5 for the key function of the software keyboard. All Delete ..... This feature enables you to delete all the registered signals in the Entry List.
6. Using On-Screen Menu Masking Unwanted Area (Blanking) This feature allows you to mask any unwanted area of the screen image. Adjust the Top, Bottom, Left or Right blanking with the SELECT 왗 or 왘 button. Image Options Selecting Aspect Ratio (not available for Viewer and LAN) Aspect Ratio allows you to select the best Aspect mode to display your source image.
6. Using On-Screen Menu Selecting Video Filter Level (not available for Video, Viewer and LAN) This function reduces video noise. User Adjust (when using User 1 to 4) Off ............... The filter is removed. Less ............. The low-pass filter is applied partially. More ............ The low-pass filter is applied fully. Selecting Noise Reduction Level (not available for RGB, Viewer and LAN) Select one of the three levels for reducing video noise: Low, Medium or High.
6. Using On-Screen Menu Adjusting Color Temperature and White Balance This feature adjusts the color temperature using the slide bar. [Top] Correct the top side on a projected image to level as shown in the drawing. Checking "Color Temperature" enables the color temperature slide bar and disables the “White Balance” button. Clear “Color Temperature” and press the White Balance button to access the Contrast/Brightness adjustment for each R, G, and B.
6. Using On-Screen Menu 3. Press the 3D REFORM button on the remote control. The Cornerstone adjustment screen is displayed. The Cornerstone adjustment screen will disappear when you move the USB mouse cursor. a a b b b b 4. Point to one of the remaining 3 corners and left-click on it. a Left-click on the corner.
6. Using On-Screen Menu When using the remote control or cabinet buttons: 5. Press the ENTER button. 1. Project an image so that the screen is smaller than the area of the raster. 6. Use the SELECT 왖왔왗왘 button to move the projected image frame as shown on the example. 2. Pick up any one of the corners and align the corner of the screen with the one of the image. 7. Press the ENTER button. (The drawing shows the upper right corner.) Projected image Screen Screen 8.
6. Using On-Screen Menu NOTE: During 3D Reform adjustment, "Aspect Ratio" and "Screen" may not be available. Should this happen, first reset the 3D Reform data and then do each setting. Second repeat the 3D Reform adjustment. Changing Aspect Ratio and/or Screen setting can limit 3D Reform in its adjustable range. The adjustable ranges for 3D Reform are as follows: Horizontal ....... Max ±5° approx. Vertical ............ Max –5° to 0° approx. 3. Correcting Keystone Distortion 1.
6. Using On-Screen Menu Menu Allows you to set preferences for the on-screen menu. Press "OK" to save your changes for all the features of Page 1 and Page 2. Selecting Menu Display Time: This option allows you to select how long the projector waits after the last touch of a button to turn off the menu. The preset choices are "Manual", "Auto 5 sec", "Auto 15 sec", and "Auto 45 sec". The "Auto 45 sec" is the factory preset. [Page1] Manual ........ The menu can be turned off manually. Auto 5 sec ...
6. Using On-Screen Menu [Page 1] Setting Closed Caption: This option sets several closed caption modes that allows text to be superimposed on the projected image. CAPTION 1-4 .......... Text is superimposed. TEXT 1-4 ................. Text is displayed in full screen. OFF ......................... This exits the closed caption mode. [Page 2] Setting Lamp Mode to Normal or Eco [Lamp Mode]: This feature enables you to select two brightness mode of the lamp: Normal and Eco modes.
6. Using On-Screen Menu Setting Mouse Button and Sensitivity [Mouse]: This option lets you change your USB mouse settings. The mouse settings feature is available for USB mouse only. Choose the settings you want: [Page 4] Mouse Button .......... "Right Hand" or "Left Hand" Mouse Sensitivity ....
6. Using On-Screen Menu Enabling Horizontal and Vertical Keystone Correction Save [3D Reform Save]: This option enables you to save your current 3D Reform settings. Saving your change once affects all sources. The changes are saved when you turn off the projector. [Page 5] Enabling High Speed Fan Mode [High Speed Fan Mode]: This option allows you to select two modes for fan speed:highspeed mode and normal speed mode. When you wish to cool down the temperature inside the projector quickly, check this box.
6. Using On-Screen Menu Selecting Aspect Ratio and Position for Screen [Screen] IP Address Screen Type: Select either 4:3 Screen or 16:9 Screen for the screen to be used. See also "Aspect Ratio" on page 6-8. NOTE: When "Resolution" is set to "Native", this selection is inactive. Position: This feature adjusts the vertical position of the image when viewing video with an aspect ratio selected.
6. Using On-Screen Menu DNS Configuration ................................ Type in the IP address of DNS server on the network connected to the projector. 12 numeric characters are used. Channel: Set this option when selecting [802.11 Ad Hoc] or [Ad Hoc] in [Mode]. Select a channel number from the pull-down list. The channel must match for all wireless devices communicating on your wireless LAN. Domain Name ......... Type in domain name of the network connected to the projector.
6. Using On-Screen Menu Key1-4: Enter encryption key when selecting [64bit] or [128bit] in [WEP]. Up to 5 characters can be set in 64 bit and up to 13 characters in 128 bit. Press the “HEX” button in the Software keyboard to change to “ASCII” to set the key in ASCII digit. You can toggle this button between “ASCII” and “HEX”. When setting the key in hexadecimal digit: * The “0x (numberal and alphabet respectively) appears automatically right in front of your key code.
6. Using On-Screen Menu changes to the following settings. Status Host Name option Select whether or not to add option hostname for DHCP. None ........................ Not add Request ................... Add at the time of DHCP_REQUEST. Discover/Request .... Add at the time of DHCP_DISCOVER and DHCP_REQUEST. Host Name Type in a hostname. This field is available only when “Request” or “Discover/Request.” Client-identifier option Select whether or not to add option client identifier for DHCP. None .........
6. Using On-Screen Menu Setting a Password A password can be set for your projector to avoid operation by an unauthorized person. Delete There are two password options: one for menu and the other for logo. When a password is set, doing any one of the following four operations will display the Password input screen. For Menu: * Changing the menu to Advanced To delete your password: * Editing the custom menu 1. Highlight [Delete] and press the ENTER button.
6. Using On-Screen Menu Security The Security function enables you to protect your projector so that the projector will not project a signal unless you enter a keyword. There is also an option to lock the projector by using a registered PC card as a protect key. Once you have registered your PC card as a protect key, you are required to insert the registered PC card into the PC card slot of the projector each time you turn on the projector. You can enable the Security function by using a keyword only. 1.
6. Using On-Screen Menu To turn on the projector when Security is enabled (when using a PC card as a protect key). * If the projector is turned on by entering the Release Code, your Security will be disabled. 1. Insert your registered PC card into the PC card slot. 2. Press and hold the POWER button for a minimum of two seconds. The projector will turn on and then recognize the PC card. Once the image has been projected, it will stay on without the PC card.
6. Using On-Screen Menu Tools Help Provides tools for setting sleep timer, capturing images, displaying files or changing your background logo in a PC Card and drawing. Contents Provides an online help about how to use the menus. An underlined link means that you can move to an adjustment item directly. Selecting the underlined link and pressing ENTER moves to the corresponding adjustment item. NOTE: The "Capture" and "PC Card Files" features are required for a PC card. Using Sleep Timer 1.
7. Maintenance 3. Remove the lamp housing by pulling out the handle. This section describes the simple maintenance procedures you should follow to replace the lamp, and to clean the cabinet and the mirror. 7-1. Replacing the Lamp After your lamp has been operating for 2000 hours (up to 3000 hours : Eco mode) or longer, the "Lamp" indicator in the cabinet will blink red and the message will appear.
7. Maintenance If the mirror surface is soiled with fingers prints or dust, wipe them off with the supplied cleaning cloth. When removing sandy dust, use a blower to blow off dust or brush it off softly and wipe the mirror surface with the supplied cleaning cloth. 7-2. Cleaning Cleaning the Cabinet 1. Turn off the projector before cleaning. 2. Clean the cabinet periodically with a damp cloth. If heavily soiled, use a mild detergent. Never use strong detergents or solvents such as alcohol or thinner.
8. Troubleshooting This section helps you resolve problems you may encounter while setting up or using the projector. 8-1. Power Indicator Indicator Condition Blinking light Off Green blinking Orange blinking Steady light Green Orange Projector Condition 0.5 sec ON, 0.5 sec OFF 2.5 sec ON, 0.5 sec OFF 0.5 sec ON, 0.5 sec OFF Note The main power is off – The projector is getting ready to turn on. Wait for a moment. The projector is in Sleep Timer mode. – The projector is cooling down.
8. Troubleshooting 8-4. Common Problems & Solutions Problem Check These Items Does not turn on • Check that the power cable is plugged in and that the power button on the projector cabinet or the remote control is on. See pages 2-7 and 3-1. • Ensure that the lamp cover is installed correctly. See page 7-1. • Check to see if the projector has overheated or the lamp usage exceeds 2100 hours (up to 3100 hours : Eco mode).
9. Specification This section provides technical information about the WT600 Projector's performance Model Number WT600 Optical DMD Resolution Mirror Lamp Image Size Projection Distance Projection Angle Single Chip Digital Micromirror Device (DMD) 1024 ⳯ 768 pixels* up to UXGA (up to SXGA for digital signal) with Advanced AccuBlend Aspherical mirror ⳯ 4 220 W DC standard (176W Eco mode) 40" - 100" (1.0 m - 2.5 m) diagonal 2.52" - 25.
9. Specification Mechanical Installation Orientation Dimensions Net Weight Desktop/Front, Desktop/Rear, Ceiling/Front, Ceiling/Rear 15.0" (W) ⳯ 12.3" (H) ⳯ 12.3" (D) (with the mirror cover open) 15.0" (W) ⳯ 8.9" (H) ⳯ 11.7" (D) (with the mirror cover closed) 380 mm (W) ⳯ 313 mm (H) ⳯ 313 mm (D) (with the mirror cover open) 380 mm (W) ⳯ 227 mm (H) ⳯ 296 mm (D) (with the mirror cover closed) 13.0 lbs / 5.
10. Appendix 10-1. Cabinet Dimensions PC CARD FOCUS 296 (11.65) SOURCE MENU SELECT ENTER CANCEL 3D REFORM AUTO ADJUST POWER ON/ STAND BY STATUS LAMP 313 (12.32) AUDIO IN R L /MONO VIDEO IN PC CARD S-VIDEO IN USB DVI-I IN AUDIO IN AUDIO OUT DVI-I RGB RGB IN RGB OUT 9.6 (0.38) REMOTE PCCONTROL IN 227 (8.94) 313 (12.32) 380 (14.
10. Appendix 10-2. Pin Assignments of D-Sub RGB Input Connector Mini D-Sub 15 Pin Connector 5 4 3 2 1 10 9 8 7 6 15 14 13 12 11 Pin No. Signal Level Video signal : 0.
10. Appendix 10-3.
10. Appendix 10-4.
10. Appendix 10-5. Using Software Keyboard 1 to 0 and Characters .............. Use to type in IP address or projector name SP ............................................ Inserts a space BS ............................................ Deletes one character backward 왗 .............................................. Returns to the previous 왘 .............................................. Advances to the next OK ............................................ Executes the selection Cancel ......................
10. Appendix http://192.168.73.1/index.html for the address or the entry column of the URL. 10-6. Operation Using an HTTP Brouther Overview Structure of the HTTP Server The use of HTTP server functions will allow control of the projector from a web browser without the installation of special software. Please be sure to use “Microsoft Internet Explorer 4.x” or a higher version for the web browser. (This device uses “JavaScript” and “Cookies” and the browser should be set to accept these functions.
10. Appendix Picture: Controls the video adjustment of the projector. Brightness 왖 ......... Increments the brightness adjustment value. Brightness 왔 ......... Decrements the brightness adjustment value. Contrast 왖 ............ Increments the contrast adjustment value. Contrast 왔 ............ Decrements the contrast adjustment value. Color 왖 ................. Increments the color adjustment value. Color 왔 ................. Decrements the color adjustment value. Hue 왖 ...................