
Computer Systems Division Computer Hardware Service and Reference Manual
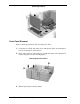


Table Of Contents
- Proprietary Notice
- Contents
- Preface
- Abbreviations
- Technical Information
- Utilities
- Option Installation
- Maintenance and Troubleshooting
- Disassembly and Reassembly
- Desktop -Illustrated Parts Breakdown
- MiniTower -Illustrated Parts Breakdown
- System Specifications
- Connector Pin Assignments
- System Resources
- Index
- FCC Statement
- Battery Replacement

Disassembly and Reassembly 5-7
Removing the 5 1/4-Inch Device Screws
4. Slide the device out from the front of the system unit.
Optional 3 1/2-Inch Hard Drive Removal
Remove the optional 3 1/2-inch hard drive as follows.
1. Remove the system access cover and front panel as previously described.
2. Label and unplug the hard drive power and signal cables from the hard
drive.
3. Remove the two screws securing the 3 1/2-inch hard drive bracket to the
front of the system unit (see the following figure).
Removing the Bracket Screws
A
– Two Drive Bracket Screws