
Computer Systems Division Computer Hardware Service and Reference Manual

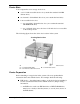


Table Of Contents
- Proprietary Notice
- Contents
- Preface
- Abbreviations
- Technical Information
- Utilities
- Option Installation
- Maintenance and Troubleshooting
- Disassembly and Reassembly
- Desktop -Illustrated Parts Breakdown
- MiniTower -Illustrated Parts Breakdown
- System Specifications
- Connector Pin Assignments
- System Resources
- Index
- FCC Statement
- Battery Replacement

3-20 Option Installation
Removing the Bracket Screws
A – Two Drive Bracket Screws
Slide the 3 1/2-inch hard drive bracket towards the back of the system
unit until it is free of the molded plastic.
Align the two screw holes on the hard drive with the two tabs on the
bracket (see the following figure). Slide the hard drive onto the tabs.
Aligning the Holes and Tabs
A – Hole B – Tab
C – Tab D – Hole
Place the hard drive into the bracket and secure with the screw.