
Computer Systems Division Computer Hardware Service and Reference Manual

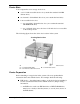


Table Of Contents
- Proprietary Notice
- Contents
- Preface
- Abbreviations
- Technical Information
- Utilities
- Option Installation
- Maintenance and Troubleshooting
- Disassembly and Reassembly
- Desktop -Illustrated Parts Breakdown
- MiniTower -Illustrated Parts Breakdown
- System Specifications
- Connector Pin Assignments
- System Resources
- Index
- FCC Statement
- Battery Replacement

Option Installation 3-11
DIMM Installation
Use the following procedure to install a DIMM.
1. Remove the access cover.
2. Locate the DIMM sockets.
3. Remove any currently-installed DIMMs that are not needed. See the
previous section “DIMM Removal.”
!
CAUTION
Before installing a DIMM, reduce static discharge by
touching the system’s metal chassis.
4. To install a DIMM, align the module with an empty socket. Make sure that
the notches on the DIMM line up with the keys in the sockets.
5. Insert the DIMM into the socket. Close the plastic clips at both ends of the
socket.
Installing a DIMM
A
– Plastic Clip
6. Replace any cables or boards that may have been removed.
7. Replace the access cover.
Data Storage Devices
The system board in your computer supports the following storage devices:
standard 1.44-MB diskette drive and an optional tape backup unit
up to four IDE drives.