
Operation Manual


84
7. Using Optional Lenses
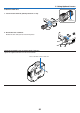
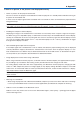
2. Pull out the existing lens slowly.
Removetheexistinglensfromtheprojector.
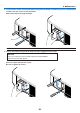
1. Rotate the lens counterclockwise while strongly pushing the
LENS RELEASE button all the way in.
Theexistinglenswillbedisengaged.
NOTE:IfthelenscannotberemovedevenbyusingtheLENSRELEASEbut-
ton, the anti-theft screw for lens may be used to secure the lens.
If such is the case, remove the anti-theft screw first. (
→
next page)
LENS RELEASE
Button
Replacing with Optional Lens
CAUTION
• Donotgiveashockorexcessiveloadtotheprojectororthelenscomponentsastheprojectorandlenscompo-
nentscontainprecisionparts.
• Whenshippingtheprojectorwiththeoptionallens,removetheoptionallensbeforeshippingtheprojector.The
lensandthelensshiftmechanismmayencounterdamagecausedbyimproperhandlingduringtransportation.
• Beforeremovingorinstallingthelens,besuretoturnofftheprojector,waituntilthecoolingfansstop,andturn
offthemainpowerswitch.
• Donottouchthelenssurfacewhenremovingorinstallingthelens.
• Keepngerprints,dustoroiloffthelenssurface.Donotscratchthelenssurface.
• Workonalevelsurfacewithasoftclothunderittoavoidscratching.
• Ifyouremoveandstorethelens,attachthelenscaptotheprojectortokeepoffdustanddirt.
• PleaseheedthefollowinginformationifyouowntwoormoreNP3200/NP2200/NP1200projectorsandmayin-
terchangethestandardlenses.
Whenreplacingthestandardlens(withanoptionallens)andthenre-installingthestandardlensbackintothe
projector,thestandardlensmustgobacktoitsoriginalprojectorfromwhichitwasremoved.
If you removethe standard lensfromoneNP3200/NP2200/NP1200 projectorand re-install itinto another
NP3200/NP2200/NP1200projector,performancemaybecompromised.
Besuretousethestandardlensincombinationwithitsoriginalfactory-adjustedprojector.