
Operation Manual
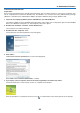
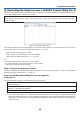


NetworkSettings
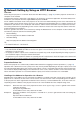
http://<theprojector’sIPaddress>/index.html
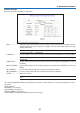
DHCP ����������������������������Enabling this option automatically assigns an IP address to the projector from your DHCP server� Dis-
abling this option allows you to register the IP address or subnet mask number obtained from your
network administrator�
TIP:YoucanchecktheIPaddressinthemenuwhen[ENABLE]isselectedfor[DHCP].Todoso,from
the menu, select [INFO.]
→
[WIREDLAN].
IP ADDRESS �����������������Set your IP address of the network connected to the projector when [DISABLE] is selected for [DHCP]�
TIP: You can check your specified IP address in the menu. To do so, from the menu, select [INFO.]
→
[WIREDLAN].
SUBNET MASK �������������Set your subnet mask number of the network connected to the projector when [DISABLE] is selected
for [DHCP]�
DEFAULT GATEWAY ������Set your default gateway of the network connected to the projector when [DISABLE] is selected for
[DHCP]�
DNS (PRIMARY) �����������Set your primary DNS settings of the network connected to the projector�
DNS (SECONDARY) ������Set your secondary DNS settings of the network connected to the projector�
UPDATE ������������������������Reflect your settings�
NOTE: Close the browser after clicking [UPDATE]. The projector will automatically update your set-
tings.
TIP:Selecting[NETWORKSETTINGS]for[RESET]fromtheprojector’smenuallowsyoutoreturnthefollowingitemstothefac-
tory default.
[DHCP]:DISABLE
[IP ADDRESS]: 192.168.0.10
[SUBNET MASK]: 255.255.255.0
[DEFAULTGATEWAY]:192.168.0.1
* [DNS(PRIMARY)] and [DNS(SECONDARY)] will remain unchanged.
41
4. Convenient Features