
Operation Manual


27
2
2
1
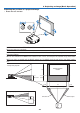
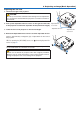
Adjusting the Tilt Foot
1. Lift the front edge of the projector.
CAUTION:
DonottrytotouchtheventilationoutletduringTiltFootadjustment
asitcanbecomeheatedwhiletheprojectoristurnedonandafterit
isturnedoff.
2.
Push up the Adjustable Tilt Foot Levers on the right and left sides
of the projector to extend the adjustable tilt feet (maximum height).
3. Lower the front of the projector to the desired height.
4.
Release the Adjustable Tilt Foot lever to lock the Adjustable tilt foot.
Thereis approximately10degrees(up)of adjustment for thefront of
theprojector.
AdjustableTilt
FootLever
AdjustableTilt
FootLever
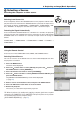
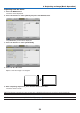
NOTE:Your“Keystone”correctiondatacanberesetbypressingandholding
the KEYSTONE button for a minimum of 2 seconds.
CAUTION:
Donotusethetilt-footforpurposesotherthanoriginallyintended.
Misusessuchasusingthetiltfoottocarryorhang(fromthewallor
ceiling)theprojectorcancausedamagetotheprojector.
TIP: For operating the [KEYSTONE] screen, see “
Correcting Keystone Dis-
tortion”onpage28.
3. Projecting an Image (Basic Operation)
4
3
4
AdjustableTiltFoot