
Operation Manual


143
6. Installation and Connections
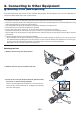
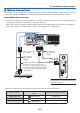
Computer cable (VGA) (supplied)
To mini D-Sub 15-pin connector on the
projector. It is recommended that you use a
commercially available distribution amplifier
if connecting a signal cable longer than the
cable supplied.
NOTE:ForMacintosh,useacommerciallyavail-
ablepinadapter(notsupplied)toconnectto
yourMac’svideoport.
Stereo mini-plug
audio cable (not
supplied)
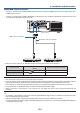
RGB - to - BNC cable
(not supplied)
Stereo mini-plug
audio cable (not
supplied)
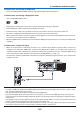
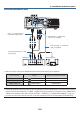
Making Connections
Theprojector can be connectedto a computer usingthecomputer cable(included), a BNCcable (5-coretype)
(commerciallyavailable),HDMIcable(commerciallyavailable)orDisplayPortcable(commerciallyavailable).
Analog RGB signal connection
• Connecttheincludedcomputercablebetweenthecomputer’sdisplayoutputconnector(miniD-Sub15-pin)and
theprojector’sComputer1orComputer2videoinputconnector.
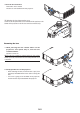
• Whenconnectingthecomputer’sdisplayoutputconnector(miniD-Sub15-pin)andtheprojector’sComputer3
videoinputconnector,useaBNCcable(5-core)→miniD-Sub15-pinconvertercable.
• Selectthesourcenameforitsappropriateinputconnectorafterturningontheprojector.
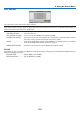
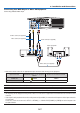
Inputconnector
SOURCEbuttonontheprojector
cabinet
Buttonontheremotecontrol
COMPUTER1IN COMPUTER1 COMPUTER1
COMPUTER2IN COMPUTER2 COMPUTER2
COMPUTER3IN
COMPUTER3
COMPUTER3