
User's Manual


35
5. Performing Stacking/Tiling Correction
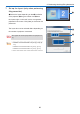
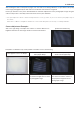
12. Click [Select Image Boundary] to set up the
4 c
orner points of the projected image that
will serve as the corre
ction result
The test image will be displayed in all the connected
pro
jectors.
Set up the 4 corners of the projected image in the
order starting from top left to top right to lower left to
lowe
r right.
Return to the main screen at the end of all the settings.
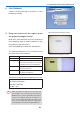
T
he following operations can be carried out using the
va
rious keys of the keyboard.
ENTER key Change the 4 selected corners as
follows.
Backspace key
Return the 4 selected corners to the
pre
vious locations.
ESC key Suspend the operation.
↑↓←→ keys The 4 selected corners can be fine-
tuned.
T
he following message will be projected in this step.
(
when top right is selected)
Select the top-right corner of the nal image.
Enter Key - Next Step
Back
space Key - Previous Step
Es
c Key - Quit
Note
• When the ↑ ↓ ← → keys are pressed and held
down for a while operations may be disabled for
a while.
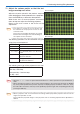
13. Click [Apply Calibration]
The corrected result will be reflected in the projected
image.
Return to the Multi Screen Tool screen at the end of
the calibra
tion.
14. Click [OK]
With this, the stacking/tiling correction will be completed when not using the web camera.