
User's Manual


34
5. Performing Stacking/Tiling Correction
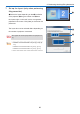
11. Adjust the various points so that the test
images overlap each other
Adjust the 4 points placed in the previous step and
check
the degree of overlap between the 2 projectors.
Pre
ss the ENTER key at the end of the operation.
When there are 3 or more projectors connected,
re
turn to Step 9 to adjust the remaining projectors.
Return to the main screen at the end of all the
adjustments.
Reference
• The degree of overlap of the test images will
be reflected in the projected screen as the
corre
ction result.
Please check and adjust the degree of overlap
betwe
en the test images even if the markings of
the 4 points are
not consistent.
The following operations can be carried out using the
va
rious keys of the keyboard.
ENTER key Proceed to the next step.
Backspace key
Return to the previous step.
ESC key Suspend the operation.
↑↓←→ keys The selected point can be fine-
tuned.
p key Change the selected points in a
clockwise dire
ction.
n key Change the selected points in an
anticlockwise dire
ction.
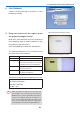
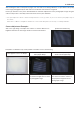
The following message will be projected in this step.
Adjust the alignment if desired.
Enter Key - Next Step.
Back
space Key - Previous Step
Es
c Key - Quit
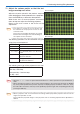
Good example
Bad example
Note
• When the ↑ ↓ ← → keys are pressed and held down for a while, operations may be disabled for a
while.
• Wh
en specifying the region of the 4 points and proceeding to the next step by pressing the ENTER
key,
the 4 points specified in the previous step may not display properly sometimes. In this case, check
the L
AN cable connection, and carry out the [Calibrate] operation again after suspending operation by
pre
ssing the ESC key.
Reference
• When 4 projector units are connected the test image will be projected in projectors that are not the
target of the operation as well.
Please hide the projected images of the projectors that are not being adjusted when adjustment is
diffi
cult.