
User's Manual

27
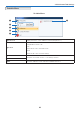
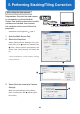
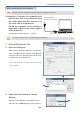
5. Select the type of calibration mode.
To perform stacking correction, select "Stacking",
then select "Master Projector" or "Auto" for the
calibra
tion mode.
* Wh
en performing stacking correction by specifying
the master projector, select the number of the
pro
jector to be the master.
To perf
orm tiling correction, select "Tiling", then
select "Specify Four Points" or "Auto" for the
calibra
tion mode.
5. Performing Stacking/Tiling Correction
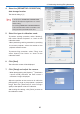
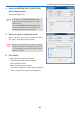
6. Click [Next]
The calibration screen will be displayed.
7. Click [Setup] and adjust the camera.
* When photographing with [Options]
→
[Continuous
capture mode] checked, the web camera's
continu
ous image is displayed.
Adjust the position of the camera to fit within the
photographing range of the projector's projected
image, then click [A
uto-Tune] to set the image's
quality
to the optimal values for calibration.
After making the settings, click [Finish] to return to
the calibra
tion screen.
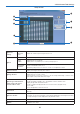
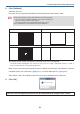
4. Select the [GEOMETRIC CORRECTION]
data storage location
The default setting is [1].
Note
In the projector, GEOMETRIC CORRECTION
data has already been registered in 1 to 3 as the
default setting.
The existing GEOMETRIC CORRECTION data
of the selected number will be overwritten in the
saving location by the Multi Screen Tool.