
User's Manual

24
4. Preparation of the Projectors
Prepare the projectors to be used for stacking/tiling correction. In addition to the explanations in this manual, also
re
fer to the projectors' operating instructions.
1. Install and connect the projectors that will be
used, and project them onto the screen (The
portion of pro
jectors that will be used)
Connection of the Equipment Page 13
Tiling corre
ction only
• Please adjust the projection positions so that the
projected image of each projector overlaps by 15% or
more
.
2. Adjust the Projectors
Refer to the projector user's manual and perform the fol-
low
ing adjustments.
Ad
justments for both stacking and tiling correction
• Adjust so that the projection image of each projector enters the screen.
• Set[ECOMODE]tothesamesettingforeachoftheprojectors.
• Makeimagequalityadjustments, projectionpositionadjustments, andzoomandfocusadjustments asre-
quired.
Adjustments for stacking correction only
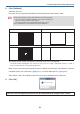
• Whencorrectingthestackingtomatch theprojectedscreenofthemasterprojectorusingthe webcamera,
pleasecarryout[CORNERSTONE]fortheprojectorthatisgoingtobethemaster.Whentheprojectedimage
of the master projector is distorted, the stacking of the other projectors will also be corrected to match the dis-
torted projection image.
Reference
• When [Auto]instead of[Master Projector] isselectedin the calibration mode, the [CORNERSTONE] ofallthe
projectors will be reset before performing the correction.
• When[Auto]isselectedinthecalibrationmode,correctionwillbeappliedonalltheprojectors.Pleasespecifythe
projectorswhichyoudonotwishtocorrectin[MasterProjector].