MultiSync LCD1860NX User’s Manual
TO PREVENT FIRE OR SHOCK HAZARDS, DO NOT EXPOSE THIS UNIT TO RAIN OR MOISTURE. ALSO, DO NOT USE THIS UNIT’S POLARIZED PLUG WITH AN EXTENSION CORD RECEPTACLE OR OTHER OUTLETS UNLESS THE PRONGS CAN BE FULLY INSERTED. REFRAIN FROM OPENING THE CABINET AS THERE ARE HIGH VOLTAGE COMPONENTS INSIDE. REFER SERVICING TO QUALIFIED SERVICE PERSONNEL. CAUTION CAUTION: TO REDUCE THE RISK OF ELECTRIC SHOCK, DO NOT REMOVE COVER (OR BACK). NO USER SERVICEABLE PARTS INSIDE. REFER SERVICING TO QUALIFIED SERVICE PERSONNEL.
Canadian Department of Communications Compliance Statement DOC: This Class B digital apparatus meets all requirements of the Canadian Interference-Causing Equipment Regulations. C-UL: Bears the C-UL Mark and is in compliance with Canadian Safety Regulations according to CSA C22.2 No. 950. FCC Information 1. 2. Use the attached specified cables with the MultiSync LCD1860NX (L182R4) colour monitor so as not to interfere with radio and television reception.
English Contents Your new NEC MultiSync LCD monitor box* should contain the following: • MultiSync LCD1860NX monitor with height adjustable base • Power Cord(s) • Video Signal Cable • User’s Manual • Cable Management Cover • NEC LCD Setup Software, User’s Manual and other helpful files. To see the User‘s Manual, Acrobat Reader 4.0 must be installed on your PC.
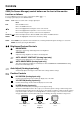
Quick Start To attach the MultiSync LCD monitor to your system, follow these instructions: 1. Turn off the power to your computer. 2. For the PC or MAC with DVI digital output: Connect the DVI signal cable to the connector of the display card in your system (Figure A.1). Tighten all screws. For the PC with Analog output: Connect the 15-pin mini D-SUB to 15-pin mini D-SUB signal cable to the connector of the display card in your system (Figure A.1).
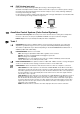
INPUT2 INPUT1 English INPUT2 INPUT1 Figure C.1 Figure C.2 Vacation Switch Power Button Figure D.1 Raise and Lower Monitor Screen The monitor may be raised or lowered in either Portrait or Landscape mode. To raise or lower screen, place hands on each side of the monitor and lift or lower to the desired height (Figure RL.1). Figure RL.
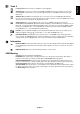
Tilt Swivel Grasp both sides of the monitor screen with your hands and adjust the tilt as desired (Figure TS.1). Grasp both sides of the monitor screen with your hands and adjust the swivel as desired (Figure TS.1). Warning: Take care not to trap fingers between monitor bezel and stand. Figure TS.1 Remove Monitor Stand for Mounting To prepare the monitor for alternate mounting purposes: 1. Disconnect all cables. 2. Place hands on each side of the monitor and lift up to the highest position. 3.
OSM (On-Screen Manager) control buttons on the front of the monitor function as follows: To access OSM menu, press any of the control buttons (EXIT, To change signal input, press the SELECT button. NOTE: , , –, +). OSM must be closed in order to change signal input. Menu Exits the OSM controls. Exits to the OSM main menu. EXIT Moves the highlighted area left/right to select control menus. Moves the highlighted area up/down to select one of the controls.
FINE (Analog input only) Improves focus, clarity and image stability by increasing or decreasing this setting. Should the “Auto Adjust function” and the “H.Size” function do not give you a satisfactory picture setting, a fine tuning can be performed using the “Fine” function. It improves focus, clearity and image stability by increasing or decreasing this setting. For this a Moiré test pattern could be used. If the Fine value is wrongly calibrated, the result would look like on the left drawing.
Language: OSM control menus are available in seven languages. OSM Position: You can choose where you would like the OSM control image to appear on your screen. Selecting OSM Location allows you to manually adjust the position of the OSM control menu left, right, down or up. OSM Turn Off: The OSM control menu will stay on as long as it is use. In the OSM Turn Off submenu, you can select how long the monitor waits after the last touch of a button to shut off the OSM control menu.
Recommended use Safety Precautions and Maintenance FOR OPTIMUM PERFORMANCE, PLEASE NOTE THE FOLLOWING WHEN SETTING UP AND USING THE MULTISYNC LCD COLOUR MONITOR: • DO NOT OPEN THE MONITOR. There are no user serviceable parts inside and opening or removing covers may expose you to dangerous shock hazards or other risks. Refer all servicing to qualified service personnel. • Do not spill any liquids into the cabinet or use your monitor near water.
Adjust the monitor’s brightness and contrast controls to enhance readability. • Use a document holder placed close to the screen. • Position whatever you are looking at most of the time (the screen or reference material) directly in front of you to minimize turning your head while you are typing. • Avoid displaying fixed patterns on the monitor for long periods of time to avoid image persistence (after-image effects). • Get regular eye checkups.
Specifications Monitor Specifications LCD1860NX (L182R4) Monitor LCD Module Diagonal: 46 cm/18.1 inches Viewable Image Size: 46 cm/18.1 inches Native Resolution (Pixel Count): 1280 x 1024 Input Signal Notes Active matrix; thin film transistor (TFT) liquid crystal display (LCD); 0.28 mm dot pitch; 200 cd/m2 white luminence; 350:1 contrast ratio, typical. Video: ANALOG 0.7 Vp-p/75 Ohms Digital Input: DVI Sync: Separate sync.TTL Level Horizontal sync. Positive/Negative Vertical sync.
ambix Technology: Dual input technology allowing both analog and digital inputs off of one connector (DVI-I) as well as additional legacy analog support off of a traditional 15-pin VGA connector. Provides traditional MultiSync technology compatibility for analog as well as DVI-based digital compatibility for digital inputs. DVI-based digital interfaces include DVI-D, DFP and P&D.
Troubleshooting No picture • The signal cable should be completely connected to the display card/computer. • The display card should be completely seated in its slot. • Check the Vacation Switch should be in the ON position. • Front Power Switch and computer power switch should be in the ON position. • Check to make sure that a supported mode has been selected on the display card or system being used. (Please consult display card or system manual to change graphics mode.
MultiSync LCD1860NX (L182R4) Lead** Congratulations! You have just purchased a TCO’99 approved and labeled product! Your choice has provided you with a product developed for professional use. Your purchase has also contributed to reducing the burden on the environment and also to the further development of environmentally adapted electronics products. Lead can be found in picture tubes, display screens, solders and capacitors. Lead damages the nervous system and in higher doses, causes lead poisoning.