Operation Manual (Enhanced split screen Model) For the specifications of your plasma monitor, refer to “Model Information”. NEC Solutions (America), Inc.
Important Information Precautions 2. Do not use this unit’s polarized plug with extension cords or outlets unless the prongs can be completely inserted. 3. Do not expose the unit to water or moisture. 4. Avoid damage to the power cord, and do not attempt to modify the power cord. 5. Unplug the power cord during electrical storms or if the unit will not be used over a long period. 6. Do not open the cabinet which has potentially dangerous high voltage components inside.
your investment in this plasma monitor, please adhere to the following guidelines and recommendations for minimizing the occurrence of image burn: * Always enable and use your computer’s screen saver function during use with a computer input source. * Display a moving image whenever possible. * Change the position of the menu display from time to time. * Always power down the monitor when you are finished using it.
• Assurez-vous de mettre en marche et d’utliser l’économisateur d’écran chaque fois que c’est possible lorsque vous l’utilisez avec une source d’entrée d’ordinateur. • Affichez une image en mouvement aussi souvent que possible. • Changer la position de l’affichage de menu de temps à autre. • Coupez toujours l’alimentation lorsque vous avez terminé d’utiliser la moniteur.
Contents Installation ...................................................... 6 Setting the background color when no signal is being input ........................................................................ 24 Setting the gray level for the sides of the screen ......... 25 Setting the screen size for S1/S2 video input .............. 25 Turning on/off the menu display ................................ 25 Setting the position of the menu .................................
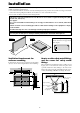
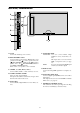
Installation You can attach your optional mounts or stand to the plasma monitor in one of the following two ways: * While it is upright. (See Drawing A) * As it is laid down with the screen face down (See Drawing B). Lay the protective sheet, which was wrapped around the monitor when it was packaged, beneath the screen surface so as not to scratch the screen face. * Do not touch or hold the screen face when carrying the unit. • This device cannot be installed on its own.
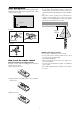
Cable Management Operating Range * Use the remote control within a distance of about 7 m/ 23ft. from the front of the monitor’s remote control sensor and at horizontal and vertical angles of up to approximately 30°. * The remote control operation may not function if the monitor’s remote control sensor is exposed to direct sunlight or strong artificial light, or if there is an obstacle between the sensor and the remote control.
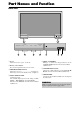
Part Names and Function Front View MENU/ENTER MENU/ENTER 7 VOLUME DOWN UP LEFT/- RIGHT/+ INPUT SELECT /EXIT VOLUME DOWN UP LEFT/ - 6 RIGHT/+ INPUT SELECT /EXIT 5 4 q Power Turns the monitor’s power on and off. 1 3 2 t LEFT/– and RIGHT/+ Enlarges or reduces the image. Functions as the CURSOR ( / ) buttons in the On-Screen Menu (OSM) mode. w Remote sensor window Receives the signals from the remote control. y VOLUME DOWN and UP Adjusts the volume.
Rear View/ Terminal Board C D E F G H A B I F DVD2/ HD2, RGB2 DVD2/ HD2: You can connect DVDs, High Definition sources, Laser Discs, etc. here. This input can be set for use with an RGB or component source. (see page 23) RGB2: You can connect an analog RGB signal and the syncronization signal. A AC IN Connect the included power cord here. B EXT SPEAKER L and R Connect speakers (optional) here. Maintain the correct polarity.
Remote Control q POWER ON/STANDBY Switches the power on/standby. (This does not operate when POWER/STANDBY indicator of the main unit is off.) w OFF TIMER Activates the off timer for the unit. e DISPLAY Displays the source settings on the screen. r WIDE Automatically detects the signal and sets the aspect ratio. Wide button is not active for all signals. t MENU/ENTER Press this button to access the OSM controls. Press this button during the display of the main menu to go to the sub menu.
Basic Operations POWER OFF TIMER To turn the unit ON and OFF: 1. Plug the power cord into an active AC power outlet. 2. Press the Power button (on the unit). The monitor’s POWER/STANDBY indicator turns red and the standby mode is set. 3. Press the POWER ON button (on the remote control) to turn on the unit. The monitor’s POWER/STANDBY indicator will light up (green) when the unit is on. 4. Press the POWER STANDBY button (on the remote control) or the Power button (on the unit) to turn off the unit.
WIDE Operations Wide Screen Operation (manual) The picture is expanded in the horizontal and vertical direction, maintaining the original proportions. * Use this for theater size (wide) movies, etc. With this function, you can select one of six screen sizes. When viewing videos or digital video discs 1. Press the WIDE button on the remote control. 2. Within 3 seconds ... Press the WIDE button again. The screen size switches as follows: 2.35:1 size screen → NORMAL → ANAMORPHIC → STADIUM → ZOOM → 2.
Wide Screen Operation with Computer Signals Information Supported resolution See page 7 of Model Information for details on the display output of the various VESA signal standards supported by the monitor. When 852 (848) dot 480 line wide VGA* signals with a vertical frequency of 60 Hz and horizontal frequency of 31.7 (31.0) kHz are input Select an appropriate setting for RGB SELECT mode referring to the“Table of Signals Supported” on page 7 of Model Information.
SPLIT SCREEN Operations Showing a couple of pictures on the screen at the same time Operations in the Side-by-side mode To change the picture size, press the cursor button. * An RGB-input picture may not be displayed in these modes, depending on the input signal specifications. 1. Press the button to select a screen mode from among single mode, side-by-side, and picture-in-picture.
Operations in the Picture-in-picture mode Selecting the input signals to be displayed 1. Press the ACTIVE SELECT button to make the desired picture active. 2. Press the PC/RGB, VIDEO1, 2, 3, or DVD/HD1, 2, 3 button to change the selection of the input signal. The INPUT SELECT button on the monitor can also be used to change the selection. To move the position of the sub screen, press the cursor or button.
OSM (On Screen Menu) Controls Menu Operations The following describes how to use the menus and the selected items. 1. Press the MENU/ENTER button on the remote control to display the MAIN MENU. MAIN MENU PICTURE SET UP AUDIO FUNCTION IMAGE ADJ. SIGNAL INFO. SEL. MENU/ENTER OK EXIT EXIT 2. Press the cursor buttons ▲ ▼ on the remote control to highlight the menu you wish to enter. 3. Press the MENU/ENTER button on the remote control to select a sub menu or item.
Menu Tree :Shaded areas indicate the default value. ←→ : Press the or button to adjust. The default value is at the center. Main menu Sub menu Sub menu 2 PICTURE PICTURE MEMORY CONTRAST BRIGHTNESS SHARPNESS COLOR TINT NR COLOR TEMP.
Main menu Sub menu Sub menu 2 FUNCTION POWER MGT. INPUT SKIP SUB.
Picture Settings Menu Adjusting the picture The contrast, brightness, sharpness, color and tint can be adjusted as desired. Example: Adjusting the contrast Storing picture settings This function allows you to store in memory the current input signal and PICTURE menu settings and to recall these settings when necessary. There are six picture memories, and notes of up to 15 characters can be added to each. Example: Storing picture settings at MEMORY1 On “CONTRAST” of “PICTURE” menu, adjust the contrast.
Setting the color temperature Use this procedure to set color tone produced by the plasma display. Example: Setting “HIGH” Changing the Gamma Curve This feature adjusts the brightness of the midtone areas while keeping shadows and highlights unchanged. Example: Setting “2.3” On “COLOR TEMP.” of “PICTURE” menu, select “HIGH”. On “GAMMA” of “PICTURE” menu, select “2.3”. PICTURE : OFF PICTURE MEMORY CONTRAST BRIGHTNESS SHARPNESS COLOR R TINT : OFF NR : HIGH COLOR TEMP. : 2.
Adjusting the pedestal level (black level) This feature adjusts the video black level in a video image. Example: Setting “3.75%” Setting the picture to suit the movie The film image is automatically discriminated and projected in an image mode suited to the picture. [NTSC, PAL, PAL60, 480I (60Hz), 525I (60Hz), 576I (50Hz), 625I (50Hz), 1035I (60Hz), 1080I (60Hz) only] Example: Setting the “CINEMA MODE” to “OFF” On “SET UP LEVEL” of “PICTURE” menu, select “3.75%”.
Audio Settings Menu Image Adjust Settings Menu Adjusting the treble, bass and left/right balance and audio input select The treble, bass and left/right balance can be adjusted to suit your tastes. Example: Adjusting the bass Adjusting the Position, Size, Fine Picture, Picture Adj The position of the image can be adjusted and flickering of the image can be corrected. Example: Adjusting the vertical position in the normal mode On “BASS” of “AUDIO” menu, adjust the bass.
SET UP Settings Menu Checking the signal being transmitted to RGB1 terminal Use this to confirm the signal being transmitted to the RGB1 terminal. It is set to RGB and can not be adjusted. Setting the language for the menus The menu display can be set to one of eight languages. Example: Setting the menu display to “DEUTSCH” On “LANGUAGE” of “SET UP” menu, select “DEUTSCH”.
Setting the video signal format Use these operations to set the color systems of composite video signals or Y/C input signals. Example: Setting the color system to “3.58 NTSC” Information 䡵 RGB SELECT modes One of these 7 modes must be selected in order to display the following signals correctly. AUTO: Select the suitable mode for the specifications of input signals as listed in the table “Computer input signals supported by this system” on page 7 of Model Information.
Setting the gray level for the sides of the screen Use this procedure to set the gray level for the parts on the screen on which nothing is displayed when the screen is set to the 4:3 size. Example: Setting “GRAY LEVEL” to “5” Information 䡵 DISPLAY OSM settings ON: The on-screen menu appears. OFF: The on-screen menu does not appear. If you press the DISPLAY button on the remote control for more than 3 seconds the main menu will appear and can be set (although it is not ON).
Function Settings Menu Setting the power management for computer images This energy-saving (power management) function automatically reduces the monitor’s power consumption if no operation is performed for a certain amount of time. Example: Turning the power management function on Setting the Input Skip When this is ON, signals which are not present will be skipped over and only pictures whose signals are being transmitted will be displayed.
Displaying the entire image during DIGITAL ZOOM operations Use this function to display the entire image within the sub screen together with an enlarged image on the main screen. Example: Setting “ZOOM NAV” to “S BY S” FUNCTION : OFF POWER MGT. : OFF INPUT SKIP : AUTO SUB. P DETECT : BTM LEFT ZOOM NAV : BTM LEFT PICTURE FREEZE : MANUAL PDP SAVER : OFF CLOSED CAPTION : LOW CAPTION CONT SEL. ADJ. EXIT RETURN On “ZOOM NAV” of “FUNCTION” menu, select “S BY S”.
INVERSE/WHITE Use this to set the inverse mode or to display a white screen. Example: Setting “INVERSE/WHITE” to “WHITE” Information 䡵 When set to AUTO Set automatically, as described below. PEAK BRIGHT: 100% ORBITER: ON INVERSE/WHITE: OFF SCREEN WIPER: OFF SOFT FOCUS: OFF OSD ORBITER: ON OSD CONTRAST: LOW On “INVERSE/WHITE” of “PDP SAVER” menu, select “WHITE”. PDP SAVER : 100% PEAK BRIGHT : OFF ORBITER : WHITE INVERSE/WHITE : OFF SCREEN WIPER : OFF SOFT FOCUS : ON OSM ORBITER : LOW OSM CONTRAST SEL. ADJ.
OSM ORBITER Use this to set OSM menu shift. Example: Setting “OSM ORBITER” to “OFF” Information 䡵 CLOSED CAPTION settings OFF: This exits the closed caption mode. CAPTION1~4: Text is superimposed. TEXT1~4: Text is displayed in full screen. A closed caption signal may not be decoded in the following signature; 1. when a video tape has been dubbed. 2. when the signal reception is weak. 3. when the signal reception is nonstandard.
External Control Pin Assignments Application mini D-Sub 15-pin connector (Analog) These specifications cover the communications control of the plasma monitor by external equipment. RGB 1 Connections 5 4 3 2 1 10 9 8 7 6 15 14 13 12 11 Connections are made as described below. External equipment e.g., Personal computer Pin No. 1 2 3 4 5 6 7 8 9 10 11 12 13 14 15 Display Connector on the plasma monitor side: EXTERNAL CONTROL connector. Use a crossed (reverse) cable.
Troubleshooting If the picture quality is poor or there is some other problem, check the adjustments, operations, etc., before requesting service. Symptom Mechanical sound is heard. The unit emits a crackling sound. Picture is disturbed. Sound is noisy. Remote control operates erroneously. The remote control does not work. Monitor’s power does not turn on when the remote control’s power button is pressed.
Limited Warranty NEC Solutions, Inc. (hereinafter NEC Solutions) warrants this product to be free from defects in material and workmanship under the following terms and, subject to the conditions set forth below, agrees to repair or replace (at NEC Solutions’ sole option) any part of the enclosed unit which proves defective. Replacement parts or products may be new or refurbished and will meet specifications of the original parts or products.
NEC Solutions (America), Inc. 1250 N.