CONFIDENTIAL USER' S MANUAL PlasmaSync Plasma Monitor PlasmaSync 61XM3 PX-61XM3G Model Information Modell-Informationen Informations modèle Información del modelo Informazioni sul modello нформация о модели Downloaded From TV-Manual.
CONFIDENTIAL Specifications Color Processing Signals Synchronization Range Input Signals 74 (2.9") 1351 (53.2") Horizontal : 15.5 to 110 kHz (automatic : step scan) Vertical : 50.0 to 120 Hz (automatic : step scan) RGB, NTSC (3.58/4.43), PAL (B,G,M,N), PAL60, SECAM, HD*1, DVD*1, DTV*1 119 (4.7") Bezel color is gray. Units are in mm (inch) The features and specifications may be subject to change without notice.
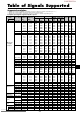
CONFIDENTIAL Table of Signals Supported Supported resolution • When the screen mode is NORMAL, each signal is converted to a 1024 dots 768 lines signal. (Except for *2, 3, 4) • When the screen mode is TRUE, the picture is displayed in the original resolution. • When the screen mode is FULL, each signal is converted to a 1365 dots 768 lines signal.
CONFIDENTIAL *1 *2 *3 *4 *5 Only when using a graphic accelerator board that is capable of displaying 852 480. This signal is converted to a 1024 dots 640 lines signal. The picture is displayed in the original resolution. The picture will be compressed for other signals. Aspect ratio is 5:4. This signal is converted to a 960 dots 768 lines signal. Normally the RGB select mode suite for the input signals is set automatically.
CONFIDENTIAL Operation Manual (Enhanced split screen Model) For the specifications of your plasma monitor, refer to “Model Information”. ENGLISH DEUTSCH FRANÇAIS ESPAÑOL ITALIANO У Downloaded From TV-Manual.
Important Information Precautions CONFIDENTIAL 7. Do not attempt to service or repair the unit. The manufacturer is not liable for any bodily harm or damage caused if unqualified persons attempt service or open the back cover. Refer all service to authorized Service Centers. Please read this manual carefully before using your plasma monitor and keep the manual handy for future reference. To avoid damage and prolong operating life: 1. Use only with 100-240V 50/60Hz AC power supply.
CONFIDENTIAL Contents Installation .................................................... E-4 Setting the Input Skip ............................................. E-22 Resetting to the default values ................................ E-22 Option2 Settings Menu ......................................... E-23 Setting the power management for computer images ...... E-23 POWER/STANDBY indicator ............................... E-23 Setting the picture to suit the movie .......................
CONFIDENTIAL Installation You can attach your optional mounts or stand to the plasma monitor in one of the following two ways: * While it is upright. (See Drawing A) * As it is laid down with the screen face down (See Drawing B). Lay the protective sheet, which was wrapped around the monitor when it was packaged, beneath the screen surface so as not to scratch the screen face. * Do not touch or hold the screen face when carrying the unit. • This device cannot be installed on its own.
CONFIDENTIAL Creating a video wall With built-in matrix display capability, you can create a 4-25 video wall. • Connect signal cables and remote cables as shown below.
CONFIDENTIAL Caution on when the plasma monitor is installed vertically • Use the optional unit. Contact your store of purchase when installing. • Rotate 90° clockwise as seen from the front when installing. • After installing, check with the NEC logo mark as seen from the front. • Be sure to set “OSM ANGLE” to “V” when using. * Failure to heed the above cautions may lead to malfunction.
CONFIDENTIAL Part Names and Function Front View MENU/ENTER MENU/ENTER 7 VOLUME DOWN UP LEFT/- RIGHT/+ INPUT SELECT /EXIT VOLUME DOWN UP LEFT/ - 6 RIGHT/+ INPUT SELECT /EXIT 4 5 q Power Turns the monitor’s power on and off. 1 3 2 t LEFT/– and RIGHT/+ Enlarges or reduces the image. Functions as the CURSOR ( / ) buttons in the On-Screen Menu (OSM) mode. w Remote sensor window Receives the signals from the remote control. y VOLUME DOWN and UP Adjusts the volume.
CONFIDENTIAL Rear View/ Terminal Board VIDEO VIDEO 1 VIDEO 2 VIDEO 3 C AUDIO 1 R (MONO) L D Y DVD1 / HD1 Cb/Pb E Cr/Pr AUDIO 2 R (MONO) L R/ Cr/Pr B/ Cb/Pb HD RGB2 / DVD2 / HD2 G/ Y F VD RGB 1 G AUDIO 3 R (MONO) L External Control A B IN REMOTE OUT I J K RGB 3 DV I ( Digital RGB ) H A AC IN Connect the included power cord here. B EXT SPEAKER L and R Connect speakers (optional) here. Maintain the correct polarity.
CONFIDENTIAL u EXIT Press this button to exit the OSM controls in the main menu. Press this button during the display of the sub menu to return to the previous menu. Remote Control i POINTER Press this button to display the pointer. o ZOOM (+ /–) Enlarges or reduces the image. !0 VOLUME (+ /–) Adjusts the audio volume. !1 MUTE Mutes the audio. !2 WIDE Automatically detects the signal and sets the aspect ratio. Wide button is not active for all signals.
CONFIDENTIAL Basic Operations POWER OFF TIMER To turn the unit ON and OFF: 1. Plug the power cord into an active AC power outlet. 2. Press the Power button (on the unit). The monitor’s POWER/STANDBY indicator turns red and the standby mode is set. 3. Press the POWER ON button (on the remote control) to turn on the unit. The monitor’s POWER/STANDBY indicator will light up (green) when the unit is on. 4.
CONFIDENTIAL WIDE Operations Wide Screen Operation (manual) 2.35:1 size screen With this function, you can select one of six screen sizes. When viewing videos or digital video discs 1. Press the WIDE button on the remote control. 2. Within 3 seconds ... Press the WIDE button again. The screen size switches as follows: Original image Information is lost on both sides. The squeezed film image is expanded to fulfill the entire screen at a ratio of 2.35:1.
CONFIDENTIAL Wide Screen Operation with Computer Signals FULL size screen Switch to the wide screen mode to expand the 4 : 3 image to fill the entire screen. 1. Press the WIDE button on the remote control. 2. Within 3 seconds ... Press the WIDE button again. The screen size switches as follows: The image is expanded in the horizontal and vertical direction.
CONFIDENTIAL SPLIT SCREEN Operations Showing a couple of pictures on the screen at the same time Operations in the Side-by-side mode To change the picture size, press the cursor button. * An RGB-input picture may not be displayed in these modes, depending on the input signal specifications. 1. Press the button to select a screen mode from among single mode, side-by-side, and picture-in-picture.
CONFIDENTIAL Operations in the Picture-in-picture mode Selecting the input signals to be displayed 1. Press the SELECT/FREEZE button to make the desired picture active. 2. Press the RGB/PC, VIDEO, or DVD/HD button. Each press of the button changes the selection of the input signal. The INPUT SELECT button on the monitor can also be used to change the selection. To move the position of the sub screen, press the cursor or button.
OSM(On Screen Menu) Controls Menu Operations Note: The main menu disappears by pressing the EXIT button. The OSM window is displayed with respect to the screen as shown on the diagram. Information Advanced menu mode When “ADVANCED OSM” is set to “ON” in the main menu (1/2), full menu items will be shown. * Depending on the screen’s mode, the OSM may be displayed differently. In the explanation, the OSM section is shown close up.
CONFIDENTIAL Menu Tree :Shaded areas indicate the default value. ←→ : Press the or button to adjust. The default value is at the center. :Menu items in a ruled box are available when the ADVANCED OSM is set to ON. Main menu Sub menu Sub menu 2 PICTURE CONTRAST BRIGHTNESS SHARPNESS COLOR TINT PICTURE MODE NR COLOR TEMP WHITE BALANCE ←→ 0←52→72 ←→ 0←32→64 ←→ 0←16→32 ←→ 0←32→64 R←→G 0←32→64 BRIGHT/NORMAL/THEAT.1/THEAT.
CONFIDENTIAL Main menu Sub menu Sub menu 2 OPTION2 PWR. MGT. CINEMA MODE LONG LIFE OFF←→ON OFF←→ON PLE ORBITER GRAY LEVEL S1/S2 PICTURE SIZE DVI SET UP Sub menu 4 AUTO/LOCK 1/LOCK 2/LOCK 3 AUTO 1 AUTO 2 MANUAL H-DOT/V-LINE/TIME OFF INVERSE OFF ON WORKING TIME/WAITING TIME WHITE SCREEN WIPER OFF ON WORKING TIME/WAITING TIME/SPEED SOFT FOCUS OFF/1/2/3/4 0←…→3←…→15 AUTO←→OFF OFF←→ON PLUG/PLAY PC←→STB/DVD BLACK LEVEL LOW←→HIGH Main menu Sub menu Sub menu 2 OPTION3 TIMER PRESENT TIME PWR.
CONFIDENTIAL Picture Settings Menu Adjusting the picture The contrast, brightness, sharpness, color and tint can be adjusted as desired. Example: Adjusting the contrast On “CONTRAST” of “PICTURE” menu, adjust the contrast. 1/2 PICTURE CONTRAST BRIGHTNESS SHARPNESS COLOR TINT PICTURE MODE : NORMAL NR : OFF NEXT PAGE EXIT RETURN SEL. ADJ. Reducing noise in the picture Use these settings if the picture has noise due to poor reception or when playing video tapes on which the picture quality is poor.
CONFIDENTIAL Adjusting the color to the desired level Use this procedure to adjust the white balance for each color temperature to achieve the desired color quality. Example: Adjusting the “GAIN RED” of “HIGH” color temperature Set “ADVANCED OSM” to “ON” in the main menu (1/ 2), then perform the following operations. On “COLOR TEMP.” of “PICTURE” menu, select “HIGH”, then press the MENU/ENTER button. The “WHITE BALANCE” screen appears. On “GAIN RED”, adjust the white balance. WHITE BALANCE COLOR TEMP.
CONFIDENTIAL Audio Settings Menu Image Adjust Settings Menu Adjusting the treble, bass and left/right balance and audio input select The treble, bass and left/right balance can be adjusted to suit your tastes. Example: Adjusting the bass Adjusting the Position, Size, Fine Picture, Picture Adj The position of the image can be adjusted and flickering of the image can be corrected. Example: Adjusting the vertical position in the normal mode On “BASS” of “AUDIO” menu, adjust the bass.
CONFIDENTIAL Option1 Settings Menu Setting the BNC connectors Select whether to set the input of the 5 BNC connectors to RGB, component or SCART1,2. Example: Set the BNC INPUT mode to “COMP.” Setting the on-screen menu This sets the position of the menu, the display format (horizontal or vertical) etc. Example: Turning the DISPLAY OSM off On “BNC INPUT” of “OPTION1” menu, select “COMP.”. On “OPTION1” menu, select “OSM”, then press the MENU/ ENTER button. The “OSM” menu appears.
CONFIDENTIAL Setting the Input Skip When this is ON, signals which are not present will be skipped over and only pictures whose signals are being transmitted will be displayed. This setting is valid only for the INPUT SELECT button on the unit. Example: Set to “ON” Information 䡵 RGB SELECT modes One of these 7 modes must be selected in order to display the following signals correctly.
CONFIDENTIAL Option2 Settings Menu Setting the picture to suit the movie The film image is automatically discriminated and projected in an image mode suited to the picture. [NTSC, PAL, PAL60, 480I (60Hz), 525I (60Hz), 576I (50Hz), 625I (50Hz), 1035I (60Hz), 1080I (60Hz) only] Example: Setting the “CINEMA MODE” to “OFF” Set “ADVANCED OSM” to “ON” in the main menu (1/ 2), then perform the following operations. On “CINEMA MODE” of “OPTION2” menu, select “OFF”.
CONFIDENTIAL ORBITER Use this to set the picture shift. Example: Setting “ORBITER” to “AUTO1” On “ORBITER” of “LONG LIFE” menu, select “AUTO1”. PLE ORBITER INVERSE SCREEN WIPER SOFT FOCUS SEL. INVERSE Use this to set the inverse mode or to display a white screen. Example: Setting “INVERSE” to “WHITE” On “INVERSE” of “LONG LIFE” menu, select “WHITE”. LONG LIFE : : : : : AUTO AUTO1 OFF OFF OFF PLE ORBITER INVERSE SCREEN WIPER SOFT FOCUS SEL.
CONFIDENTIAL SCREEN WIPER When this is set to ON, a white vertical bar moves repeatedly from the left and of the screen to the right end at a constant speed. Example: Setting “SCREEN WIPER” to “ON” SOFT FOCUS Reduces edges and softens the image. Example: Setting “SOFT FOCUS” to “2” On “SOFT FOCUS” of “LONG LIFE” menu, select “2”. On “SCREEN WIPER” of “LONG LIFE” menu, select “ON”. PLE ORBITER INVERSE SCREEN WIPER SOFT FOCUS SEL. LONG LIFE : : : : : ADJ.
CONFIDENTIAL Option3 Settings Menu Information 䡵 S1/S2 settings AUTO: Adjusts the screen size automatically according to the S1/S2 video signal. OFF: Turns the S1/S2 function off. Using the timer This function sets the monitor to turn ON/OFF automatically at a set time. Set “ADVANCED OSM” to “ON” in the main menu (1/ 2), then perform the following operations. On “OPTION3” menu, select “TIMER”, then press the MENU/ENTER button. The “TIMER” screen appears.
CONFIDENTIAL • Use the ▲ and ▼ buttons to select “MULTI MODE”, then use the 䊴 and 䊳 buttons to choose from “SINGLE”, “SIDE BY SIDE1~3” and “PICTURE IN PICTURE (BOTTOM LEFT~TOP LEFT)”. • Use the ▲ and ▼ buttons to select “MAIN”/ “SUB” and “LEFT”/“RIGHT”, then use the 䊴 and 䊳 buttons to choose from “VIDEO1~3”, “HD/DVD1~2” and “RGB1~3”. PROGRAM TIMER This sets the day and time at which the power will be switched ON/OFF as well as the input mode.
CONFIDENTIAL Setting the power on mode This function sets the input mode at the time the power is switched on. Example: Setting “VIDEO2” Set “ADVANCED OSM” to “ON” in the main menu (1/ 2), then perform the following operations. On “PWR. ON MODE” of “OPTION3” menu, select “VIDEO2”. The available sources depend on the settings of input. Enabling/disabling remote control wireless transmission This function enables/disables remote control wireless transmission.
CONFIDENTIAL ID number setting When using more than one of these displays, this function sets ID numbers so that operation of the remote control does not cause multiple monitors to operate at the same time. Example: Setting “2” Set “ADVANCED OSM” to “ON” in the main menu (1/ 2), then perform the following operations. On “ID NUMBER” of “OPTION3” menu, select “2”. DIVIDER Set the 4-25 video wall. Example: Setting “4” On “DIVIDER” of “VIDEO WALL” menu, select “4”. VIDEO WALL DIVIDER : POSITION DISP.
CONFIDENTIAL DISP. MODE Select the screen mode from between two options (Splitting, Blanking). Example: Setting “BLANK” IMAGE ADJUST The position of the image can be adjusted and flickering of the image can be corrected. Example: Adjusting the vertical position On “DISP. MODE” of “VIDEO WALL” menu, select “BLANK”. On “VIDEO WALL” menu, select “IMAGE ADJUST”, then press the MENU/ENTER button. The “IMAGE ADJUST” screen appears. On “V-POSITION” of “IMAGE ADJUST” menu, adjust the position.
CONFIDENTIAL PLE LINK Use this function to set a uniform brightness for each display. Turn on the AUTO ID and set the DIVIDER (at 1, 4 or 9) before the following operations. Example: Setting “ON” 1 DIVIDER SOURCE WORK TIME 2 DIVIDER SOURCE WORK TIME SEL. On “PLE LINK” of “VIDEO WALL” menu, select “ON”, then press the MENU/ENTER button. VIDEO WALL DIVIDER : POSITION DISP. MODE : AUTO ID : IMAGE ADJUST P. ON DELAY : PLE LINK : REPEAT TIMER : SEL. ADJ. No.1 No.2 No.4 No.
CONFIDENTIAL 䡵 ZOOM NAV settings OFF: Will not show the entire image on the sub screen. S BY S: Will show the entire image on the sub screen of side-by-side mode. BTM LFT~TOP LFT: Will show the entire image on the sub screen of picture-in-picture mode. Option4 Settings Menu Erasing the sub screen image when there is no input signal This function automatically erases the black frame of the sub screen when there is no sub screen input signal.
CONFIDENTIAL Side-by-Side Advanced OSM Settings Menu Picture-in-Picture RGB/PC1 Setting the menu mode This allows you to access full menu items. When P. ON DELAY or PLE LINK is ON, this won’t be turned OFF. Example: Setting “ON” RGB/PC1 SELECT/ FREEZE button SELECT/ FREEZE button On “ADVANCED OSM” of “MAIN MENU”, select “ON”. 1/2 MAIN MENU S BY S1 RGB/PC1 RGB/PC1 PICTURE AUDIO IMAGE ADJUST OPTION1 RGB/PC1 RGB/PC1 ADVANCED OSM NEXT PAGE SEL. ADJ.
CONFIDENTIAL Color System Settings Menu Setting the video signal format Use these operations to set the color systems of composite video signals or Y/C input signals. Example: Setting the color system to “3.58 NTSC” On the MAIN MENU, select “COLOR SYSTEM”, then press the MENU/ENTER button. The “COLOR SYSTEM” screen appears. On “COLOR SYSTEM”, select “ 3.58NTSC ”. COLOR SYSTEM COLOR SYSTEM : 3.58NTSC EXIT RETURN ADJ.
CONFIDENTIAL External Control Pin Assignments Application mini D-Sub 15-pin connector (Analog) These specifications cover the communications control of the plasma monitor by external equipment. RGB 1 Connections 5 4 3 2 1 10 9 8 7 6 15 14 13 12 11 Connections are made as described below. External equipment e.g., Personal computer Pin No. 1 2 3 4 5 6 7 8 9 10 11 12 13 14 15 Display Connector on the plasma monitor side: EXTERNAL CONTROL connector. Use a crossed (reverse) cable.
CONFIDENTIAL Troubleshooting If the picture quality is poor or there is some other problem, check the adjustments, operations, etc., before requesting service. Symptom Mechanical sound is heard. The unit emits a crackling sound. Picture is disturbed. Sound is noisy. Remote control operates erroneously. The remote control does not work. Monitor’s power does not turn on when the remote control’s power button is pressed.