The Battery The cellphone comes with a rechargeable battery. • Use only approved batteries for the G’zOne XXXXXXX. Wipe your cellphone before opening the battery cover to prevent moisture or dust from entering. • Failure to follow the below directions for installing/removing the battery could result in product failure. • Fully charge the battery before using the cellphone for the first Getting Started with Your Phone Warning! time.
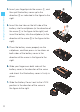
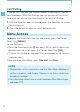
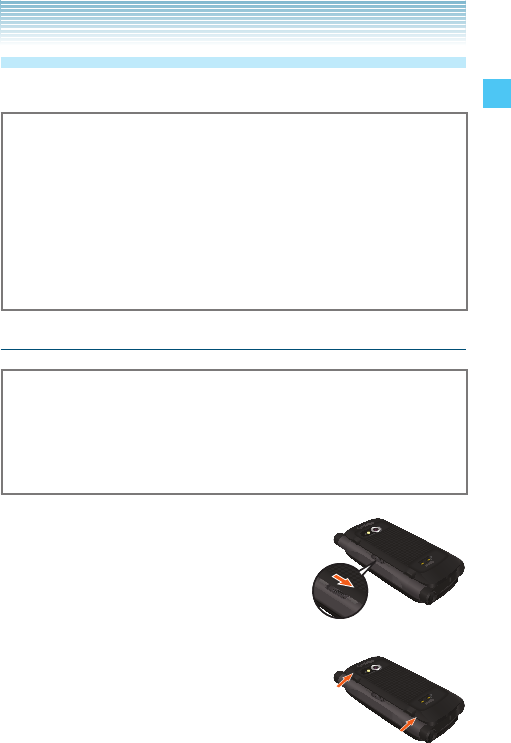
3. Insert your fingertip into the recess , and Getting Started with Your Phone then pull the battery cover up to the direction as indicated in the figure to the right. 4. Insert the two tabs on the left side of the battery into the cellphone (in the direction of the arrow in the figure to the right) and insert the battery into the cellphone (in the direction of the arrow in the figure to the right). 5.
Warning! • Follow steps 1 to 3 to remove the battery cover instead of prying cellphone may be damaged. • If you are using a wrist strap (purchased separately), be careful not to get it caught between the battery cover and cellphone, in order to maintain waterproofing. Removing the battery 1. To remove the battery cover, perform steps 1 through 3 under Getting Started with Your Phone it open at one location. Otherwise, the battery cover and/or the “Installing the Battery” on page XX. 2.
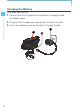
Charging the Battery Getting Started with Your Phone To charge your battery: 24 1. Connect the Wall Charger to the Handset Charging Cradle (included in box). 2. Plug the Wall Charger power plug into an electrical outlet. 3. Insert the cellphone into the Handset Charging Cradle.
Warning! • Hold the Wall Charger power plug horizontally and carefully removing it from the Handset Charging Cradle, hold the cradle steady as shown in the figure to the right. Slide the cellphone along the guides on the cradle back support. • The Charge Indicator is turns red while Getting Started with Your Phone insert it into the Handset Charging Cradle. • Whenever placing the cellphone into or charging.
2. Plug the Wall Charger power plug into Getting Started with Your Phone an electrical outlet and the Wall Charger connector to the Charging/ Data Port. 3. When the cellphone is completely charged, unplug the Wall Charger connector and push the center of the port cover into the Charging/Data Port. 4. Make sure the port cover is completely closed. Warning! • Do not forcibly insert the Wall Charger power plug into the Charging/Data Port.
Battery Level The battery level is shown at the top of the main display. When three ways: an audible tone will sound, the battery icon will begin to blink, and BATTERY LOW will appear on the display. If the battery level becomes too low, the phone automatically powers off and any function in progress will not be saved.
Making a call Getting Started with Your Phone 1. From the idle screen with the flip either open or closed, enter a phone number (include the area code if needed). 2. Press the Send Key to make a call. 3. Press the End/Power Key to end a call. NOTE When you make a call with the flip open, the alphabetical characters entered in the dial up window will be converted into the corresponding numbers when origination a call. The following table shows the mapping between alphabetical characters and numbers.
Answering a call • Since the answer option is set to Flip Open as default, you can directly answer an incoming call by simply opening the cellphone. For how to select an answer option, see page XXX. • Caller ID displays the number of the person calling when your cellphone rings. If the caller’s identity is stored in Contacts, the name appears on the screen. Getting Started with Your Phone NOTES 1.
Call Waiting Getting Started with Your Phone If you are on a call and you receive another incoming call, you will hear two beeps. With Call Waiting, you may put the active call on hold while you answer the incoming call. To use Call Waiting: 1. With the flip either open or closed, press the Send Key to answer the waiting call. 2. Press the Send Key again to switch between calls. Menu Access To display the Main Menu from the idle screen, press the Center Select Key [MENU].
Grid Menu The Grid Menu has nine items. desired menu option then press the Center Select Key [OK]. NOTE When navigating within menus and submenus or when configuring your cellphone’s settings, you can return to the previous screen or step by pressing the Clear Key / . Getting Started with Your Phone 1. From the idle screen, press the Center Select Key [MENU]. 2.
Getting Started with Your Phone Installing a Memory Card Warning! • Whenever installing or removing a memory card, make sure the cellphone is turned off and that the Wall Charger is not connected. • When installing or removing a memory card, avoid touching the memory card contacts and avoid damaging the memory card. Either can cause malfunction or loss of data. • The front and back of the memory card look different. When inserting the memory card, make sure the correct side is facing up.
Removing a Memory Card • Never remove a memory card from the cellphone while it is being accessed. Doing so can damage the memory card or the data stored on it. • The memory card is very small. Make sure you do not drop it. • Failure to completely reseal the battery cover after removing may result in damage if the cellphone is exposed to water. Getting Started with Your Phone Warning! NOTE For information about how to remove and install the battery, see page XX. 1.
Connecting the Headset Getting Started with Your Phone You can connect a compatible headset equipped with a standard 2.5mm plug to your cellphone for safe, convenient, hands-free conversations. 1. To open the Headset Jack cover, insert your finger in the depression of the cellphone near the Headset Jack cover and lift open. 2. Plug the headset connector into the Headset Jack. Warning! • Do not forcibly insert/remove the headset plug into/from the Headset Jack.
Quick Access to Convenient Features Vibrate Mode Vibrate Mode mutes key tones and activates an alert for an incoming the flip open, press *. Press * again, to deactivate Vibrate Mode. NOTE With the flip closed, press and hold to activate Vibrate Mode from the idle screen. Press and hold again, to deactivate Vibrate Mode. Quick Access to Convenient Features call or message.
Volume Quick Adjustment 1. With the flip either open or closed, press the Volume Keys up or down to select from: All Sounds Off, Alarm Quick Access to Convenient Features Only, Vibrate Only, Low, Medium Low, Medium, Medium High and High. 2. Press the Center Select Key [OK] to save. Or, press the Left Soft Key [Play] to check the ringtone’s volume. NOTE The keypad volume is adjusted through the Menu. For more detail, see page XXX.
NOTE To activate and deactivate the speakerphone with the flip closed: 1. To activate, press the Speakerphone/Flashlight Key from the idle screen. again. Operating Your Cellphone with the Flip Closed With the flip closed, you can operate your cellphone using the Alphanumerical Keypad and side keys. The following functions are available with the flip closed: Quick Access to Convenient Features 2.
Voice Commands: Able to use the Voice Commands by pressing the Clear/Voice Commands Key . Sound Recorder: Able to recording sound with the Sound Quick Access to Convenient Features Recorder which is activated by pressing and holding the Clear/voice 38 Commands Key . NOTES • When registering a contact with the flip closed, only Name/ Mobile 1/Home/Work/Zip Code fields can be registered. • Available functions are limited when the flip is closed.
Entering and Editing Information Text Input with the Flip Open With the flip open, you can enter or edit Messages, Contacts, and Schedule using the Qwerty Keypad. ; Left Soft Key [Symbols]: Press to display the SYMBOLS popup box for the selection of a symbol. 2 Shift/Caps Lock: Press to change case. Abc m ABC m abc 1 Function: Press to enter the right upper symbol on the key after pressing the Function Key 1. : Space: Press to insert a space. 3 Clear: Press to delete a single space or character.
Text Input with the Flip Closed With the flip closed, you can enter or edit Messages and Contacts using the front Alphanumeric Keypad. With the flip closed, you can also enter a text in any of 5 modes Entering and Editing Information including T9 Word and T9 Palabra modes. Key Functions Shift: Press to change case. T9 Word: T9 Word m T9 WORD m T9 word Abc text: Abc m ABC m abc T9 Palabra: T9 Palabra m T9 PALA. m T9 palabra Next: T9 Word or T9 Palabra mode to display other punctuation and symbols.
Using T9 Word Mode Text Input T9 Word mode incorporates a built-in-dictionary to determine a word based on the entered characters. A word can be entered more quickly by pressing each key once per character. To type the message “Call the office.” follow these steps from the 1. From the text entry screen with the flip closed, press the Center Select Key [Options]. 2. Select Entry Mode, then press the Center Select Key. 3. Select T9 Word, then press the Center Select Key. 4. Press . 5.
Entering and Editing Information 3. Select Entry Mode, then press the Center Select Key. 4. Select T9 Word, then press the Center Select Key. 5. Press and hold the Clear Key to erase the existing word. 6. Press . “Kop” is displayed. 7. Press to accept your choice and add a space. Using 123 (Numbers) Text Input To type numbers using one keystroke per number: 1. From the text entry screen with the flip closed, press the Center Select Key [Options]. 2. Select Entry Mode, then press the Center Select Key.
Using T9 Palabra Mode Text Input The T9 Palabra mode is a T9 mode for Spanish input. To type the message “Llame la oficina.” follow these steps from the text entry screen: 1. From the text entry screen with the flip closed, press the Center “Llame la oficina.” is displayed. Entering and Editing Information Select Key [Options]. 2. Select Entry Mode, then press the Center Select Key. 3. Select T9 Palabra, then press the Center Select Key. 4. Press . 5.
RECENT CALLS The Recent Calls menu is a list of the last phone numbers or Contact entries for calls (including PTT calls) you placed, accepted, missed, or blocked. It is continually updated as new numbers are added to RECENT CALLS the beginning of the list and the oldest entries are removed from the bottom of the list. Accessing the Recent Calls submenu 1. From the idle screen with the flip open, press the Center Select Key [MENU], then select Recent Calls and press the Center Select Key [OK]. 2.
Making a Call from Recent Calls 1. From the Recent Calls submenu, select one of the following call lists: Missed/Received/Dialed/Blocked/All 2. Scroll to highlight an entry, then press the Send Key to make the call. 1. From the Recent Calls submenu, select one of the following call lists: RECENT CALLS Viewing Recent Call History Missed/Received/Dialed/Blocked/All 2. Scroll to highlight a call entry, then: • Press the Center Select Key [OPEN] to view the entry.
• If you selected a PTT Group or Temp PTT Group from the Missed or Received Calls list, press the Right Soft Key [Options] to select: New TXT Message/New Picture Message/New Video Message/New Voice Message/Save to Contacts/Save to RECENT CALLS PTT Contacts/Erase/Lock (Unlock)/Erase All/View Timers • If you selected a PTT Group or Temp PTT Group from the Dialed Calls list, press the Right Soft [Options] to select: Erase/Lock (Unlock)/Erase All/View Timers View Timers To view the duration of selected calls:
CONTACTS The Contacts menu allows you to store names, phone numbers and other information in your cellphone’s memory. You may store up to 500 entries. Adding a new Contact from the idle screen (up to 48 characters) you want to register. 2. Press the Right Soft Key [Options]. CONTACTS 1. From the idle screen with the flip open, enter the phone number NOTE Pressing the Right Soft Key [Options] allows you to access the following options: Add 2-Sec Pause: Inserts a 2-sec Pause into the number.
New Voice Message: Sends a voice message to the given phone number. Assisted Dialing: Sets the Assisted Dialing setting. For more detail, see page XXX. CONTACTS 3. Press Save to Contacts, Add New Contact. 4. Select the type of phone number you want to save, then press the Center Select Key [OK]. Mobile 1/Mobile 2/Home/Work 5. Scroll to highlight the information field you want to enter.
• To assign the call ringtone, scroll to highlight the Ringtone field, then press the Left Soft Key [Set]. Then select a ringtone, press the Center Select Key [OK]. • To add the IM Screen Name, scroll to highlight the IM Screen Name field, then press the Left Soft Key [Set]. Then select a service provider, press the Center Select Key [OK]. Enter the IM Screen Name, then press the Center Select Key [SAVE]. State, Zip Code, or Country field then enter street, city, state, zip code, or country. 6.
7. After entering the information as necessary, press the Center Select Key [SAVE] to save. 8. CONTACT SAVED appears on the display. The phone number reappears on screen. Press the End/Power Key to exit, or press CONTACTS the Send Key to make a call to the displayed phone number. Adding a Phone Number from the idle screen 1. From the idle screen with the flip open, enter the phone number (up to 48 characters) you want to register. 2.
Phone Numbers with Pauses Pauses are used for automated systems (e.g. voicemail or calling cards). Insert a pause after a set of numbers then enter another set. The second set of numbers is dialed after the pause. This feature is useful for dialing into systems that require a code. There are two different types of pauses you can use when registering a phone number: Key [Release] to advance to the next number.
Accessing the Contacts submenu 1. From the idle screen with the flip open, press the Center Select Key [MENU], select Contacts and press the Center Select Key [OK]. 2. Select a submenu: New Contact/Contact List/Favorites/Groups/New PTT CONTACTS Contact/PTT Contact List/PTT Groups/Speed Dials/In Case of Emergency/My Name Card NOTE When on the idle screen with the flip open, the Right Soft Key [Contacts] functions as a hot key to access the Contact List.
NOTE Your cellphone is able to perform a dynamic search of the contents in your cellphone’s memory. A dynamic search compares entered letters or numbers against the entries in your Contacts, and displays matches in alphabetical order. You can then select a number from the list to call or edit. You may locate a contact by: • Scrolling Alphabetically 1. From the Contacts submenu, press Contact List. CONTACTS • Searching by Letter Or, from the idle screen, press the Right Soft Key [Contacts].
Making a Call from Your Contacts Once you have registered phone numbers into your Contacts, you can make calls to those numbers quickly and easily. 1. From the Contacts submenu, press Contact List. 2. Select the Contact entry, then press the Center Select Key [VIEW]. CONTACTS 3. Select the phone number, then press the Send Key to make the call. NOTES • Selecting the Contact entry and then pressing the Send Key will dial the Default Number of the Contact entry automatically.
Erasing a Contact Entry 1. From the Contacts submenu, press Contact List. 2. Select the Contact entry, then press the Center Select Key [VIEW]. 3. Press Left Soft Key [Erase], then press the Center Select Key [OK] to select Yes. Assigning Contacts to Favorites Up to 10 contacts can be assigned to Favorites. 1. From the Contacts submenu, press Favorites. 2. Select an unassigned position, then press the Center Select Key CONTACTS Favorites [Assign]. 3.
the phone number you want to dial by pressing the Directional Key = left or right, then press the Send Key. • Press the Message Composer Key 8 to create a text message to be sent to the Default Number of the Contact entry as destination.
[Options]. Press Add, then your contact entries will be displayed in alphabetical order. Select the contact you want to add then press the Center Select Key [MARK]. Press the Left Soft Key [Done]. • To change the group name, select the existing group name that you want to change, then press the Right Soft Key [Options]. Press Rename, then edit the group name, press the Center • To erase the group, select the existing group that you want to erase, then press the Right Soft Key [Options].
• To call and talk with the selected individual, press the Left Soft Key [Alert]. Then press and release the PTT Key . • Press the Right Soft Key [Options] to select one of the following options: New PTT Contact/Copy To Contacts/Temp PTT Group/ Erase/Edit/Call/New TXT Message/New Picture Message/ CONTACTS New Video Message/New Voice Message/Sort NOTE When on the idle screen, the PTT key functions as a hot key to access the PTT Contact List. PTT Groups 1. From the Contacts submenu, press PTT Groups. 2.
• To erase the PTT Group, select the existing group that you want to erase, then press the Right Soft Key [Options]. Press Erase, then press the Center Select Key [OK] to select Yes. • To add PTT Contacts to the PTT Group, select the existing PTT Group where you want to add the PTT Contact, and then press the Right Soft Key [Options]. Press Add, then your PTT Contact entries will be displayed in alphabetical order. Select Key [MARK]. Press the Left Soft Key [Done].
• Press the Left Soft Key [Remove] to remove the entry. • Press the Right Soft Key [Options] to select one of the following options: Remove All/New TXT Message/New Picture Message/New Video Message/New Voice Message/Save As PTT Group CONTACTS Speed Dials Speed Dialing is a convenient feature that allows you to make phone calls quickly and easily (Speed Dial 1 is reserved for Voicemail). Assign the Speed Dial digits to your Contacts to use this calling feature.
Resetting a Speed Dial 1. From the Contacts submenu, press Speed Dials. 2. Select the Speed Dial position, or enter the Speed Dial digit, then press the Right Soft Key [Remove]. 3. Press the Center Select Key [OK] to select Yes. A confirmation message appears. 1. From the idle screen with the flip either open or closed, press and hold the Speed Dial digit. 2. Your cellphone recalls the phone number from your Contacts, CONTACTS Single-Digit Speed Dialing displays it briefly, and then dials it.
In Case of Emergency (ICE) Follow the procedure below to register a Contact to be contacted in case of emergency, or to register a medical record number or other personal info. Up to three different Contacts can be registered to ICE. CONTACTS NOTE Even when the cellphone is locked, the Contact or personal info registered as ICE can be viewed without unlocking the cellphone by pressing the Left Soft Key [ICE]. Adding a Contact to ICE To register to ICE: 1.
2. Select Personal Info, then press the Center Select Key [VIEW]. 3. Select Note 1, Note 2, or Note 3, then press the Center Select Key [ADD]. 4. Enter the information, then press the Center Select Key [SAVE]. 5. The information you entered now appears in place of Note 1, Note 2, or Note 3. To register a name, telephone number, and e-mail address to My Name Card: 1. From the Contacts submenu, press My Name Card. 2.
Push to Talk The Push to Talk (PTT) feature on your cellphone allows you to use your cellphone like a walkie-talkie to communicate with an individual or group of individuals who are also Verizon Wireless Push to Talk subscribers. Push to Talk NOTES • The PTT mode is Off by default, and you are not be able to send or receive PTT calls and alerts. • For how to turn the PTT mode on, see page XXX.
of the called party. Your Push to Talk service cannot be used for any applications that tether your phone to computers or other devices for any purpose. Push to Talk-capable phone and service required. Making a PTT Call You can make two types of PTT calls: • A barge call automatically connects to the other party. The called party does not have the option to ignore the call. want to talk with using a tone. The called party has the option to answer or ignore the call.
3. Press the Left Soft Key [Alert]. The message “Press PTT Key to Alert” will appear on the display. 4. Press and release the PTT Key to alert the selected individual. The “PTT Outgoing Alert” tone will sound, and “Alerting” will appear on the display. 5. If the called party answers the alert, “Listening to” appears on the Push to Talk display and you will hear the called party speaking.
Calling from Keypad (Barge) 1. From the idle screen with the flip open, enter the 10-digit cellphone number of the Verizon Wireless PTT subscriber you wish to contact. 2. Press and hold the PTT Key . Wait until the “OK to Talk” tone sounds and the message “Talking to” appears on the display. Speak while holding the PTT Key . If the cellphone number you entered has already been registered cellphone number entered on the display when you initiate the call by pressing the PTT Key . 3.
is unavailable to accept a PTT call, an “Unavailable” message will appear on your display. 5. When the called party finishes speaking, you will hear the “Floor Available” tone and the “Connected to” screen will appear on your display. Push to Talk 6. Press and hold the PTT Key to talk. 7. Release the PTT Key to let the other party talk. 8. Press the End/Power Key to end the call. Otherwise, it will automatically time out after ten (10) seconds of inactivity. Incoming PTT Call Incoming PTT (Barge) 1.
2. Answer or ignore the alert: To answer the alert, press and hold the PTT Key and begin talking. To ignore the alert, press the Right Soft Key [Ignore]. 3. Release the PTT Key to let the other party talk. 4. Press the End/Power Key to end the call. Otherwise, it will automatically time out after ten (10) seconds of inactivity.
MEDIA CENTER Media Center gives you customizable service right on your cellphone that lets you get ringtones, play games, surf the web, get up-to-the-minute information and more. You can use Media Center and download applications anywhere on the Verizon Wireless network, as long as you have a digital signal available for your cellphone. MEDIA CENTER Music & Tones You can personalize your phone’s ringtones and download music. You can select from a wide variety of genres.