
User Manual


10
Chapter 2 Getting Started with Neat 5
2
Getting Started with Neat 5
process depends on the quality of the item being scanned. For example, if the text on a
receipt is very light or the vendor name on a business card is in a highly stylized font,
Neat 5 may not be able to read every detail clearly. Therefore, each scan should be
reviewed for accuracy.
Scans do not have to be reviewed immediately after scanning. You can scan items and
then review them later. Neat 5 lists scans you have not yet reviewed for more than two
seconds into a Smart Filter called Unreviewed. After you have reviewed an item for more
than two seconds, it will no longer appear in the Unreviewed list.
REVIEWING
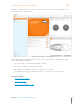
In step 1, you selected a folder to scan your first item into. That folder is still selected. Once the
scan is complete, the item will appear in the Thumbnail View Pane on the right side of the screen.
Thumbnail View displays a tiny image of the scanned item along with key details (if applicable)
and the Item Type dropdown menu.
4. Look at the Item Type dropdown menu. Did Neat 5 correctly identify the type of item you
scanned? If so, leave it as is. If not, reclassify the item by choosing the correct type from
the Item Type dropdown menu.
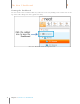
5. Want a closer look at the scanned item? Double-click on the thumbnail to view the item in
Details View. (Alternatively, click the Details View button under the Toggle Item View
heading in the top right corner of the window.) Details in this view can be edited if
necessary.
6. Click on the Grid View button under the Toggle Item View heading in the top right corner
of the window to review the item in that view. Note that several fields concatenate into
the Description column to provide as many details as possible. Details in this view can be
edited if necessary.
7. Click on the Thumbnail View button under the Toggle Item View heading in the top right
corner of the window to return to Thumbnail View.