
User Manual


114
Chapter 7 Exporting, Reporting & Printing
7
Exporting, Reporting & Printing
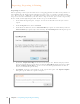
Exc el Wizard Step 2
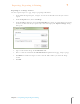
7. Type the names of your Excel Template worksheets into the three Excel Sheet Name
fields.
TIP: Neat 5 automatically separates exported data into three separate sheets in Excel:
receipt data, receipt images and receipt comments. You need to specify the
destination sheet for each of these data types by entering its corresponding Excel
sheet name. For example, if your Excel template worksheets were named Receipts,
Images and Comments, you would type those worksheet names into the three Excel
Sheet Name fields.
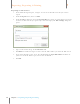
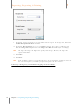
8. Click Details to confirm or change the starting row for the export. The default is Row 2 but
you should change that to suit the template you are using.
TIP: The default starting row is Row 2 because, if you have pre-populated column names in
Row 1 of your Excel template files, receipt data will begin in Row 2. However, if your
template has receipt data starting in row 7 instead, you would want to change the
Starting Row number to Row 7.