
User Manual


111
Chapter 7 Exporting, Reporting & Printing
7
Exporting, Reporting & Printing
Exporting to Excel
When exporting to Excel, you must first create a mapping plan that describes how your Neat 5
data will flow into the Excel program. Mapping associates one set of values or format (in this
case, Neat 5 data) to a different set of values or format, such as Excel. You may create as many
maps as needed to accommodate your data. Once a map is created, you can use it repeatedly.
Neat 5 walks you through this procedure in three steps as outlined below.
1. In the Folder Navigation pane, navigate to and select the folder or items you want to
export.
2. From the Export menu, choose To Excel.
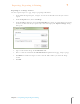
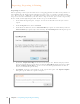
3. From the Excel submenu, choose Selected Folder (to export an entire folder) or choose
Selected Items (to export only selected items). The Excel Map To Use dialog box opens.
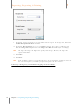
4. By default, Sample Excel Map is selected as the map to use. Alternatively, if you have
created a custom map, you can choose it from the Excel Maps dropdown menu or click
Create or Manage Excel Maps to create a new custom map. (Instructions on how to
create a new Excel map are below.)
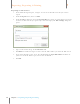
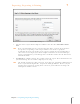
5. Click Export. A progress bars displays as the export takes place. The Export Complete
dialog box opens when the export is complete.