
Tus neeg siv phau ntawv


- 92 -
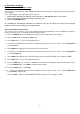
Example 3: Measurement of a single signal
With the digital oscilloscope it is quite easy to record a non-periodic signal such as a pulse or a signal peak
etc.. However, the general problem is how to set up a trigger if you do not know the signal? For example, if
the pulse is a TTL logic signal, you should set the trigger level to 2 V and set the trigger edge to the rising
edge. Since our oscilloscope supports various functions, the user can solve this problem quite easily. First,
a test with automatic triggering must be performed to determine the obvious trigger level and trigger type.
Then the user just needs to make some adjustments to get the correct trigger level and mode. Proceed as
follows:
1. Set the probe attenuation to 10x
2. Press the Vertical Scale and Horizontal Scale adjustment buttons to make the appropriate vertical and
horizontal settings for the signal you want to observe.
3. Press the Acquire Menu button.
4. Select Acqu Mode in the lower menu and then Peak Detect.
5. Press the Trigger Menu button.
6. Press Single in the bottom menu and then Single in the right menu.
7. Select Edge in the left menu via the M rotary knob or touch screen.
8. Select Source in the lower menu and then CH1.
9. Select Coupling in the lower menu and then DC.
10. Select Slope in the bottom menu and then rising.
11. Turn the Trigger Level adjustment knob and set the trigger level to approximately 50% of the signal to
be measured.
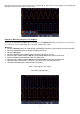
12. Check the trigger status indicator at the top of the screen. If it is not ready, press the Run/Stop button
to start recording and wait for a trigger. When a signal reaches the set trigger level, a sample is taken
and then output to the screen. In this way, a random pulse can be easily captured. For example, if we
want to find a high amplitude pulse, we set the trigger level to a slightly higher value than the average of
the signal level, then press the Run/Stop button and wait for a trigger. When a pulse occurs, the unit
will automatically trigger and record the waveform generated in the period around the trigger time. Turn
the HORIZONTAL POSITION adjustment knob in the Horizontal control panel to change the horizontal
trigger position to create a negative delay that allows you to easily observe the waveform before the
pulse.